Talk to a Tacoma Sales Tech
1-877-870-8556
M-F 8:30A-11P, Sat-Sun 8:30A-9P
Logo Image
$20K Sweeps! 10 Chances to Win! Enter Daily >

Eibach Pro-Truck Coil-Over Kit; Stage 2 (05-23 6-Lug Tacoma)

Item TT23837
Verify parts fit and get product recommendations.
Tacoma Sales Techs: Connect Now M-F 8:30A-11P, Sat-Sun 8:30A-9P
$0.00
Our Price

$1,163.00 (kit)

FREE Shipping Market Price $1,360.99 You Save 15% ($197.99) Up to 10% off for Military & First Responders! See Details

Will this fit your Vehicle?

Select a different vehicle Help?
Update or Change Vehicle
Ship to: Enter Zip
Sorry, please enter a valid US or CA postal code
We're sorry, zip can't be updated at this time.
    Create a list
    Add to New List

    Saved - View your saved items

    We're sorry. We couldn't save this product at this time.

    or use

      Product Videos

      Merideth: This coil-over set will be a great addition to your Tacoma if you want up to 2.5 inches of adjustability in the front and 1.5 in the rear to get some more ground clearance and a better-performing ride in off-road situations. Not to mention, this will work really well for any Tacoma owner who not only needs the adjustability or added height, but also wants more of a responsive system that will offer greater comfortability when driving. This kit will come with two coil-over struts in the front and two rear sport shocks, as well as a sway bar drop bracket to create more room underneath the truck for better ground clearance without sacrificing drivability. Now, the components will also create a better foundation when it comes to stance and, of course, adding those larger wheels and tires for a better look and better performance.Now, speaking of tires, the recommended size will be a 31-inch tire or the equivalent with no modifications and a decent amount of room inside the wheel well. Now, you may be able to fit a 33 with the highest adjustability here, but, again, there's not gonna be a ton of room and you most likely will still have to do a little bit of trimming, so I would keep that in mind when upgrading the tires with this set. Now, when it comes to the build, the coil-overs will be anodized 6061-T6 billet aluminum with a front-adjustable threaded spring perch for 0 to 2.5 inches of adjustability. Now, inside will feature a 46-millimeter piston monotube design with nitrogen-filled variable force valving for optimal performance on road, and it's going to drastically reduce any shock fade over time. This will also come with a heavy-duty bushing system while also being individually dyno-tested, so you can rest assured that you're getting reliability that you can count on with this set.Now, as you can assume, this will be pricier than the average lift kit coming in at about $1,200. Now, comparing this to other solutions on the site, you are getting that adjustability and incredibly durable design, and you're maintaining a lot of comfort when it comes to the drivability, which is tough when you're lifting your truck, especially up to that 2.5 -inch mark. Now, when comparing this to other coil systems, this will have the one up from Eibach's Stage 1 kit, but will still keep it pretty standard compared to other more expensive options that may include external reservoirs or a higher lift range. Now, I think if you want more than the average lift kit, but you don't necessarily wanna go over the top for your application, then this kit is going to be a good one to choose. When it comes to install, this will be a two out of three wrenches on the difficulty meter, taking you roughly three hours to get the job done. Now, at this point, we can head over to the shop and check out a detailed breakdown of the install and what it looks like step by step. So, that's gonna wrap it up for me. Let's go ahead and get into it.Man: Tools required for this install include an air gun, an impact gun, a hammer, a 17 and 19-millimeter wrench, a 17 and 14-millimeter ratcheting wrench, a pair of needle nose pliers, a vice grip, a pry bar, a 12, 14, 17, 18, 19, and 21-millimeter sockets. What's up, guys? Today, we're installing a lift kit on our Tacoma, so let's get started. So, our first step is to remove our skid plate. We have two 12-millimeter bolts at the back, two 12-millimeter bolts at the front. So, we'll remove all those, and then we can slide it off of our two hooks in the front. And now, with all of our bolts removed, we can pop it off our hooks and remove it. So, next, we can remove our cotter pin on the castle nut on our tie rod end. So, we'll grab a pair of needle nose pliers to bend back our pins on the other side, and then we can push it through and pull it out.Next, we can grab a 19-millimeter socket to remove our castle nut. So, now we're gonna get our castle nut and thread that on a few threads, and then we can take a hammer and smack the side of our knuckle here to break our tie rod loose. And then once we get it to pop out of place, we can remove our castle nut and slide that out. Next, we can remove our 12-millimeter bolt holding in our brake line bracket and our 18-millimeter nut holding our sway bar end link. So, we'll grab a 12-millimeter socket for our brake line bolt, and then we'll grab our 18 for our sway bar end link. Next, we can remove our cotter pin on our upper control arm ball joint. So, we'll, once again, just get our needle nose pliers and pop that out, and then we can grab our 19-millimeter socket to loosen up our castle nut. We're gonna do the same thing as we did for the tie rod. We're gonna leave it on a few threads so that we can bang the side of the knuckle to break it loose. And then we can pull down on our upper control arm and remove our nut.Next, we can loosen up our lower strut mount. So, we'll get a 19-millimeter socket on our nut side and a 19-millimeter wrench on our bolt side to loosen this up. Next, we can loosen up our upper strut nuts. Now we're gonna fully remove the one in the back and one of them in the front, and then we'll just leave one in there just to hold everything in place until we're ready to remove our strut. So, we'll take a 14-millimeter ratcheting wrench to loosen these up. Now we can come back and fully remove our lower strut bolt. You might have to get a pry bar in here to lift up on your lower control arm to be able to get the bolt out. And now we can pull our sway bar out of the way and remove the last nut on the top of our strut. And then we can remove our strut.So, next, we can remove our two 14-millimeter bolts that hold in our sway bar bracket so that we can install our spacer. Now, we don't need to fully remove the sway bar from the truck, we just need to drop it down so that we can get our spacer in. So, we'll grab a 14-millimeter socket to take these out. And then we can repeat that same process on the other side. So, now we can install our spacer. Now, the larger hole is gonna be facing the back side and the threaded hole is gonna be facing the front. We're gonna put our factory hardware in through our larger hole. We can thread that in. And then we can move our sway bar out of the way and grab a 14-millimeter socket to tighten these down. And then next we can grab our hardware included in the kit and we can thread in our frontmost bolt. And then we can grab our bracket, slide that over our sway bar, and slide that into the bolt we installed, and then we can install our other bolt. And now we can grab our 17-millimeter socket to tighten down our two bolts.And then once we're done installing our bracket on this side, we can do the same thing on the other side. So, now we can install our new strut assembly. And then we can start threading on our nuts. Next, we can grab a pry bar to pry down on our lower control arm so that we can get our lower strut mount into place. And then we can start to feed our bolt through. Next, we can reinstall our washer and our nut on the other side of our bolt. And then we can grab a 19-millimeter socket for our nut side and a 19-millimeter wrench for our bolt side to tighten that down.So, our next step is to reconnect our knuckle to our upper control arm. So, we'll loosen up our nut. So, to make this a little bit easier, you can get a pry bar over the top of the upper control arm and then underneath our upper control arm mount. And then we'll pull the knuckle into place and then thread our nut onto the bottom side. And then we can grab our 19-millimeter socket to tighten that down. And now once you have that nut tight, we can come in with our cotter pin and click that back into place. Next, we can reinstall our tie rod end. We'll reinstall our castle nut. And then we can tighten that down with a 19-millimeter socket. And then we can reinstall our cotter pin. Now, we can go back up to the top of our strut and tighten down our nuts. So, we'll grab a 14-millimeter ratcheting wrench to tighten these down. Now, at this point, we can repeat that entire process on the other side and then we can reconnect our sway bar on both sides. So, now we can reinstall our brake line bracket as well as our sway bar end link. And then we'll tighten down the bolt on our brake line bracket with our 12-millimeter socket. And then we can tighten down the nut on our sway bar end link with a 17-millimeter socket. And at this point, you can repeat that same process on the other side.So, now the last thing we have to do on the front is reinstall our skid plate. So, we'll hang it onto our hooks and then start reinstalling our four bolts. And then we can grab our 12-millimeter socket to tighten these down. So, now moving on to the rear, we need to remove our rear shock. We're gonna start with the top. We'll get a 14-millimeter ratcheting wrench on that nut. And then we'll grab a set of vice grips to grab the flat portion of the stud at the top to prevent the shock from spinning. And then once we have it loosened up enough, we can just finish it up with the 14-millimeter ratcheting wrench. So, now we can get our ratcheting wrench onto our nut, and then we'll grab the top of that stud and remove our nut. And then once we have it most of the way off, we can pop off our vice grip and remove our nut.And now we can remove our bolt and our lower shock mount. So, we'll get a 17-millimeter wrench on our bolt side and a 17-millimeter socket on our nut side to remove this. Now, you might have to use a pry bar to put some upward pressure on your shock to remove your bolt. If that doesn't work, you can pry on the bolt. And now we can fully remove our shock. Now, once you have the shock removed from one side, we can do the same thing on the other side. So, now we can install our new shock. So, we'll take our nut off the top, and then we can remove our top plate and our top isolator. Slide that through our hole and then throw that back on the top and then reinstall our nut. So, now we can compress our shock to get it into our lower mount and get our bolt through.And now, once we have it into our lower mount, we can slide our bolt through and then we can reinstall our washer and our nut on the other side. And then we'll take our 17-millimeter socket on our nut side and 17-millimeter wrench on our bolt side to tighten this down. And now we can come to our upper shock mount and grab a 17-millimeter ratcheting wrench to tighten down our nut. And then once we have this side installed, we can do the same thing on the other side. So, that'll wrap up this review and install of the Eibach Pro-Truck Coil-Over Kit Stage 2 for your 2005 and newer 6-Lug Tacoma. Thank you for watching. And for all things Tacoma, keep it right here at extremeterrain.com.

      Product Information

      Features, Description, Reviews, Q&A, Specs & Installation

      Features

      • Pro-Truck Coil-Over Kit
      • Front Adjustable Threaded Spring Perch
      • 46mm Piston Monotube Design
      • Individually Dyno Tested
      • Limited Lifetime Warranty
      • Fits 2005-2023 6-Lugs Tacomas

      Description

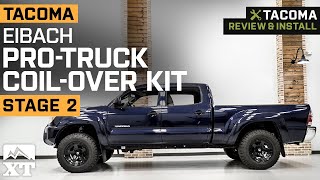
      Reliable Excellent Quality. Looking for a way to take your truck's suspension to the next level? Check out the Eibach Pro-Truck Coil-Over Kit. This kit offers a front adjustable threaded spring perch, 46mm piston monotube design, nitrogen filled variable force valving, and is individually dyno tested for coordinated operation and accuracy. On top of that, the heavy duty bushing system has also been cycle tested to ensure durability. Therefore, if you're looking for a way to improve your truck's suspension and get better performance out of it, the Eibach Pro-Truck Coil-Over Kit is the way to go.

      Warranty. Each purchase of an Eibach Pro-Truck Coil-Over Kit comes with a limited lifetime warranty against damages on materials and workmanship.

      Application. An Eibach Pro-Truck Coil-Over Kit is expertly manufactured to suit 2005-2023 6-Lugs Tacomas.

      Fitment:

      Details

      Eibach E86-82-007-01-22

      CA Residents: WARNING: Cancer and Reproductive Harm - www.P65Warnings.ca.gov

      Installation & What's in the Box

      Installation Info

      What's in the Box

      • (2) Front Pro-Truck Coilovers
      • (2) Rear Sport Shock Absorbers
      4.8

      Customer Reviews (18)

        Questions & Answers

        10 More Questions

        Will It Fit My Tacoma

        • 2.7L I4 - 05, 06, 07, 08, 09, 10, 11, 12, 13, 14, 15, 23
        • 3.5L V6 - 23
        • 4.0L V6 - 05, 06, 07, 08, 09, 10, 11, 12, 13, 14, 15