Talk to a Tacoma Sales Tech
1-877-870-8556
M-F 8:30A-11P, Sat-Sun 8:30A-9P
Logo Image
$20K Sweeps! 10 Chances to Win! Enter Daily >

Rough Country 3.50-Inch Bolt-On Suspension Lift Kit with Lifted N3 Struts and Premium N3 Shocks (05-23 6-Lug Tacoma)

Item TT10398
Verify parts fit and get product recommendations.
Tacoma Sales Techs: Connect Now M-F 8:30A-11P, Sat-Sun 8:30A-9P
$0.00
Our Price

$799.95

FREE Shipping Market Price $919.99 You Save 13% ($120.04) Up to 10% off for Military & First Responders! See Details

Will this fit your Vehicle?

Select a different vehicle Help?
Update or Change Vehicle
Ship to: Enter Zip
Sorry, please enter a valid US or CA postal code
We're sorry, zip can't be updated at this time.
    Create a list
    Add to New List

    Saved - View your saved items

    We're sorry. We couldn't save this product at this time.

    or use

      Product Videos

      Hey, guys. It's Sara with extremeterrain.com, and today, we have a review and install of the Rough Country 3.5-inch Bolt-On Suspension Lift Kit with Lifted N3 Struts and Premium N3 Shocks, fitting your '05 to '21 6-lug Toyota Tacoma models. This kit is perfect for the Tacoma owner who wants a complete lift kit for the front and rear of their truck, and wants to upgrade their struts, shocks, and control arms in the process. This kit includes lifted struts, new control arms, shocks for the rear of your truck, as well as rear lift blocks, paired with longer U-bolts, a diff spacer, and all the necessary mounting hardware.The rear lift blocks feature a steel construction with a nice black powder coat finish and pair with these longer U-bolts to ensure that they clear both the lift blocks and the leaf springs to install properly. This kit also includes new upper control arms with heavy-duty ball joints. This is a great feature because a lot of lift kits require you to use your factory control arm and ball joint which can easily be over-extended because of that additional lift height and put a lot of undue stress on that ball joint, causing premature wear and failure. These new control arms feature a heavy-duty ball joint with a corrected ball joint angle, and they were designed for this 3.5-inch lift kit so you get the factory-style geometry.This kit includes complete N3 strut assemblies for the front as well as premium N3 shocks for the rear so you get that lift that you're after while upgrading your ride quality in the process. The front strut assemblies for this kit provide 3.5 inches of lift to the front of your Tacoma. The rear lift blocks measure in at approximately 2 inches, providing the 2 inches of lift to the rear of your Tacoma. So you are getting lift in the front and rear of your truck, but because it is a staggered setup, you're also getting a more level appearance.Now, depending on the year and model of your truck, stock tire sizes may vary. For our Tacoma, we have a 31-inch tire stock, which is what you will see in this video. And with this kit installed, the manufacturer notes you can fit up to a 31-inch tire comfortably. Now, we do have 33s on hand, so we threw those on to give you guys an idea of what those would look like. However, they do rub significantly. So if you are looking to run 33s, you should expect to do some significant trimming up front.And, as far as price goes, this kit comes in at approximately $950. This is about middle of the road, price-wise, when compared to other options. And for your money, you are getting a lift kit for the front as well as the rear, all upgraded components, and those control arms which a lot of other kits do not offer. And as far as the install goes, I'm giving this one a three out of three wrenches on the difficulty meter.It does feature a direct bolt-up installation. However, some minor trimming is required to install the diff spacer. All in all, it can be done within six hours, and you should expect to get a professional alignment afterwards. With that said, let's check out that install. For this install, we used an impact gun, but a regular hand ratchet will work just fine. You'll also need a grease gun, as well as 19-millimeter, 17-millimeter, 15-millimeter, 14-millimeter, and 12-millimeter wrenches. Twenty-two-millimeter, 19-millimeter, 17-millimeter, 14-millimeter, 12-millimeter, and 10-millimeter sockets. You may also want an extension, as well as a swivel extension. You'll need a pry bar, you'll need a pop clip removal tool, a rubber mallet, as well as a hammer, a pair of needle-nose pliers, and you may want a bungee cord or similar tool to support the knuckle.All right. So the first step in our uninstall. With your truck in the air supported, you're going to remove that front wheel. Now, if you don't have a lift, a jack and jack stands will work fine as long as it's supported safely. Once you've done that, grab a set of needle-nose pliers, we're going to remove the cotter pin holding on that nut for our outer tie rod. So, to get this cotter pin out, it helps to straighten the other side. Just go ahead and pinch those two pins straight. And once you've done that, grab the opening, use some leverage, and just pull it straight out. And now that your cotter pin is removed, you can get a socket on top of here. We're going to use a 19-millimeter. Go ahead and remove this nut.Now, if the ball joint is fully seated in this part of the knuckle, it's probably not going to come out from just force down. What you may need to do here...suggest turning that a little bit to give yourself some more room. Rethread on this nut to protect your threads, and then we're just going to strike this side right here with a hammer to release this ball joint. Once that is released, go ahead and run that nut again, and pull it out of the knuckle.Next up, we're gonna remove the sway bar end link from the knuckle. Now, you need to remove this 17-millimeter nut. You can do it with an impact. But if the end link starts to spin, you'll need a 17-millimeter wrench and a 6-millimeter Allen key to hold that end link steady so you can break it loose.Then once your nut is removed, go ahead and remove the end link from the knuckle. Next up, we're going to be removing this bolt that holds on your brake line bracket just to give us a little extra slack when we drop our knuckle down. Grab a 12-millimeter socket and get this bolt removed. Remove the bracket out of the knuckle.Next up, we can also remove this second bracket that holds the brake line to the frame just to give us a little bit more room here. We're using a 12-millimeter wrench. Just because this line's a little bit in the way, you can use a socket with a swivel as well. And make sure you remove the brake line out of this hole as well. There is a second ABS line that is attached to your upper control arm. What you wanna do here is grab a 10-millimeter socket and remove this bolt so that you can remove this bracket as well. Next up, we'll be removing this pin holding on the nut for your upper ball joint. And on the far side, this might be a little bit hard to see, but there is a tab that you need to release. And once you've released the back part of this clip, grab the needle-nose pliers and just pull it straight out.Now you can see the hook part that we had to release right here. It goes around the edge of the nut. Once you remove that, we can remove the nut. Now that we have that pin removed, we can grab a 19-millimeter socket with a swivel extension and remove this nut. We're actually going to leave it on just slightly because we will need to hit this part of the knuckle to release it. You'll want to strike right on the side of the knuckle in order to release this ball joint.Now with a pry bar, we can pry down on that upper control arm to give ourselves a little bit of slack. Remove the nut, and then release the upper control arm out of the knuckle. Now we can fully release the knuckle from the upper control arm. But since we have it hanging off to the side here, what we're gonna do is just have a bungee cord support this for now so that we don't damage the axle which is still attached. We don't need to fully support, but as long as we're just taking a little bit of the weight off of it, that will be better.Next up we're gonna be removing the three nuts that hold on the top of the strut. Grab a 14-millimeter socket, or we're using a ratcheting wrench here, and get these removed. You can leave one threaded on slightly just to hold that in place. Continue on to remove the rest of them. This one in the back is probably gonna be hard to see, but the same process, using your socket or wrench, go ahead and remove it. Now for the bottom of the strut, you'll need a 19-millimeter wrench and a 19-millimeter socket, and get this nut removed. Now, to remove this bolt, right now there's a bit of tension on it from the lower control arm and the strut. Now, if you lift up on the lower control arm, you should be able to wiggle it free. And if you don't have a second set of hands, you can grab a rubber mallet and tap it out.In order to make it easier to drop our strut, we are gonna lower the sway bar. This step is optional. If you can wiggle that strut out with a sway bar in place, feel free. But this does make it a lot easier. There's four 12-millimeter bolts holding on this cover. Once that's removed, we can drop the sway bar down and out of the way. Grab a 12-millimeter socket, go ahead and remove all four of these bolts. Next up, remove the other 12-millimeter bolts. This one is at the back.Now we're moving on to the front two bolts on your skid plate. These are a little bit harder to get to. You can remove this plastic trim piece, or you can just grab an extension and pull it back slightly. Once you're on it, go ahead and remove that with a 12-millimeter socket. Repeat that with your other bolts at the front of the skid plate. Make sure you're supporting this as this is the last bolt holding it in.Now with all the bolts removed, you can remove the skid plate by pushing it slightly forward. That will unhook the front. Once it's unhooked on both sides, you can bring it down. Now that we have our skid plate removed, we can remove these two 14-millimeter bolts on each side that hold on the sway bar bracket. Grab a 14-millimeter bolt and get these removed.Now, make sure you have something supporting this so you don't let it fall straight down. And now that we have the sway bar mount disconnected on this side, make sure you repeat those steps to disconnect the end link as well as the mount on the opposite side. And once the sway bar is completely disconnected, you can go ahead and slide it out of the way.Now, there are two brackets there so it won't come off the truck unless you remove those. But as long as you push this out of the way, we can now remove the strut assembly. We're removing that nut that we had placed on top just to hold it in place. Then we can bring it out and down and remove it off the truck. Now that we have the strut assembly removed, we can remove the control arm by removing that bolt up top. Now, to give ourselves a little bit more room, we're gonna remove these two covers. So grab a pop clip removal tool, and let's get these off.With your pop clip, just go behind the cover and just go ahead and pop those out. Should be five on this back cover here. And these may break when coming out, so you may want to grab a few spares if you're not sure, but go ahead and remove this cover. Now you can repeat that on the other side. Again, we're just removing these so that we have a little bit more room to work with when we're removing that top bolt out of your upper control arm. Same process, get behind the piece and twist to remove these pop clips.Now, to remove this large bolt in your upper control arm, what you need to do is grab a 19-millimeter socket and a 19-millimeter wrench, and remove the nut on this side. Now, to remove this long bolt through the upper control arm, it is a little tricky. Now, the factory service manual does say to cut this bolt, but you will need to reuse this for your new kit. So to get this bolt out in one piece, you may have noticed there's a couple of pry marks on this part of our pinch weld.What we're gonna do is pry back on this part of the pinch weld and start to push the bolt up and past it. Make sure you leave the washer where it is because the washer will hang you up. And slowly work your bolt out past that part of the frame. As long as you have clearance on the head of the bolt, you may wanna go into the engine bay and check. Another method you can use is grab an extension, a longer one, and go ahead and tap that through with a mallet. This will help you to get the bolt slid through.Again, you wanna leave that washer where it is and work your bolt out the front. Now we're in the engine bay, and you can see the bolt here is almost all the way extended. We're gonna push it to the side and pull it out the rest of the way by hand. Once you do pull that bolt out, your washer is probably going to fall. Once you've done that, go ahead and wiggle the control arm loose and remove it off of your truck.The next step here is installing the spacers on both of our differential mounts. Now, before you can do this, you do need to trim the driver side support brace. These are these two braces going from your frame to the bottom of the rad support where your sway bar is resting currently. Now, the only one that needs to be trimmed is the driver side so you have enough clearance on that differential mount. Now, to do this, all you need to do is take out four 17-millimeter bolts, drop this down, make your cut, and bolt it back up. We'll have you take a look at where our cut was already made so you know exactly where to make yours. And then once you've done that, we can get the spacers installed on both the differential mounts.Now, on our Tacoma, this cut was already made, but I wanted to show you guys exactly where you should measure and how to do this here. I would measure with this brace still installed on your truck. You're gonna measure about 1 inch up, and then 4.5 inches along. Once you've measured, go ahead and drop that, make the cut with a Sawzall, and then you can bolt it right back up. To remove the driver side support brace, grab a 17-millimeter socket and remove all four bolts holding it on. Then remove the two on the bottom of your ride support.You might need to pull back on the plastic trim piece under your bumper and have an extension to get to these. Go ahead and remove those with your 17-millimeter socket. Now, as you're removing the last one, make sure you're supporting this because it's the last thing holding that guy on. Then go ahead and remove it. Now grab a 19-millimeter wrench and a 22-millimeter socket, and what we're going to do is remove this large bolt holding on our differential brace. Now, repeat that on the other side with your other mount. Go ahead and remove that bolt as well.Now we have the included spacers. Go ahead and slide it right on top between the mount and the frame. Here is this factory large washer that's sat right here. We want to reuse this, but we'll be using these new longer bolts with a washer. Go ahead slide that through. And then slide it through both the mount and your spacer, back through the frame. Then we have a washer as well as a nylon lock nut for the top side. Now, you can use your hand, or you can use a pole jack here, or a floor jack just to compress the space between this a little more so you can get that threaded on. Now, we're going to leave them loose for now until both sides are installed. So go ahead and repeat that on the other side, lining up that spacer. And then using the new included bolts, slide them through the frame, and then install your washer and nylon lock nut on the other side.Now that both sides are installed, you can use a 19-millimeter wrench and a 19-millimeter socket and tighten these down. Now repeat that on the other side. And now that you've trimmed that support brace, you can go ahead and get it re-installed on your truck. Now with it in place, you can see exactly where it would hit if it were not trimmed. Grab your factory bolts. Go ahead and get them threaded in.I recommend lining up at least two before you tighten them down. And then make sure the holes are lined up for the other two as well. Then with your 17-millimeter socket, tighten it down. Repeat that with the two bolts up front going through the support bar into the rad support. Then with your 17-millimeter socket and your extension, again, you might have to pull back on the plastic just a bit so you can tighten these down.All right. Now that we have our suspension components uninstalled from the front, we can take a look at them side by side with the fresh components here. Now, starting with the strut assembly, the biggest difference that you'll notice is the height. This new strut assembly will get you 3.5 inches of lift in the front. And it does achieve this without losing factory ride quality because the lift comes from the spring as well as the vehicle-specific valving for that lift height. In addition, it does feature a pre-compressed assembly so you can install this directly on your Tacoma without having to do any extra work.Now moving on to our upper control arms. The first difference I wanted to point out is the construction. This new upper control arm features an aluminum construction that is still beefier than the steel of your factory. In addition, this control arm was designed to keep the factory-style suspension geometry by correcting that ball joint angle. It gives you more range of motion in that ball joint than the factory, allowing you to cut down on the wear and tear on the ball joint from the lifted strut assembly. So, with that said, let's go ahead and finish up our install.All right. While our control arm is still uninstalled, we're gonna start by installing the strut assembly first. This will just give us a little bit more room to work with so we don't have to work around that control arm itself. So we're gonna get the strut assembly lined up in the top of the strut tower. And with the included nuts, go ahead and thread it up top just to hold it in place for now. And now we'll install the control arm. And now we can install the control arm.What we're gonna do is get it lined up on both sides of the strut tower. Install the washer over top of your long factory bolts. And then we're gonna start to line up that bolt up into your engine bay and then through the control arm itself. Now you can work this bolt all the way through your control arm. If it gets stuck, you can take a look at it and lightly tap it on the head of the bolts from the engine bay. And once you have it all the way seated through the upper control arm, you can reinstall the washer and the nut on the opposite side.Now with your 19-millimeter socket and your 19-millimeter wrench, go ahead and tighten this down. Now we're gonna line up the bottom part of the strut assembly and install the factory hardware. Now, you may need an extra hand to this because you will need to pry it down as well as back. But go ahead and line that bolt up. Now you can install the factory hardware, a washer, as well as the flange nut. We're gonna keep these hand-tight for now, and then tighten it down when it's on the ground. Now we can get the nuts installed on top of the strut assembly.Remember, we already have that one there to hold it in place. So we can go ahead and install the other two. Go ahead and thread them on top of those studs that are sticking up through your strut tower. And this rear one might be a little bit hard to see, but go ahead and thread them on there as well. Now you can grab a 15-millimeter socket, I'm using a ratcheting wrench here, and tighten them down.All right. So we have our truck closer to the ground so we can get a floor jack underneath the lower control arm. And all we're doing here is just bringing the gap between our upper control arm and the top of the knuckle a little closer to make it easier to see. So go ahead and line up the knuckle with the ball joint. Go ahead and jack it up as you're lining it up.Now, we're gonna use a pry bar to help us see the upper control arm to the top of the knuckle. You want it to be fully seated in the top there. And then our kit did not come with new hardware, so we're going to reuse the factory castle nut. Now, if you'd like new hardware, the threads are the same as factory, so you can pick one up if you like.Now we're gonna use a pry bar to fully sit the ball joint in the knuckle. And then install the included hardware, a washer, as well as one of the nyloc nuts. Then with a 22-millimeter wrench, we're gonna tighten this down. Now, you can hold on to the ball joint itself if you start to see it spinning. Now go ahead and remove that pry bar. And, while we have our jack still supporting our lower control arm, it maybe easier to install the outer tie rod at this point. Go ahead and seat that in the knuckle. Grab the factory castle nut and thread that on to your outer tie rod. Then with a 19-millimeter socket, go ahead and tighten it down.And now that we have our upper control arm fully installed, we can reinstall this bracket that sits on top of it. Grab the included hardware with your kit, go ahead and thread that through the bracket that holds on your ABS line and into your control arm. Then grab your 10-millimeter socket and tighten it down. Now you can reinstall the brackets that hold on your brake line to the knuckle, as well as the frame. We're starting with the one into the knuckle. Go ahead and thread that bolt in.Make sure the tab is in its opening on top of it. We're using the factory 12-millimeter bolt here. And with your 12-millimeter socket, tighten it down. Repeat that same thing for the bracket that goes onto the frame. Go ahead and line that tab up. And then what you'll do is thread that factory bolt in. And with your 12-millimeter ratcheting wrench, tighten it down. Now, don't forget to reinstall these covers on top of the areas where you removed them so you could do the control arm. Grab the factory snaps, line them up with the holes in the frame, as well as the pinch weld, and go ahead and just press them back into place. Repeat that for the front one as well.Now, I do recommend getting the other side caught up to this point. And keep your sway bar disconnected. It does make it a lot easier to install with the sway bar disconnected on both sides. But once you're ready to reconnect that sway bar, we're gonna start with getting the end link back through the knuckle. Now, if you do need to do one side and then the other, I recommend just leaving the sway bar fully disconnected until both sides are done and then tightening this up last. Either way, whatever works for you. Once you have the end link through the knuckle, go ahead and reinstall that factory nut. And then with your 17-millimeter wrench, tighten that down. Now, keep in mind, there is an Allen key that can go inside here. If it does start to spin, hold it still with an Allen key and then tighten that 17.Now that you have the end link connected, slide the bracket over top of the sway bar itself. Go ahead and line up the openings with the threaded holes in the frame and reinstall those factory bolts. Then with your 14-millimeter socket, go ahead and tighten 'em down. All right. So now that you have the sway bar fully connected on the passenger side, make sure you repeat that for the driver's side.Once it's all done, we can get our skid plate reconnected. We're gonna start by lining it up at the front with both of those hooks coming off of the front of those frame pieces. Hook it on each side, then we can connect it at the back. Now you can reinstall all of your factory bolts. Then go ahead and install them upfront as well and get them threaded into those factory holes.Then with your 12-millimeter socket, and you may want an extension, go ahead and tighten them down. You may have to peel back on the plastic piece just slightly to be able to get your socket and extension up there, but repeat that for the rest of your bolts. Then once you have your truck on its own weight, on its wheels, you can tighten down that bolt on the bottom of your strut assembly with a 19-millimeter wrench and a 19-millimeter socket. Then once you have your castle nut completely tightened down, we're going to slide the cotter pin through the opening here.Now, if the opening in the ball joint does not line up with the opening in the castle nut, what you can do is just tighten it down a little bit more until one of these openings lines up. Once you slide the cotter pin through, go ahead and grab a needle-nose pliers to bend each side around. Now, you can reuse your factory cotter pin or you can just grab a new one just to be sure that it's in good condition when you reinstall it.Now that we have the upper control arm fully installed, what we're going to do is fill up the ball joint with grease. Now, to do that, you need to remove this cover. Just go underneath it with a flathead. A smaller one will work best. Just go ahead and pop this cover off. Now we can attach a grease gun to that grease fitting on the top of the ball joint. And go ahead and fill that ball joint with grease. And you want to just keep going until you see the boot just slightly expand. And once you've filled it with grease, go ahead and remove the grease fitting. Now you can return the cover. And you can pop it in by hand, but if you need any assistance, you can lightly tap it in with a rubber mallet.All right. Now we're moving on to the rear uninstall. We have our truck in the air and supported with pole jacks. Now, if you don't have a lift, you can use a jack and jack stands as well as long as you're supporting that rear axle. So we can drop it down and install the shocks and rear lift blocks. First step, you're gonna grab a 17-millimeter socket and wrench, and let's remove the bolts on the bottom of our shock. Now with your 17-millimeter socket and 17-millimeter wrench, go ahead and get this nut removed off your bolt. Now, you can wiggle and remove this bolt out of the shock.All right. So now we're gonna get the top part of the shock unbolted. There's a nut up top here that attaches it to the threaded body. Now, there is a slotted spot you can hold with a small wrench up top here, and then with a 14-millimeter wrench, remove this nut. However, I believe this gets in the way, and we can't seem to get this nut off with a wrench up top here.So an alternative, not the best way to do it but it'll definitely get the job done, is to hold this bottom part with a pair of vise grips. And with your 14-millimeter wrench, go ahead and remove that. Now you can remove the nut up top as well as the bushing and the washer, and then remove the shock off of your truck. Now we're gonna remove the U-bolts off of our truck. Make sure your axle is supported so that it doesn't drop down when we remove the nuts on the bottom of the U-bolts here. Grab a 19-millimeter socket, and let's get these removed. Now you can remove the bracket and set it aside, and remove both of the U-bolts over the top of your leaf spring. Make sure the bump stop stays on top of the leaf spring.All right. Now that we have our factory shock uninstalled from our truck, we can check it out side by side with our new shock here. Now, this is Rough Country's Premium N3 Nitrogen-Charge Shock, and it features a nice silver powder coat on the body. This one was designed for a smooth factory-like ride, whether on-road or off-road. But unlike that factory shock, this was also designed for that 2 inches of lift in the rear. So that's how they achieve that lift without sacrificing ride quality. With that said, let's go ahead and finish up our install.All right. Now that we have our factory U-bolts disconnected and removed, what we can do is drop down this axle. Now, because it is a straight axle, I do recommend doing both sides simultaneously if you can, that way you can lower the axle down at the same time on each side. Continue to lower the axle until you can slide the lift block in place. Now, it is tapered, so you want the larger side towards the back. And there will be a tab on the bottom. Line up the bottom tab with the opening in your axle.Now you can start to raise it up, and at the same time, line up the tab with the hole in the top of the lift block. Now you can raise it up until it's fully seated. Now you can slide the aftermarket U-bolts over top of the leaf spring. Make sure they sit in the opening on this bump stop up top. There should be a little tab that holds it in place. Make sure it's sitting on top of that bump stop. Now you can install the bracket, the factory bracket on the bottom of your new bolts. You may need to squeeze them a little bit to get 'em lined up and in place. And then make sure they don't pop out up top.Now grab the included hardware and thread it over top of those U-bolts. You'll need a washer as well as one of the 22-millimeter nylon lock nuts. Repeat that for the rest of the threaded ends on the U-bolts. Now that all of those nuts are threaded on, we can grab a 22-millimeter socket and tighten them down. You want to try to tighten in a cross pattern, and tighten each one of them evenly.All right. At this point, we can get the shock installed. Before we do that, we need to slide one of the metal washers, as well as one of the bushings over top of the threaded stud on the top of your shock. From there, go over top of this line, and then get it lined up in the top of the tower. Now that you have it lined up in the top of the tower, go ahead and slide one of the rubber bushings on top as well. Then once you have it through the top of the strut tower, go ahead and slide one of the rubber bushings on top, as well as one of the washers. And you may have to press up a little bit, but go ahead and thread one of the nuts on as well.Now that you have the top of the shock lightly installed, you can compress the bottom, get it lined up, and slide your factory hardware through. Then go ahead and reinstall the factory washer as well as the nut on the other side. Then with your 17-millimeter socket and 17-millimeter wrench, tighten it down. And finally, you can grab a 15-millimeter ratcheting wrench and tighten down that nut up top.Now, there is an area to hold it still if it does start to spin in the center, but go ahead and tighten that down. And that top part is what you would hold still if that does start to spin. All right. And now that our passenger side install is complete, if you haven't already, repeat all of those steps on your driver's side. Make sure everything is torqued to spec, and you will need that professional alignment afterwards.But that is gonna it for the review and install of this lift kit. And, remember, for all things Tacoma, keep it right here at extremeterrain.com.

      Product Information

      Features, Description, Reviews, Q&A, Specs & Installation

      Features & Specs

      • 3.50-Inch Bolt-On Suspension Lift Kit
      • Increased Clearance for Better Off-Roading
      • Premium N3 Nitrogen-Charged Shocks
      • Tubular Upper Control Arms
      • Fabricated Rear Blocks
      • N3 Struts
      • Accommodates 34-Inch Tires
      • Bolt-On Installation
      • Rough Country’s Warranty
      • Fits All 2005-2023 6-Lug Toyota Tacomas

      Description

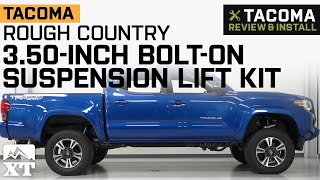
      Boosts Off-Road Performance. Take your Tacoma to the next level by installing this Rough Country 3.50-Inch Bolt-On Suspension Lift Kit with Lifted N3 Struts and Premium N3 Shocks. The kit lifts your truck by 3.50 inches and allows larger tires with up to 34-inch diameter to be installed. Finally, it includes Lifted N3 Struts and Premium N3 Shocks to maximize the off-roading performance of your truck.

      Lifted N3 Struts and Premium N3 Shocks. The N3 Struts increase ground clearance, are nitrogen-charged, and feature infinitely variable damping. The N3 shocks are also nitrogen-charged and provide incredible balance.

      Tubular Upper Control Arms. Tubular upper control arms optimize your truck to achieve the factory-like geometry after lifting. They improve ride height and ball-joint performance.

      Fabricated Rear Blocks. This suspension lift kit includes rear lift blocks and N3 loaded spacers to lift your truck by 3.50 inches. And as a result, tires with up to 34-inch diameter can be installed for more exciting off-roading.

      Installation. You can install this suspension lift kit by reusing the factory bolt locations of your Tacoma. Standard tools can be used for the installation. Minor cutting is required.

      Rough Country Warranty. Rough Country grants a lifetime replacement warranty for this suspension lift kit. It also offers a 3-year manufacturer’s warranty to Adjustable Vertex Coil-Overs and V2 Monotube Shocks. Please visit the manufacturer’s website or contact customer service for more information.

      Application. This Rough Country 3.50-Inch Bolt-On Suspension Lift Kit with Lifted N3 Struts and Premium N3 Shocks fits all 2005-2023 6-Lug Tacoma models.

      NOTES - IMPORTANT

      • Requires minor cutting.
      • Does NOT fit models with 5 lug wheels.
      • Does NOT fit T/X Baja models.
      • Does NOT fit XSP-X models.
      • A carrier-bearing drop bracket is advised for trucks equipped with a 2-piece rear driveshaft.

      Fitment:

      Details

      Rough Country 74231

      CA Residents: WARNING: Cancer and Reproductive Harm - www.P65Warnings.ca.gov

      Installation & What's in the Box

      Installation Info

      What's in the Box

      • (2) Upper Control Arms
      • (2) N3 Loaded Struts
      • (2) Differential Spacers
      • (2) N3 Shocks
      • (2) Rear Lift Blocks
      • (4) U-Bolts
      • Installation Hardware
      4.7

      Customer Reviews (500+)

        Questions & Answers

        10 More Questions

        Will It Fit My Tacoma

        • 2.7L I4 - 05, 06, 07, 08, 09, 10, 11, 12, 13, 14, 15, 23
        • 3.5L V6 - 23
        • 4.0L V6 - 05, 06, 07, 08, 09, 10, 11, 12, 13, 14, 15