Talk to a Tacoma Sales Tech
1-877-870-8556
M-F 8:30A-11P, Sat-Sun 8:30A-9P
Logo Image
$20K Sweeps! 10 Chances to Win! Enter Daily >

DV8 Offroad Roof Rack (16-23 Tacoma Double Cab)

Item TT6341
Verify parts fit and get product recommendations.
Tacoma Sales Techs: Connect Now M-F 8:30A-11P, Sat-Sun 8:30A-9P
$0.00
Our Price

$539.99 (each)

FREE Shipping Market Price $620.99 You Save 13% ($81.00) Up to 10% off for Military & First Responders! See Details

Will this fit your Vehicle?

Select a different vehicle Help?
Update or Change Vehicle
Ship to: Enter Zip
Sorry, please enter a valid US or CA postal code
We're sorry, zip can't be updated at this time.
    Create a list
    Add to New List

    Saved - View your saved items

    We're sorry. We couldn't save this product at this time.

    or use

      Product Videos

      Merideth: Hey guys. So, today we're checking out the DV8 off-road roof rack, fitting all 2016 and newer double cab Toyota Tacomas. So, if you're looking for extra-storage solutions for your truck and you don't want extra cargo taking up your bed space or your cab area space, a roof rack is always a great solution. And this option by DV8 is going to be a great choice to take a look into.So this is going to span the whole roof of your Tacoma giving you the maximum space on top of your truck for, again, any extra cargo that you're taking on long trips or even taking off-roading that you don't want taking up additional space.Now, this is going to be made of a durable aluminum construction which will hold up if you do take your truck out on the trail and it's gonna hold up to 100 pounds, so you can ensure that this will hold whatever you need on your off-roading or even just your daily adventures.Now, this is also gonna have a black-powder-coat finish on top to give it a very sleek look and of course protect that aluminum underneath from any corrosion. So, what I really like about this option is not only are you getting the max storage space on top of your truck but you're also getting a couple of extra things in the meantime. So, you're getting a wind deflector built in at the front that's also going to provide some rigidity to the roof rack itself. You're getting a cutout in the back for your antenna so you can maximize that space on top of your truck. You're getting multiple cutouts on the side for some extra styling and you're also getting light mounting solutions. So, on either side of this roof rack, you're getting two mounts for some smaller light bars or even some additional cube lighting. And on the front, you're gonna have a mount for a 45 to 46 slim light bar.Now, I personally like the fact that this not only is going to offer you storage but it's going to offer you a couple other benefits in the meantime making this well worth your money. Now with that being said, this is going to come in at roughly 500 and I personally think that that is a great price point for what you're getting out of this roof rack. You're getting a solid build, a low-profile and sleek design, and you're getting multiple options with this setup.Now, in comparison to some other choices, you're gonna see other racks on the page that are just gonna consist of crossbars or they're going to consist of bed racks. Now, what I really like about this is the fact that this is gonna cover the whole space on top of your Tacoma, give you more of a basket design and provide those light mounting options, as well as a sleek and a stylish design.Now, install is going to be a one out of three wrenches on the difficulty meter. You are gonna be utilizing your factory mounts for this, so it is going to be a very easy install with a couple of basic hand tools probably taking you about an hour's worth of your time to get the job done. So, speaking of that install, let's jump into that right now.The tools that I used for my install were a panel-removal tool, a ratchet, a 4-millimeter Allen key, and a 10-millimeter wrench.To kick off this install, first we need to remove the weatherstripping on top of our Tacoma. You're gonna need a trim-removal tool, and I would recommend a step stool for this, and we can head up to our roof.So we're gonna start in the back here. As you can tell, there is a shorter piece of this weatherstripping or this trim. I'm gonna take the panel-removal tool, or trim-removal tool, and we can pop that and peel that back. So, then what we can do is start to peel the front one forward all the way up to the front. Then we can repeat that on the other side.So, if there is a little bit of residue left from the 3M tape, I would recommend to remove that for the best installation.So, because we've removed our trim before and installed a roof rack, what we have here is a piece of tape covering the factory mounting hole, so we didn't get any water in it. Now you will have this if you have not done this or removed this trim before, however, it will be a piece of factory tape painted the same color as your paint. So I'm just going to peel this back to expose those factory holes because that's what we will be mounting our roof rack into. And as you can see through this piece of tape...you can actually peel this back, it's just gonna be painted the same color. There's gonna be factory mounting holes underneath there. Same thing for the other side of the tape. And then, repeat this on all four mounting locations.So, next we're gonna install our side pieces. Now you wanna make sure that the DV8 logo is up at the front and your front-mounting location and back-mounting location line up. You're gonna have a harder curve up at the front than you will at the back. You also wanna make sure that these mounts are facing inside. So we can take our provided bolts and thread those into the threaded holes in the top of our Tacoma. I have a 4-millimeter Allen key here, I'm just gonna thread those in by hand.So the hardware that you'll be using for this is the button-head bolt, the Allen-head bolt, as well as a small flat washer, and a lock washer. So, because we can adjust this back and forth, I'm gonna leave them a little bit loose. I am going to snug them up a bit just to make sure it's not moving around too much. But we still want a little bit of adjustability for when we add our crossbars. So, now that the front is installed, we can secure it on the back.So now that both mounts are threaded in, we can repeat that process on the other side.So, now that our side rails are installed, what we can do is start installing our crossbar. So, now we're going to install the front and the most rear one first. And they are going to be labeled. So we're gonna start with Number 1, making sure that DV8 is facing upward. I would recommend a friend to help you do this just so you make sure that you're not scratching your paint. We're gonna send this over to the other side...take our provided hardware...put that through...and then secure it on the other side.So, once we have the main crossbar mounted up, what we can do is just secure the other two bolts. So, same hardware. Two flat washers, lock washer, and nut. And this is gonna have a little bit of adjustability. So, once we get both sides mounted up, what we can do is put it where we want it, probably a little bit more upwards. And then, we can snug them up to make sure that they stay in place and we're not gonna tighten anything down just yet. Again, we wanna make sure that everything is adjusted correctly, everything is fitting on here, before we go ahead and tighten anything down.Now I'm gonna take that 4-millimeter Allen key and just put this all the way up and snug it up by hand. And then, we can come back and secure it down in a little bit. And we can repeat that for the other side. Now we can head to the rear crossbar.So now we can install the rear crossbar. Now this is going to have little cutouts in the back, that's going to be facing the rear of our Tacoma. And you also wanna make sure that DV8 is facing upwards. Now, this is gonna go on the inside of our rails. Again, I would recommend to have a second person just to make sure that everything lines up. And we're gonna use the same hardware that we did up at the front.Now that our front and rear crossbar are installed, we can start on our middle cross bars.So now we can install our Number 2 crossbar, again, it is going to be labeled and there is going to be threaded holes in either side of the crossbar. So we're just going to set it to the other side. And then, we'll be able to line everything up. So, now that we have it in place and lined up, what I'm gonna do is grab our Allen-head bolt and the flat washer and lock washer and we can thread that into the side of the crossbar. This is going to have a threaded hole in either side, so we can snug them up with that 4-millimeter Allen. And then, we can move to our next crossbar.So we can continue this process for the other two cross bars, and then, head to the other side to completely secure them down.Now that this side is secure, what we can do is the same thing on the other side, and then, we can completely tighten everything down.So, if you are having some spacing issues, there is spacers provided in the kit. I'm just gonna lay this in between the sidebar and the crossbar and we can install as normal.So now that everything is secure, what we can do is start to tighten everything down. Now I'm gonna start with the bars here, then we can move to the side bars, and then our front and rear crossbar, since they do have some extra hardware on the back there.So I have the 4-millimeter Allen key that I have been using to snug these up, I'm also going to grab a ratchet, and we can tighten these all up.So now we can tighten up the side bar since we're here. So I'm gonna take that same 4-millimeter Allen and ratchet and tighten those up. Then, you can do the same thing for the front now.So, after both sides of the mid cross bars, as well as both sides of our side bars, are tightened down, what we can do is tighten down our front and our rear crossbar. So I'm gonna be taking that 4-millimeter Allen key, but I also have a 10-millimeter wrench that I'm gonna hold on the back there. And we can tighten those up. Then we can repeat that on the other side.So, once everything is tightened up with your roof rack, then you are all set to go. You do have brackets that are provided in the kit for additional lighting, if you would like to mount them up at this time, or you can mount them up on the front with the extra brackets or you can mount up your lighting on the sides.Now, it's gonna wrap it up for my review and install. Make sure you like and subscribe for more videos and products like this. And always keep it right here at extremeterrain.com.

      Product Information

      Features, Description, Reviews, Q&A, Specs & Installation
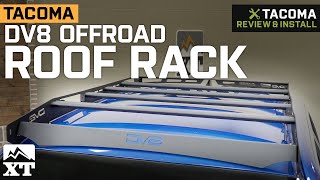
      Features & Specs

      • Sleek Integrated Look
      • Offers Additional Cargo Space
      • Crafted From Durable, Lightweight Aluminum
      • Features a Black, Powder-Coated Finish
      • Built to Accommodate LED Lights
      • Comes With an Air Deflector
      • No-Fuss Installation
      • Covered by a One-Year Limited Warranty
      • Fits 2016-2023 Toyota Tacoma Double Cab Models

      Description

      Boosts the Truck’s Off-Road Functionality. Confidently carry all your equipment through any off-road environment with DV8 Offroad’s Roof Rack. This aftermarket accessory is designed to meet all your off-road needs, by increasing your Toyota Tacoma’s storage space while staying within its height and weight limits. Plus, it boasts a sleek integrated look, giving your truck a rugged appeal.

      Can Accommodate Various Lighting Systems. Aside from offering additional cargo space, this Roof Rack can also help improve your vehicle’s lighting performance. This is because it can accommodate 45-inch and 46-inch slim LED lights.

      Features a Lightweight, Yet Durable Construction. The roof rack and its extruded cross bars are made entirely out of heavy-duty, lightweight aluminum. They also come covered in a black, powder-coated finish. As a result, this product can support your vehicle’s extreme off-roading applications.

      Covered by a One-Year Limited Warranty. This Roof Rack is backed by DV8 Offroad’s One-Year limited warranty. For more information on the warranty’s terms and conditions, as well as its exclusions, please visit the manufacturer’s website.

      Application. DV8 Offroad’s Roof Rack is ideal for use with all 2016-2023 Toyota Tacoma Double Cab models.

      Fitment:

      Details

      DV8 Offroad RRTT1-01

      CA Residents: WARNING: Cancer and Reproductive Harm - www.P65Warnings.ca.gov

      Installation & What's in the Box

      Installation Info

      What's in the Box

      • (1) Roof Rack
      • Mounting Hardware
      4.3

      Customer Reviews (65)

        Questions & Answers

        10 More Questions

        Will It Fit My Tacoma

        • 2.7L I4 - 16, 17, 18, 19, 20, 21, 22, 23
        • 3.5L V6 - 16, 17, 18, 19, 20, 21, 22, 23