Talk to a Tacoma Sales Tech
1-877-870-8556
M-F 8:30A-11P, Sat-Sun 8:30A-9P
Logo Image
$20K Sweeps! 10 Chances to Win! Enter Daily >

Light Bar DRL Projector Headlights; Jet Black Housing; Clear Lens (12-15 Tacoma)

Item TT6577
Verify parts fit and get product recommendations.
Tacoma Sales Techs: Connect Now M-F 8:30A-11P, Sat-Sun 8:30A-9P
$0.00
Our Price

$424.99 (pair)

FREE Shipping Market Price $489.99 You Save 13% ($65.00) Up to 10% off for Military & First Responders! See Details

Will this fit your Vehicle?

Select a different vehicle Help?
Update or Change Vehicle
Out of Stock

Ship to: Enter Zip
Sorry, please enter a valid US or CA postal code
We're sorry, zip can't be updated at this time.
    Create a list
    Add to New List

    Saved - View your saved items

    We're sorry. We couldn't save this product at this time.

    or use

      Product Videos

      Hey, guys. Adam here with extremeterrain.com. And today we're taking a closer look at and installing the Light Bar DRL Projector Headlights with the Jet Black Housing and Clear Lens available for the '05 to '15 Tacoma.You should be checking this out if you're looking to upgrade or modernize the front end of your Tacoma that's upwards of 10-plus years old at this point. This guy here is gonna take the factory very chrome reflector style headlights and replace it with a projector style with a black interior and a DRL. Let's focus on that DRL at first.Now, this DRL is a daytime running light and it's this white light bar that you see running around with LEDs inside of it. Now, that's something you see on a lot of the newer generation vehicles coming off the line. It's a lot more of a modern look that's gonna upgrade this older gen truck here.Inside because we no longer have to have that reflector styling, we have this projector headlight that's got a better output for lighting. It's a little bit more attractive and way more modern. The black interior housing there gives it the look of a stealthy headlight or a smoked headlight without impeding any light output, thanks to the clear polycarbonate lens.Now, the price tag for this guy comes in right around 500 bucks, and is completely plug in play so you don't have to do any splicing or wiring. You'll transfer over the factory parking light bulb, but other than that, everything else has built-in lights.Now, the install gets one out of three wrenches on our difficulty meter. It takes about an hour, maybe two from start to finish depending on your experience. I'm gonna walk you through it. Let's get started.Tools used the install include an impact gun, panel removal tool, ratchet, and 10-millimeter deep socket. First things first, pop your hood. We're gonna take our factory grille off. There are two 10-millimeters we have to get out of the way. If you don't have a 10-millimeter, you can use a Philips head screwdriver.All right, next up in each corner of the upper grille we have one of these black push pin clips. Lift up on the center section. Pop that guy off. Repeat that on the other side.All right, next up, we can pull our grille off. Top is loose, so that comes straight back. Grab the center on both sides and pull straight out. All right, set that aside.All right, next up we have to remove the trim piece underneath of our headlights. Now this is on both sides. All you need is a panel removal tool, and you wanna head into this corner are here where it meets the grille, pry up just like that, then pull straight out toward the inside where that grille was and it pops out. All right, we can set this aside.Top of the headlight, we have two 10-millimeters. Let's tackle those next.Now, there is one more 10-millimeter and it's down in the corner. Now, I've already gotten it off because it is absolutely impossible to see on camera, but I'm gonna pull the headlight out and show you guys generally where it's gonna be.That bolt is right around this area underneath of the bumper and fender, right where they meet together, and it's facing out this way. So you wanna put your ratchet on it from the outside in.Now, what you're gonna do to take the headlight out once that bolt is out of the way is you're gonna pull this off of the frame there and you're gonna have to do a little bit of yoga to get this guy out. So we basically wanna take this corner and tilt it downward in order to get it out at that weird angle. So you can see it has trouble clearing there. So you basically go straight down and then you can pull it out and back up.Now, if you look in this corner here, that's where that 10-millimeter is and that's tucking in just in here. So once you pull the headlight out, you can look in and see where that is, but you basically wanna crawl either underneath of the vehicle or through the wheel well to get this guy out with your 10-millimeter.Once that's out of place, let's unplug our headlight harnesses and set it aside. On the back of the headlight, we have three connectors that we have to pull off. Start here, pinch and disconnect. This one is pulled straight back and then pinch and disconnect here for the parking light and then set your factory light aside.So we got our factory headlight off of our driver's side of our '13 Tacoma behind me. It's on the table next to our LED DRL projector light. Let's go through some similarities and differences. And obviously first and foremost, you can see that our factory light is that reflector style headlight, whereas our new headlight is the projector style. So big change up there in terms of just the lighting technology and the lighting styling.Now, that reflector light relies on a chrome interior housing to collect light outward, hence the name. The projector light does not rely on that so it leaves you the opportunity to have a more black interior housing, which is what we have here, so that it can take the place of that chrome material.Now, the projector style does just that. It projects light outward, so you get a little bit of a wider beam. It gives you better visibility at night, it's a little bit of a whiter, more attractive light. But aside from that, this one also incorporates that LED DRL or daytime running light. Now that's something our factory light does not have, but a lot of the newer gen trucks off the line are coming with nowadays.This guy here is gonna give you that modern look. That LED DRL wraps around the sides there. It's almost like a C-shape, and that's gonna be a bright, pure white light, right around 6,000K color temperature. So it is more of a pure white light.Interior is a gloss black finish clear polycarbonate lens. So it lets all that light output through, and it gives you the impression of a smoked headlight, thanks to the black interior. And you get a nice, vibrant, amber light on the side. It's a little bit more of a deeper contrast than the factory light which is a little bit more faded.Aside from that, you can also see you get those similar vents on the side compared to your factory one. These are a little bit more gloss black. These are somewhat faded, but our light itself is faded at this point. This 2013 is nearing a decade old so it's getting pretty up there so these factory components start to fade out. This is obviously gonna be a really cool refresh.With that said, guys, all we have to do is plug and play and get this going. On the back of the light, you can see there is one open hole so we have to transfer over one of our parking lights so what did you say we do that next?Next up, we're gonna remove our factory bulb here. We only have to transfer one of them over. It's the one in the top right. So you wanna twist counterclockwise and pull that guy out, switch it over. This is your parking light. We're gonna pop that guy in here, twist to lock it in just like that, and now we can put this guy in our vehicle and start plugging in the headlights.All right, next up, we're just gonna plug in our new headlight to our factory harnesses. All right. It's really just plug and play from here on out. You're gonna grab the corresponding plugs, make sure they snap in together just like that. To bring it up a little bit closer for the last one here, bring this guy up and around. Once you have them plugged in, we can seat the headlight into the vehicle.Now, remember you have to go at a weird angle here so you gotta down straight just like that and wrap it back around in order for it to seat properly.All right, from here, we can start putting our factory bolts back in place. Remember that one is difficult to see on the sides here so we're gonna go underneath and tackle that. But, again, it's this exact same location, then we'll pick up from these two up top. We can put those factory bolts back up at the top, the 10-millimeters.All right, next we can put this trim piece back in. That just slides in on the outer corner and then snaps into place. Now at this point, repeat this on the other side, and then we can put our grille back on.That's gonna wrap up my review and install for the Light Bar DRL Projector Headlights with the Jet Black Housing and Clear Lens for the '05 to '15 Tacoma. You can get yours right here at extremeterrain.com.

      Product Information

      Features, Description, Reviews, Q&A, Specs & Installation

      Features & Specs

      • Aggressive Projector Headlights
      • Appealingly Enhances Style, Safety, and Visibility
      • Comes with H7 (Low Beam) and H7 (High Beam) Bulbs
      • With DRL Light Bars
      • Durable Clear Lenses
      • High-Strength and Stylish, Gloss Black Housings
      • DOT and SAE-Compliant
      • Plug-and-Play Installation
      • Sold as a Pair, Driver and Passenger Sides Included
      • Designed for All 2012-2015 Toyota Tacoma Models

      Description

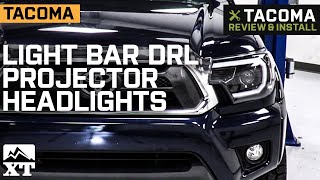
      Distinctive Illumination and Style. Confidently navigate through the dark nights and harsh weather conditions with the Light Bar DRL Projector Headlights; Jet Black Housing; Clear Lens installed on your Toyota Tacoma. This pair of projector headlights is designed to reinforce your safety and visibility. Additionally, they integrate nicely with the lines of your vehicle’s front end and eliminates fatigue with the evenly dispersed illumination.

      Reliably Bright Lighting. These Jet Black Projector Headlights with Light Bar DRLs features projector lenses that generate an impressively brilliant light output. With the included H7 (high beam) and H7 (low beam) bulbs, these headlights produce a sharp, focused light beam that allows you to see the road ahead with ease. Moreover, each assembly is furnished with stylish light bar DRLs that will help to make your Tacoma much more visible, especially to distracted motorists.

      High-Quality Construction. With premium materials and electronics, these Projector Headlights are designed to withstand various impacts that come with off-road use. The bulbs are enclosed by tough, gloss black housings and tightly sealed, high-impact clear lenses for lasting elegance and protection.

      Direct-Fit Install. Designed for a simple installation these Projector headlights bolt directly to your truck’s factory mounting locations. The installation process completes with light mechanical and electrical skills.

      SAE and DOT-Compliant. These Light Bar DRL Projector Headlights meet the automotive standards for manufacturing, testing, and design set forth by the SAE. They were also built consistent with the rigidity, performance, and safety standards of the U.S. Department of Transportation’s Federal Motor Vehicle Safety Standard 108.

      Application. The Light Bar DRL Projector Headlights are specifically designed to be used on all 2012-2015 Toyota Tacoma models.

      Fitment:

      CA Residents: WARNING: Cancer and Reproductive Harm - www.P65Warnings.ca.gov

      Installation & What's in the Box

      Installation Info

      What's in the Box

      • (1) Driver Side Headlight
      • (1) Passenger Side Headlight
      • (2) Low Beam Bulbs
      • (2) High Beam Bulbs
      4.4

      Customer Reviews (64)

        Questions & Answers

        10 More Questions