Talk to a Wrangler Sales Tech
1-877-870-8556
M-F 8:30A-11P, Sat-Sun 8:30A-9P
Logo Image
$20K Sweeps! 10 Chances to Win! Enter Daily >

PowerStop Z17 Evolution Plus Brake Rotor, Pad and Caliper Kit; Front and Rear (07-18 Jeep Wrangler JK)

Item J168574
Verify parts fit and get product recommendations.
Wrangler Sales Techs: Connect Now M-F 8:30A-11P, Sat-Sun 8:30A-9P
$0.00
Our Price

$592.97 (set)

FREE Shipping Market Price $681.92 You Save 13% ($88.95) Up to 10% off for Military & First Responders! See Details

Will this fit your Vehicle?

Select a different vehicle Help?
Update or Change Vehicle
Ship to: Enter Zip
Sorry, please enter a valid US or CA postal code
We're sorry, zip can't be updated at this time.
    Create a list
    Add to New List

    Saved - View your saved items

    We're sorry. We couldn't save this product at this time.

    or use

      Product Videos

      Jake: Jake here for ExtremeTerrain, and today, I'm taking a look at the PowerStop Z17 Evolution Plus Front and Rear Brake Rotor, Pad, and Caliper Kit fitting 2007 to 2018 JK Wranglers. If you're looking for an affordable, effective upgrade to your street-driven JK's brakes, PowerStop has got you covered here. These are a mild upgrade versus your stock brakes, and they're gonna give you some enhanced stopping power and a factory-fresh feel for about the best price in the category.NowI've said this before and I'll say it again, there are a few places on my own vehicles where I believe that it's really worth spending however much money the budget will allow, and brakes are one of those places. The PowerStop's products are consistently excellent too. They provide you with increased braking performance versus your stock setup, and you can take solace in knowing that you've got a really quality product backing you up.Now this kit that we have here today is meant to be a direct replacement for your stock brakes, both front and rear. And there's a few extra little tidbits thrown in to make it a bit more pleasant than your factory brakes. Starting out, you do get new rotors both front and rear. The fronts are of the vented variety, again, just like your stock brakes, whereas the rears are of the solid disc variety, again, just like your stock brakes. These are just blank rotors, so these are gonna be basically an OEM type of replacement.However, the real magic in this kit is in the pads. Now these are made using PowerStop's proprietary ceramic compound. So this is designed to give you really good bite while keeping dust and noise to a minimum. So not only should this outperform your stock brakes, it should also produce less dust and less noise. So it's a win-win-win situation.Now the pads are chamfered on the edges, and they're slotted down the center to help keep noise at bay. And you also get dual layered rubberized shims on the back of each of them to help keep out more unwanted noise and vibrations. PowerStop also includes new stainless steel hardware. Pretty much everything you can possibly replace in this part of the braking system. So you're gonna have a very solid refresh of your system with these. They're gonna stop better, they're gonna make less noise, and they're gonna generally outperform your stock brakes without any real fuss. That's also thanks to these brand-new calipers.So you've got brand-new calipers for the front and rear, both single piston, again, just like your stock brakes. So if your calipers are a little worn out, getting a little sticky, these are gonna help fix that issue. And since they are new inside out, it's gonna be a really nice refresh. Now, again, these are totally new. They've got all the new hardware, all the bushings and everything that you need in here, plus the connectors for your brake lines too. So these are gonna have a nice smooth operation, they're gonna be quite a bit better than what you've got on your Jeep, especially if you've got some miles on it.Now it is important to keep in mind that this setup is meant to be used on a street or daily driven Jeep, and not one that's gonna see much more extreme usage cases. So, if you are doing a lot of heavy-duty off-roading, overlanding, or you've got a lot of extra weight and accessories and things on your JK, check out the other options that PowerStop has, we've got them listed on our site, those might suit your needs a bit more closely. But if this is just your daily driver, you're taking out on a trail here and there, this is gonna be a great replacement, it's gonna be just a little bit better than what you get stock.As far as construction goes, those pads again that we were talking about feature PowerStop's proprietary ceramic compound. So again, that's designed to be resistant to rust and corrosion, as well as be low noise and low dust while still giving you a little bit of extra bite versus stock. They also use what they call positive mold technology during the manufacturing process, making these strong and durable. The pad surface is thermal scorched for optimal performance and a fast break-in as well.Those rotors we were talking about earlier are made from OEM-grade cast iron, and they're mill balanced for smooth operation. They're also made to very strict tolerances to make sure that they fit and perform just as well if not better than your original equipment. Now the faces of the rotors also have a bit of a cross hatch pattern to help with pad breaking. And as we were talking about earlier, these are built basically to OEM standards. So they have the same weight, and in the case of the front ones, they have the same vein count as your original rotors as well. And those calipers, again, that we were talking about have all new hardware, new pistons, new bushings, new everything in them. So this is gonna give you quite a bit more stopping power versus what you've got on there now, but it's still gonna be similar in overall operation and feel to your factory setup.This kit is gonna run you about $650, including everything you see here on the table. Now while 650 bucks isn't exactly a drop in the bucket for most people, it is about the least expensive way to get a full set of pads, rotors, and calipers for your JK. So it's certainly a cost-effective upgrade. And it is also an upgrade like we were talking about before, it's gonna cost you less than the equivalent factory parts from Mopar would cost, and you're gonna get a little bit better braking performance to boot. So for that, I really think that this represents a good value for your money. And if you've got a daily driven JK that needs a little bit of a refresh in its braking system, this is gonna be an excellent way to get it done.Installation here gets a two out of three on our difficulty meter, and you should plan on this job taking you about three hours to complete. Now while this is a totally bolt-on system, it's not gonna require any modifications to your rig, but it is worth noting that you are going to have to do a full bleed of the brake system and get some new fluid too since you've gotta open the brake lines to get these new calipers fitted. Now that might sound intimidating, it's not a difficult job, just one that's gonna take a little bit of time. And it is gonna require either a brake bleeder or another set of hands to help you out with it. But fret not, we're gonna show you exactly how to get this whole thing done right now. So with that, let's head on over to the install bay.Male Speaker: For this install, you will need an impact, various ratchets, swivel adapters and various size adapters, 13, 14, and 21-millimeter sockets, 10, 15, and 17-millimeter wrenches, or channel locks. Also, a vacuum bleeder, brake fluid, and not shown here, but a bucket as well as a jack and jack stands. What's up, guys? Today we're gonna be doing some brakes on our Jeep. So let's get started.So for this kit, we're gonna be removing the caliper from the vehicle and swapping it out with another one. So, the first thing we're gonna do is remove the brake line from the caliper. So, in this instance, you are gonna wanna get a bucket or something to catch the brake fluid that is gonna come out of the line. It is inevitable, and brake fluid is very slippery, so you don't want that all over your floor. So, we'll go ahead and grab our 15-ml wrench. Go ahead and crack this screw off of the line, get that off of there. And then you're gonna wanna let that drain out of the caliper as much as possible so you don't get any excess fluid going everywhere when you're trying to remove it and get it out of the way.So your new caliper should come with a plug in the place where your line's gonna go into it. You can just grab that one out of it and go ahead and place that into your factory one like so. And that'll kind of prevent any excess fluid from coming out. So now we can go ahead and remove the caliper from the bracket itself, and you can also pop this ABS line out of its holder just to kind of give you some more room. Then we'll grab our 13-ml socket on our ratchet so we can go ahead and pop this off. We can get our lower mounting bolt here, like that. Then we can go ahead and remove our caliper, then we'll set that aside. So now we'll go ahead and remove our pads from the bracket. You simply just pull, pop right out like so. We'll set these aside as well.Next, we can go ahead and remove our bracket itself. We're gonna remove our two, 21-millimeter bolts holding that in. So we've got our 21-millimeter socket and the swivel adapter on our impact. We'll go ahead and get these off. Go ahead and remove our bolts. Go ahead and set this aside. Then we can go ahead and just pull our rotor right off. Now once you've got this done for this side, you can go ahead and repeat this process on the other side.So now since we are gonna be replacing the calipers for this setup, we're gonna need to go ahead and break this brake line off of our stock caliper here. So we're gonna grab our 15-ml socket, and go ahead and crack our banjo bolt loose. Then we're gonna go ahead and run this off. Now when you're doing this, you do wanna have a bucket or a pan underneath because you are gonna lose some brake fluid here. It's perfectly normal, it's gonna happen, just make sure you catch it. You don't want this stuff on the floor, it's very slippery, and not very fun to clean up, so go ahead and run this out.And when you take this off, you're gonna go ahead and let your caliper drain. And this is just gonna make things easier once you actually remove the caliper as to not get it all over your floor or anything crazy like that. We'll go ahead and let that drip for a minute. And what we're gonna do is your new caliper setup will have a plug in any place where the line's gonna go. So we're just gonna grab that and put it into this one here. So, no excess fluid's gonna drip when you put it aside and wrap it up and maybe send it in for a core or something like that. Now we're just gonna go ahead and plug that hole where our line came out, just like so.Now once we have that done, we can go ahead and remove the caliper and get to the pads, bracket, and rotor. So, first, we'll go ahead and remove our two, 13-millimeter caliper pin bolts. We'll grab our 13-ml socket on a ratchet. Go ahead and pop these off. Now you wanna make sure you crack both of these loose before you fully remove one, that'll keep it in place. So you're not trying to hold your caliper and do this at the same time. Now you wanna support your caliper while you remove your other bolt. I will take that off, and we can simply pull our caliper off, and we'll set that aside.Now we can go ahead and pull our pads out of our bracket. They simply just pop right out like so, and we can set these aside as well. And we'll go ahead and remove our bracket bolts, which are these two, 18-millimeter bolts holding our bracket in place. So we'll grab our 18-ml socket on our ratchet, and we'll go ahead and pop these off. We can go ahead and support our bracket, run our bolts out, and go ahead and pull our bracket off. Now we are gonna save our factory hardware because we're gonna be reusing that, and we'll set our bracket aside. And once all that's off, we can go ahead and pull our rotor off and set that aside.So now that we have everything off, we can go ahead and begin by installing our new front rotor. Just get that onto our lugs there. Then just as with the rear, we're gonna go ahead and install our entire caliper and bracket assembly. So go ahead and get that in place. We're gonna reuse our factory 21-millimeter bolts. Then we will go ahead and grab our 21-ml socket on our ratchet. Go ahead and snug these down.So now we can go ahead and get our line installed into our new caliper. And again, just as for the rear, this is where you would want to replace your copper washers for your brake line block. Again, ours is going back to stock, so we're not actually gonna replace ours, but you simply wanna remove the banjo bolt and remove the inner and outer washer, replace them with your new provided ones. And then we can go ahead and install our line into our caliper. Get that started. Go ahead and grab our 15-ml wrench. Then we can go ahead and, again, grab our brake clean, give a little spritz, clean up any drips we may have.So now we can go ahead and get ready to take our caliper off of the bracket. So, again, we've got our caliper hanger tool, we've got our 14-ml socket on our ratchet, and we've got our channel locks. We're gonna go ahead and pop this caliper off. Go ahead and support our caliper, get our bucket out of the way. Remove our pin bolts. We can go ahead and hang our caliper. Now we can go ahead and install our new slider clips for our pads, those just simply pop in, little spring-loaded ears. The flat ear is gonna go in towards the rotor. There are outer ones here.Now we'll go ahead and install our pads, and we'll start with our inner one. We'll get our ears lined up with the sliders. These may be a little stiff from the get-go here. Gonna take a little bit of effort and patience to get them in, and we'll go ahead and get our outer pad in. Once we have those in, go ahead and grab our caliper, put that back into position. Grab our slider pin bolts, go ahead and get those back in. And again, we'll grab our 14-ml socket on our ratchet and our channel locks. And once again, you always wanna refer to your manufacturer-specific torque setting for all of your hardware. And once you have this process complete for this side, you can go ahead and do the same thing for the other side.Now we're gonna go ahead and install our new rotor. We'll just get that right onto our lugs here, make sure that sits. Then we're gonna take our entire caliper and bracket assembly, and go ahead and install that now. So we'll reuse our factory 18-millimeter bolts. And go ahead and get our hardware back in. I'm just gonna run these in hand tight for now.So now is the time where you would wanna change out your copper washers on your brake line block here going into the caliper. Your kit will come with two new washers for each caliper. That is one for the bottom side of the block and one for the top side of the bolt head. Now for demonstration purposes, we're actually not gonna change ours out. This will be going back to the stock ones we had, but definitely wanna change these before you reinstall your line back onto your new caliper.So now we'll go ahead and install our line onto our new caliper and get that started. Then we'll go ahead and grab our 15-ml wrench. Go ahead and get this tightened back down. Now we'll grab a can of brake clean, clean up any drippage we have on our caliper in line. Remember, a little bit goes a long way with this stuff, so no need to over-soak it.So now we're gonna go ahead and remove our caliper from our bracket. So we've got ourselves a caliper hanger tool, we're gonna set that up onto our frame. That's to support our caliper while we're working in here as you don't want it hanging from your line, that's gonna cause damage or anything like that. So we're gonna go ahead and remove our caliper pin bolts with our 14-ml socket on our ratchet.Now you may find you need to grab ahold of the backside retainer nut on your pin. So we're just gonna use channel locks as most wrenches are a little too thick to actually get in here between the caliper and the base of the nut. So we'll go ahead and grab onto that. Grab our 14-ml socket again, go ahead and pop that loose just like so. We'll go ahead and support our caliper, remove our pin bolts, then we can go ahead and hang our caliper from our hanger tool just like so.Now we can go ahead and install our new sliders for our pads. Go ahead and just get those locked in there. Now we can go ahead and install our pads with our pin ear on the inner pad. Just go ahead and get that started into its brackets. Go ahead and do the same thing for our outer pad. So we can go ahead and grab our caliper back off the hanger. Go ahead and get that back into position, and reinstall our hanger bolts, sorry, pin bolts rather.Once we have those on, we can go ahead and grab our 14-ml socket on our ratchet along with our channel locks. Go ahead and grab onto that inner nut and tighten these down. Now once we have that done, we can go ahead and grab our 18-ml socket on our ratchet and give our bracket bolts our final tighten-down. And remember, you always wanna refer to the manufacturer-specific torque setting for all of your hardware. Now once you have this done for this side, you can go ahead and repeat the same process for the other side.So now we're gonna have to refill and bleed our brake system. And so the first thing we wanna do is come up under our hood to our master cylinder located on the driver's side right on the firewall right here. So we're gonna go ahead and remove the cap for that. And you wanna check your fluid level first and foremost, make sure that is good. And you wanna add a little bit extra because some is gonna be coming out. And you always wanna use the correct type fluid for your vehicle, which would be indicated in your owner's manual or found by your manufacturer tech specs. So we'll go ahead and add a little bit of fluid in here. And you will have a minimum and maximum line on the side of your reservoir to indicate your fluid level. So, now that we have that topped off, we're gonna leave the cap off for now. We'll go back down to our brakes.So now we're ready to bleed our brakes. We've got our master cylinder reservoir open, and the fluid level is at the proper spot it should be. So now we're gonna come to the farthest wheel from our master cylinder, which is the rear right wheel. We're gonna grab a 10-millimeter wrench for our bleeder. I like to use line wrenches for these just because they sit on the bleeder pretty good, and you don't have to take them off and putz around trying to grab them while you're doing all this.Now we are gonna use a vacuum bleeder here. So we've got our vacuum pump, our reservoir with brake fluid in it that creates a proper suction. And then we're gonna hook this hose to our bleeder valve itself. Now you can also do this the old school traditional way of having a buddy pump up the pedal and crack the bleeder open, releasing the pressure and pushing fluid through. But if you're doing this solo, a vacuum bleeder is a very good thing to have.So we've got our nipple on our bleeder valve here, make sure it's nice and secure. And we're just gonna go ahead, crack this bleeder open. Make sure our valve is good and open. We can even hold this like this. We're just gonna pump till we see fluid start to come out into our lines. So now we've got fluid coming out, we wanna make sure it's not aerated, a.k.a., bubbly. That means it's got solid levels. And once you're happy with the amounts coming out, you can go ahead and tighten your bleeder back up. And then you wanna go ahead and do that for the other three wheels. Now you wanna move from your rear right wheel to your rear left wheel, then onto your front right, and then your front left, working closer to your master cylinder.All righty, guys, that about wraps up our review and install of our PowerStop Z17 Evolution Plus Brake Rotor, Pad, and Caliper Kit for the Front and Rear of your '07 to '18 Jeep Wrangler JK. Thanks for watching, and as always, for everything Wrangler, keep it right here at extremeterrain.com.

      Product Information

      Features, Description, Reviews, Q&A, Specs & Installation

      Features & Specs

      • Streel-Grade Brake Pad, Rotors and Caliper Kit
      • Bolt Circle Size of 127mm
      • Height: Front: 55.08mm Rear: 76.50mm
      • Front Hub Hole Diameter of 72.06mm
      • Rear Hub Hole Diameter of 72.10mm
      • Front Minimum Rotor Thickness of 26.40mm
      • Rear Minimum Rotor Thickness of 10.40mm
      • Front Nominal Rotor Thickness of 28.58mm
      • Rear Nominal Rotor Thickness of 12mm
      • Front Outside Diameter of 302mm
      • Rear Outside Diameter of 316mm
      • Drum-in-Hat Rear Rotor Design
      • Cast Iron Rotor Material
      • Vented Front Rotors
      • Solid Rear Rotors
      • Front Stud Size of 16.64mm
      • Rear Stud Size of 16.6mm
      • Five Lug Quantity
      • Limited Lifetime Warranty
      • Easy Installation
      • Fits 2007-2018 Jeep Wrangler JK Models

      Description

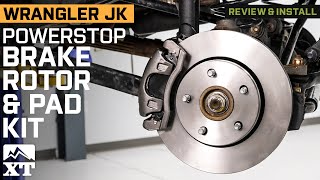
      Reliable Street Stopping. If you find your Jeep Wrangler missing its mark and unresponsive to your pedal, then it may be time to replace your brakes and upgrade to this PowerStop Z17 Evolution Plus Brake Rotor, Pad and Caliper Kit; Front and Rear. It features a modern plain rotor surface with OEM-style calipers paired with the Z17 ceramic brake pads to give you optimal traction on the street and highway.

      Strong Composition. Designed for better road grip and reliable performance stop after stop, this kit features a solid structure that can handle stress, heat as well as exposure to changing road and weather conditions. It is machined from cast iron and offers optimal rigidity to support and top your car.,

      Installation. This product is easy to install and should take about 1 hour.

      Warranty. There is a limited lifetime warranty on this product.

      Application. The PowerStop Z17 Evolution Plus Brake Rotor, Pad and Caliper Kit; Front and Rear fits 2007-2018 Jeep Wrangler JK models.

      Fitment:

      PowerStop KCOE2798

      CA Residents: WARNING: Cancer and Reproductive Harm - www.P65Warnings.ca.gov

      Installation & What's in the Box

      Installation Info

      What's in the Box

      • (4) Plain Rotors
      • (8) Z17 Brake Pads
      • (4) Calipers
      4.8

      Customer Reviews (19)

        Questions & Answers

        10 More Questions