Talk to a Gladiator Sales Tech
1-877-870-8556
M-F 8:30A-11P, Sat-Sun 8:30A-9P
Logo Image
$20K Sweeps! 10 Chances to Win! Enter Daily >

DV8 Offroad Roof Rack (20-24 Jeep Gladiator JT)

Item JG6002
Verify parts fit and get product recommendations.
Gladiator Sales Techs: Connect Now M-F 8:30A-11P, Sat-Sun 8:30A-9P
$0.00
Our Price

$449.99 (kit)

FREE Shipping Market Price $517.99 You Save 13% ($68.00) Up to 10% off for Military & First Responders! See Details

Will this fit your Vehicle?

Select a different vehicle Help?
Update or Change Vehicle
Ship to: Enter Zip
Sorry, please enter a valid US or CA postal code
We're sorry, zip can't be updated at this time.
    Create a list
    Add to New List

    Saved - View your saved items

    We're sorry. We couldn't save this product at this time.

    or use

      Product Videos

      Merideth: If you need some more space to mount up your cargo that you don't want crowding up the back of your Gladiator, this DV8 Offroad Roof Rack will be a great solution for your 2020 or newer Gladiator JT.Now this rack will be a great addition to your build if you want a large basket-style rack to mount up your essentials for your overlanding trips, your family vacations, or just everyday life. Now, this will offer you a ton of space for anything that you need while also boasting a lower profile fit compared to other systems if you're looking to keep it on the simple side with no modifications to the hard top.The basket-worthy platform here will completely cover your hard top, offering you a ton of space while incorporating five lower crossbars to support up to 200 pounds. Now on the sides and the front, you'll also have raised edges to keep your cargo secure and multiple tie-down points to properly secure whatever you're mounting up. Now, not to mention, this will also have a non-permanent and easy installation with heavy-duty clamps on either side that attach to the drip rails. The rack will be made of a 0.125-inch-thick steel, being durable and able to hold up to whatever is thrown at it.Now, on top, this will also have a nice black powder coat finished to resist any rusting or corrosion on the steel underneath, but also to match with any other heavy-duty accessories that you may already have mounted up to the JT. Now, the cutouts on the sides and the front as well as the logo will be laser cut for some extra style and of course that clean appearance. Now the kit will also come with everything you need in order to get this mounted up and ready for your next adventure. When it comes to price, this will come in at roughly $500 for the kit. Compared to other options, I like the fact that this is gonna give you a ton of space while still maintaining a low profile. And compared to other platform racks, this is going to have those higher sides and be more of a basket-style. It's also gonna have tie-down points at every angle.Now other choices on the page may be set up similarly, but the load capacity may be a bit different, or the rack itself may require modification as to where this is not going to require that. I think if you're in search of a solid system that's going to offer you ample room, ease of install, and a tough look at the same time, then this is gonna be a great pick. Now, install will be a one out of three wrenches on the difficulty meter, taking you about an hour to get the job done with some basic hand tools. Now, at this point, we can head over to the shop and check out a detailed breakdown of the install and what that looks like step by step. So that's gonna wrap it up for me. Let's go ahead and get into it.Man: Tools required for this install include a ratchet, a 10-millimeter wrench, a 10-millimeter ratcheting wrench, a four-millimeter allen wrench, a four-millimeter allen socket, and a 10-millimeter socket. What's up guys? Today we're installing a roof rack on our Gladiator. So let's get started.So our first step is to get our outer frame all laid out. Now, we have two longer bars and two shorter bars. The shorter bars are gonna be for the front and back, and the longer bars are gonna be for the sides. So once we have this laid out, we can get four of our shorter button head bolts, four washers, four lock washers, and four nuts for each corner. They're gonna be exactly the same. We're gonna be using a bolt going through our hole. And then on the backside we'll put a washer, lock washer and nut, and then we can tighten everything down with a four-millimeter allen and a 10-millimeter wrench.So now we can begin to install our hardware. So we're gonna get our bolt going through the top and then a washer and a lock washer, and then a nut. And then we'll repeat that same hardware setup for the rest of our bolts. And then once we have all of our hardware installed, we can take our four-millimeter allen bit and a 10-millimeter socket to tighten these down. And then we can repeat that same process on our remaining three corners. So now once we have our outer frame assembled, our next step is to lay out all of our bows. Now, these do have a slight arc in them, that arc's gonna be facing down. If you can't tell, there's also a bigger hole on the top and a smaller hole on the bottom.So once we have our bows all laid out, we can take that same bolt that we used on our corners, we're gonna put a washer on, put it through the hole in the top, and then on the bottom we're gonna use another washer, a lock washer, and a nut. So now we can take our washer and we're gonna slide it through the opening in the end of our bow, line it up over our hole, and then we can drop our bolt in. And then once we have our bolt in, we can drop it through the rail. We're gonna get something to prop it up. Put a socket in there so that our bolt doesn't move around. And then we can put our washer and our lock washer on the bottom followed by our nut.And then now since we have a lack of clearance in here, I'm gonna get a four-millimeter allen wrench onto our bolt side and the 10-millimeter socket on our nut side to tighten this down. And then we can repeat that same process for the rest of our bow mounting points. So now once we have all of our bows installed onto our rack, our next step is to grab the feet. These are what's gonna be holding it to the hard top. So we're gonna put these down on our double holes here. I flipped our whole rack upside down just to make it a little bit easier for us. So we're gonna be using the same hardware that we just used for our bows. We're gonna be putting a bolt with a washer up through the bottom and then putting a washer, lock washer and nut on the top. Now we're gonna leave these hand-tight for now because they are able to slide forward and backward to adjust to our roof.So once we get it laid onto the roof, then we'll come back and tighten everything down. So now we can install our feet. So we have our side with our slots where we have forward and back adjustment. And then this edge that has that little protective rubber edge is gonna be facing down and away from our rack. But since our rack's upside down right now, it's gonna be facing up. So then we can grab a bolt with a washer and slide that from the bottom up. We'll put another washer on top of there, then a lock washer, and then a nut. And once again, we're just gonna get these hand-tight. So we still have that slide ability for when we go to lay it down onto the roof. And then we can repeat that same process for the rest of our feet.So now once we have our roof rack fully assembled, it would be a good time to grab yourself a buddy to help you lift it on top. The little tongues with those protective boots are gonna go in the rail on our hard top. So now that we have our roof rack in place, we can install our other bracket. This is gonna slide right over our other one. It has that protective tongue that'll slide onto the bottom side of the groove in our hard top. And then we're gonna be putting our longer bolts with a lock washer and flat washer through here into the threaded holes in our main bracket.So before we do that, we're gonna add this little foam piece onto this inside lip of our secondary bracket. So peel off the double-sided tape backing and then we can just lay it in there just like that. We'll slide it onto our bracket, and then we'll thread in those longer bolts, putting a lock washer on first, followed by a flat washer. And then we can just get these hand-threaded in for now until we get all of them installed. And we'll make all of our adjustments on our rack and then go back and tighten down our brackets fully. And then we'll repeat that same process for the rest of our bracket.So now once we have our rack in a place where we like it, we can tighten down the two bolts on our secondary bracket as well as the bolts on our primary bracket that we left hand tight until we got everything where we want it to sit. So now we can take a four-millimeter allen to tighten down this bracket. So, now coming up top, we can fully tighten down the two bolts holding our bracket to our side rail. To do that, I have a four-millimeter allen wrench for the top and a 10-millimeter ratcheting wrench for our nut. And now we can repeat that process for the rest of our brackets. So that'll wrap up this review and install of the DV8 Offroad Roof Rack for your 2020 and newer Jeep Gladiator JT. Thank you for watching and for all things Gladiator, keep it right here at extremeterrain.com.

      Product Information

      Features, Description, Reviews, Q&A, Specs & Installation

      Features & Specs

      • Roof Rack Storage System
      • Heavy-Duty Roof Cargo Space
      • Built from High-Quality Steel
      • Comes with a Durable Powder-Coated Finish
      • Includes Removable Crossbars
      • Designed with a 200-Pound Load Rating
      • Quickly Installs on Roof Gutters
      • Protected by a Limited One-Year Warranty
      • Fits All 2020-2024 Jeep Gladiator JT Models

      Description

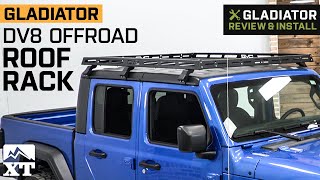
      Versatile Roof Cargo Space. Load up your gears with ease and superb security with this DV8 Offroad Roof Rack for Jeep Gladiators. Featuring a non-permanent design, this roof rack is the perfect cargo solution for when you only need a temporary roof storage space. And with its noise-reduced design, this roof rack lets you drive anywhere without the annoying rattling sound. With this roof rack, you can bring along all the essentials that you require for an enjoyable weekend getaway.

      Engineered to be Tough. This Roof Rack has a remarkable 200-pound load rating, thanks to its high-quality construction. It is made of highly durable 0.12-inch thick steel for maximum strength. This roof rack also comes with a tough powder-coated finish to ensure maximum protection against corrosion and to give your Jeep a more formidable appeal.

      Removable Design. This Roof Rack delivers extra convenience with its removable design. When not in use, you can simply remove the entire rack from the top of your vehicle without the need for special tools.

      Simple, Bolt-On Installation. DV8 Offroad engineered this Roof Rack to install quickly and easily. It has been engineered to attach to the gutters of your Jeep without the need for cutting, drilling, or welding.

      Backed by a One-Year Limited Warranty. DV8 Offroad covers this Roof Rack with a warranty against manufacturing defects for One-Year from the retail sale date. Some conditions for this warranty may apply. To learn more, please contact customer service.

      Application. This DV8 Offroad Roof Rack is designed to be used on all the 2020-2024 Jeep Gladiator JT models.

      Fitment:

      Details

      DV8 Offroad RRJL-02

      CA Residents: WARNING: Cancer and Reproductive Harm - www.P65Warnings.ca.gov

      Installation & What's in the Box

      Installation Info

      What's in the Box

      • (7) Crossbars
      • (2) Side Bars
      • (1) Front Bar
      • (1) Rear Bar
      • (2) Rubber Pads
      • (6) Gutter Mounts
      • Installation Hardware
      4.3

      Customer Reviews (65)

        Questions & Answers

        10 More Questions

        Will It Fit My Gladiator

        • 3.0L V6 EcoDiesel - 23
        • 3.6L V6 - 23