Talk to a Wrangler Sales Tech
1-877-870-8556
M-F 8:30A-11P, Sat-Sun 8:30A-9P
Logo Image
$20K Sweeps! 10 Chances to Win! Enter Daily >

CSF OE Replacement Radiator (87-06 2.4L, 2.5L or 4.0L Jeep Wrangler YJ & TJ)

Item J170576
Verify parts fit and get product recommendations.
Wrangler Sales Techs: Connect Now M-F 8:30A-11P, Sat-Sun 8:30A-9P
$0.00
Our Price

$104.91 (each)

FREE Shipping on orders over $119 Market Price $119.99 You Save 13% ($15.08) Up to 10% off for Military & First Responders! See Details

Will this fit your Vehicle?

Select a different vehicle Help?
Update or Change Vehicle
Ship to: Enter Zip
Sorry, please enter a valid US or CA postal code
We're sorry, zip can't be updated at this time.
    Create a list
    Add to New List

    Saved - View your saved items

    We're sorry. We couldn't save this product at this time.

    or use

      Product Videos

      Noah: Hey, guys. Noah from ExtremeTerrain here. This is the CSF OE Replacement Radiator for the '87 to 2006 Jeep Wrangler YJ and TJ. This radiator is going to be a perfect choice for someone shopping for a direct drop-in replacement to ditch their clogged or leaky original unit. If you've got temperature issues or coolant leaks on your rig, there's a few things that could be causing that problem, and a lot of times, all of those issues stem from a radiator. The radiator sits right up front and it takes a beating from all the stuff flying at you down the road, and they hold the majority of your coolant, which, all things considered, makes it a really crucial part of the vehicle's basic function. So when they go bad, it's usually a pretty big deal, and that's where something like this radiator from CSF shines. It's drop-in, so you don't need to have custom flanges welded or make a different fan shroud for it or anything like that. All the hoses are in the factory locations as well, and there isn't any adaptation needed. This is a single-row radiator, so it is nice and slim, and it really doesn't take up a ton of space as well, just like the crusty factory one you'd be taking off.Looking at the construction of the radiator here, it's designed to be the same as OE, so you know it's built right. It has a cross flow design which is going to help circulate coolant well and keep the temp down. Now, the actual radiator core is made from aluminum here in the center, which means it's not going to rust like something made out of steel wood. It's got a pretty big surface area, so it's going to do a great job at keeping everything inside cool as well. Now, these intakes on the sides are plastic, and that's going to keep the price down but still be durable and heat-resistant. All in all, it's a great OEM build quality and you can definitely be confident in this guy getting the job done.The radiator comes in around $160, and I feel that a sub $200 price point for a drop-in radiator is actually pretty impressive, especially when you need it in a pinch. Usually with radiator issues, your rig is down and out, so an affordable unit that's plug and play is a great solution.So this guy is going to have an install difficulty of only one out of three wrenches and an hour for your install time. Replacing this radiator is going to be pretty easy, but it's always messy, so make sure you've got a nice drain pan and a whole bunch of shop towels ready in case you make a big mess. I would also recommend changing all the coolant out as well rather than reusing the stuff you take out, and now would be a great time to do a coolant flush too. Next up, we have an XT customer who's going to walk you through the install process on their own vehicle, so you can get a closer look at what you need to get the install done.Joe: Tools-wise, we have a wrench for clamps, light source, a flathead screwdriver, ratchet with both 11- and 10-millimeter sockets, an extendable arm there just for any tight spots, and an adjustable wrench is always nice, and then same thing, a 10-millimeter wrench for those tight spots, as well as a funnel for putting your fluid back into the new radiator can help to keep things nice and dry and if you get drips somewhere, and a bucket of some type to catch the fluid. Hi, everyone, my name is Joe and we'll be replacing my 2002 Jeep Wrangler's radiator. We are using a CSF OE radiator. And here's the new one here out of the box. And we're going to be taking out the old one and putting in a new. So essentially, what we're gonna do here is we are going to drain this into the bucket, and we will then remove all the lines and we'll get to the lines on the underside there. We're going to take this fan shroud off or push it over a little bit, removing four screws here and then six screws for the actual radiator. Like I said, we're going to remove all the pipes and we will go from there. So let's start with draining.So we're under the Jeep now. You can see that we have the leak here along what may be the seal, or even it could be a pin or something along the lines or somewhere that I can't see on the radiator currently. So first things first, we're going to drain it into my bucket here. So what we're gonna do is we're gonna just turn this counterclockwise, get a better angle at it. Adjust that bucket a little bit. Let it drain out. While that's draining, I'm gonna come up here and I'll go ahead and air that to drain in out. While it's doing that, we'll go ahead and remove the top here. Just put that to the side because we are going to need it for the new one, as you can see. So make sure you keep your cap and throw that away. And we're going to go ahead and, while it's draining, we're going to remove the reservoir. So use those pliers that we were previously talking about. If there's a pin there or a clamp, make sure to pull it off, and then just pull it easy, off like that. We're gonna go ahead and remove the reservoir itself that's attached to the fan shroud because we're gonna have to move this fan shroud over a little bit to be able to pull this out after we get it loose. So we're gonna pull this reservoir out. To pull the reservoir out, there's a little push button right here that you just actually push on and then lift up. So I'm gonna go ahead and do that now. Let me put this on the tripod. I'm gonna go ahead. Like I said, push on this side here, and just simply lift up after it cuts loose. And your reservoir will come loose, and just set it aside. If the fluid is clean, you can go ahead and reuse it.The next step is we're going to remove this fan shroud. There's two bolts on each side. There's one at the top. Similarly on the other side, there's another one on that side. And then, as you can see down there, there's one respectively in each side towards the bottom. I'm going to go ahead and remove the bolts here. So again, 11-millimeter socket. Get these out. It should be pretty smooth. I'm just gonna loosen up so you can get them out with your fingers. And we're going to take both of these completely out. You'll need a light. Give yourself a light. Let this fall, the bolts, I mean. Let me see if I can do this with my fingers now. Yep. And like that. There's bolt number two. Go ahead for the third bolt now, on the opposite side right at the top. There you go. That was number three. And my shroud actually just came completely loose, so I'm guessing previously this was done before because I do not have a bolt down there. But in the case of most Jeeps that are OE, there should be a bolt down here that you have to loosen. So we're not removing the shroud. We're just moving it over, out of the way.So here's a better shot. You can see we're just taking the fan. So it was here, the fan shroud. We're taking the fan shroud and just moving it out of the way here. So when we want to remove this fully, it will pull out. So now that the fan shroud is off and the radiator for me is still draining, so what I'm going to do is I'm going to take this top off here. This is where that flathead screwdriver comes in. You can also use a socket, if you'd like, of respective size. Get that clamp loose. It doesn't need to go undone completely. It just needs to be loose enough to get this upper tube off. And what we're going to do is we're just going to tuck it to the side. It's important to make sure that you go ahead and you can get this done after it's been mostly drained out. Obviously, you're going to have a spill if you do it before that. So we're about done draining this radiator here. It's just dripping, finishing up. So if you have an automatic transmission, you'll have two transmission lines going on each side here. You'll have to get those removed, and for the sake of losing transmission fluid or not losing transmission fluid, you're going to want to quickly tuck them up somewhere vertically if at all possible. But for my case, I have a manual transmission, so we just have these plugs here which I'm going to transfer over to the new radiator.If you have a manual transmission, you won't need to use these. But if you have an automatic, this is where those lines attach to. I'm just showing you on the new radiator before I throw it in. All right. So if you have an automatic transmission, you're going to remove the two pipes that are going to here and just tuck them up to make sure that they don't leak transmission fluid. In my case, I have a manual, so these are actually capped. We're going to use these caps and take them over to the new radiator. And now that I am all drained out, I have all my fluid, I'm going to remove this pipe right here in which the lower tube attaches to the engine. Just going to get it nice and loose, and we're going to shimmy it off. I got the bucket under it just in case we get a little bit of fluid, which, as you can see, you get a little bit. Bucket caught it. And now we're gonna go ahead and get with removing the old radiator and putting the new one back on.So we're almost there. Now that the radiator is empty and the pipes are all removed, we're gonna remove these three bolts on each side. As you can see, one, two, and three down it towards the bottom, and respectively, we have another three on this side. It's hard to see that third one down there. There it is. So we're going to remove those now. This is a 10-millimeter socket, and this is where that extension may come in handy, specifically on the other side there. Something to note about this top one, you can see it's got this breather hose clamp here, so we're gonna want to make sure that we put that back on the way afterwards. So we're just gonna tuck this hose over here. Don't lose your bolts. Just tuck the hose over to the right here and keep on going. You might be able to get it loose enough to use your fingers. It's easier for you. All right. And something to note of this bottom screw is you do not have to remove the entire screw. Just get it loose enough because the radiator will actually slide off. It's got a notch. This one's a little difficult to get to. You have the steering box right under it. This one's gonna take a second. But like I said, all you gotta do is get it loose enough to come undone. So there you go. I got it about two or three turns from coming all the way off. And then we're going to need the extender for this side. Make sure you use your extender. Same size bolt, should be a 10-millimeter, and it holds conveniently through them. And again, if it looks like this, you can actually just spin it this route. Make sure you catch that bolt just so it doesn't go into the bay. And like I said, keep these bolts because you want to reuse them when putting the new one on.I might have some wiring here from the headlights. Looks like mine's actually...it has a zip tie, so I'm going to quickly cut that. If you get into this scenario, just make sure you don't cut any wires. There we go. That's out of the way. And again, another access hole here, so we should be able to get in there snug with an extension. Alternatively, you can use a standard wrench to get in there without an extension. Just make sure it's 10-millimeter. It's okay if the fan shroud is flopping around in here. It's going to go back to where it was after we replace the original radiator. And again, the bottom one is a little difficult to get to. I'm gonna actually go from the bottom side here and reach from under, but you can theoretically go from the top as well. Sorry, it's not a great camera angle, I know. But again, this bottom one, you just need to get loose. You don't need to remove all the way. So we're going to remove it till you got some room. So you can see it has some play now. So just push your fan shroud as far away and out of the picture to the side. We'll get this for a second. All right. And you're gonna have to wiggle it out. Just be careful. Look at that camera angle in here. We have some lines here just to be careful of. You don't want to pop them or nothing. And wiggle it out. So here's the old one.So you can see here we got the new one on your right and the old one on the left. Mine is pretty beat up. I'm excited to get this new one in there. All right, so we're going to put the new radiator in, same way the old one came out. Just remember, those bolts on the bottom that we left there are going to go right into this side here and this side right here. Can you see that? So they're going to slide on and over. Just be careful again guiding your radiator and line up with the bolts. It's looks like there's kind of a piece here that needs to be removed because it's not needed for me. It literally actually says, "Removed if no need." And that will allow you to let those lines sit in there. Something before I put this all the way in, I'm gonna make sure those bolts are out and just ready to go so we don't have to mess around too much with these guys. So we'll leave a little bit of room for these prongs here to get in there. And I'm going to do this side. Just slide it over. And then, now that that's lined up, make sure this side's lined up. There we go. All right. Push down. Make sure it's on. There we go. All right. Once we know that we're all the way down here, we're snug, we're going to put the bolts back in.So we'll start with those bottom ones and work our way back up. Actually, to make sure we're all in the right spot, I'm gonna go ahead and just hand tighten the top two bolts to keep it in place. And then we'll also make sure it's aligned correctly. And we could probably go ahead...I'll go ahead and tighten these now. All right. And you want them pretty snug, but you don't have to go crazy. It's going into aluminum, so you want to [inaudible 00:18:48]. Like I said, you don't want to strip it. I'm gonna go ahead and do this side as well, get that extension on here. And then we'll get those bottom ones and we'll do the middle. All right. And tight. And I'm going to go get those bottom ones done. I'll go ahead and, right before we get the bottom one, I'm just going to run these and get these in place, the middle one. Just take the extension like so. I'll run it through. Make sure you don't lose the bolt. All right. I'm gonna come back and tighten these middle ones right after I get the bottom. So I'm just hand tightening for now, get it most of the way. I'm gonna add my socket into the mix. That fan shroud is a little in the way, but that's okay. Just push it out of the way and tighten. All right. This hand tight is fine. So while we're on this side, we'll go ahead and tighten the rest of the two here. I'm going to hand tighten the bottom one until it gets difficult to finish it off. There we go. Again, this fan shroud, you can move around if you need to. The middle one, tighten it as much as I can. There we go. And then we finish it off with the ratchet. Be careful when you're ratcheting with this metal here. You don't want to cut yourself. All right, and the left side. We have extension. You can do these really in any order of your preference. We're just gonna finish off that bottom. We already got the bottom done.All right. So new radiator is in place. Next thing we are going to do is go ahead and put the fan shroud on. Push that back. Again, that's with those four screws with a 11-millimeter. Get them on. Hand tighten first. We'll go ahead and get the top one on, go from there. Line it up. There we go. You don't need your extension anymore. All right. It's snug. Like I said, mine must have been messed with before because I'm missing a bolt, but there will be a fourth bolt that you'll put on just under these hoses here that you would tighten in. I'm going to return mine the way it was, which was two on this end, one on the other. And just be careful, you don't want to lose the bolt. So hand tighten it first and proceed from there. All right. You can see it's not going anywhere. Next thing we're going to do is put the hose back on. Make sure you get the clamp where you want it to be. Just put it back on. If this hose is old and worn, it might be time to replace it. I did these actually relatively recently, so I'm gonna leave them the way they are. We're just going to tighten. That's not going anywhere. Go ahead and put the reservoir while we're already here. You can do this after, but while I'm already in this spot, go ahead and put it. So again, this will feed into this hole down here, slides in. And then this little button here will keep it, and then this will lock it up. You want to move, from this angle? Slides in. Make sure this lines up, and push down. And that's how it gets in. It snugs right there. Take this line. Make sure there's no tension over here, nice and nothing clamped. And take this.You want to go over so it keeps it in space. I've seen a lot of people's builds where this clamp isn't here, but if not, just keep it snug. And so the original cap is going to go here, but we won't have to do that yet because we're still going to need to fill it.All right, so we're going to put this hose back on. This is the lower hose. Just make sure it goes all the way up past the nipple here, right here, and then clamp it into place. You might have a few drops from where it came out. This is the lowest point, so that's totally fine. And again, if these hoses are old, you're already doing it. It's probably worth considering putting new hoses if they're not in good shape. Hand tight. There we go. All right, that's set. If you have the automatic transmission, you would put those lines back here and then clamp respectively. There are two smaller lines right here and back a little bit right here. Now, I did put this radiator back, and what I'm gonna do, I'm gonna take these plugs off of the original. So, put this right here. Just plug it up so nothing gets inside. These lines don't actually...they're not attached to the main coolant here, so even if you don't plug it, it's okay. You can leave them. And then before we get up, just make sure this is nice and snug, closed, because we are about to fill it.So we're gonna need a funnel towards the top. And I'm actually going to reuse my fluid. Thank you. I'm going to reuse my fluid just because it's clean. I did it a couple months ago before I realized the radiator was leaking. But you would put new fluid if it is dirty. Take your time. And it might bubble over, so just slow down if you need to. They're draining into spaces. Let it drain for a second here. Clean up this. I already splashed. So, see, I keep getting ahead of myself as well. It's a little easier with new fluid that's in a smaller container. And when you're done with this, you want to make sure that this is all topped off correctly, and we're going to run. So you can see fluid's pretty topped off, but go ahead and have some fluid in here so as it flushes, it'll get into different areas and then it'll just pull any extra fluid needed from here. Take your old cap, or if you bought a new one, new cap, and just put it on, and it's ready to go. We're going to start her up. As you can see, we are running now. Cap is nice and tight. I got a little bit extra overflow than normal, but I know that it's going to seep a little bit, so that's okay. This is going to pull fluid from there as it needs space, so this will go back down to a normal level. And you let it run, rev it a little bit, it'll circulate. You can see here we don't have a leak anymore. Something to note here is make sure that you put this line back with the radiator, this breather line here. So I forgot, so I'm just using a 10-millimeter wrench and got that back in place here. So I'm gonna tighten that up and we're good to go.Noah: That was the CSF OE replacement radiator fitting the '87 to 2006 Jeep Wrangler YJ and TJ. As always, for all things Wrangler, keep it right here at extremeterrain.com.

      Product Information

      Features, Description, Reviews, Q&A, Specs & Installation

      Features

      • OE-Style Coolant Radiator
      • Sing Row Downflow Design
      • Core Length of 18-1/8 Inches
      • Core Width of 19-5/8 Inches
      • Core Thickness of 1-1/4 Inches
      • Aluminum Core Material
      • Features Virgin-Grade Plastic Tank
      • With EPDM Rubber Gaskets
      • Passenger Side Inlet Location
      • Driver Side Outlet Location
      • Inlet Diameter of 1-1/4 Inches
      • Outlet Diameter of 1-1/2 Inches
      • Limited 2-Year Warranty
      • Easy Installation
      • Fits 1997-2006 Jeep Wrangler TJ Models

      Description

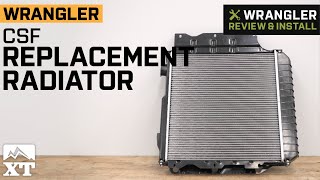
      Improved Temperatures. Optimize your Jeep Wrangler and drive with better temps on your system with This CSF OE Replacement Radiator. Designed as a quick fix to your cooling issues, it replaces your Radiator system with a single row design for greater clearance and smoother fitment of larger engine components. It sports a bright metallic silver exterior to compliment the look of your engine.

      Tough Design. This Radiator's core material is made from high-quality aluminum, which is far more conductive than steel and synthetics. The composition of the metal not only makes it immune to rust but also perform better in managing vibration and impact as well as dissipating heat, significantly optimizing your temps.

      Warranty. There is a limited 2-year warranty on This product.

      Installation. This product is easy to install and should take about 1 hour.

      Application. The CSF OE Replacement Radiator fits 1987-2006 Jeep Wrangler YJ and TJ Models.

      Fitment:

      Details

      CSF 3244

      CA Residents: WARNING: Cancer and Reproductive Harm - www.P65Warnings.ca.gov

      Installation & What's in the Box

      Installation Info

      What's in the Box

      • (1) Radiator
      4.5

      Customer Reviews (56)

        Questions & Answers

        10 More Questions

        Will It Fit My Wrangler

        • tj Rubicon 2 Door - 03, 04, 05, 06
        • tj Rubicon Unlimited 2 Door - 05, 06
        • tj Wrangler 2 Door - 97, 98, 99, 00, 01, 02, 03, 04, 05, 06
        • tj Wrangler Unlimited 2 Door - 04, 05, 06
        • yj Wrangler 2 Door - 87, 88, 89, 90, 91, 92, 93, 94, 95