Talk to a Wrangler Sales Tech
1-877-870-8556
M-F 8:30A-11P, Sat-Sun 8:30A-9P
Logo Image
$20K Sweeps! 10 Chances to Win! Enter Daily >

Body Armor 4x4 GEN 3 Trail Rear Doors (07-18 Jeep Wrangler JK 4-Door)

Item J104836
Verify parts fit and get product recommendations.
Wrangler Sales Techs: Connect Now M-F 8:30A-11P, Sat-Sun 8:30A-9P
$0.00
Our Price

$409.99

FREE Shipping Market Price $466.99 You Save 12% ($57.00) Up to 10% off for Military & First Responders! See Details

Open Box from $82.00

Will this fit your Vehicle?

Select a different vehicle Help?
Update or Change Vehicle
Ship to: Enter Zip
Sorry, please enter a valid US or CA postal code
We're sorry, zip can't be updated at this time.
    Create a list
    Add to New List

    Saved - View your saved items

    We're sorry. We couldn't save this product at this time.

    or use

      Product Videos

      Hey guys, it's Sara with extremeterrain.com, and today we have review and install of the Body Armor 4 by 4 Gen 3 Trail Doors, fitting your '07 to '18 Jeep Wrangler JK. These are perfect for the Jeep owner who likes the open air feel of a tube door but wants a bit more material between them and the trails. These trail doors are very similar to the construction of a tube door with the added features of these plates as well as the netting to give you a bit more between you and the obstacles on the trail. The hinges and latches on these doors are adjustable for a precise fit to your Jeep and the netting has several attach points to ensure there's no flapping on the highway. In addition, there is a mounting point for an aftermarket mirror, however, this kit does not come with any hardware or the mirror itself and it does not work with the factory mirrors. Now, it is important to note that the front and the rear doors are sold separately as pairs. So, our friends with the two-door Wranglers can purchase just the fronts.So, as far as price goes, this comes in at around $400 for the pair of front or rear doors, which is low to middle of the road price wise when compared to other options. And for your money, you're getting a nice tube door with the net included which is not always the case and it still saves you some money over more expensive options. I'm giving this install a two out of three wrenches on the difficulty meter. It does take a little bit of additional time to bolt up the hinges and the latch the first time around, but once you've done that, it will be significantly less time to get these on your Jeep and get out on the trails. All in all this install can be done within one hour. So, with that said, let's jump into our install. For this install you will need an impact gun or a ratchet, a 13-millimeter socket, a T45 Torx socket, an Allen key set, a 13-millimeter wrench and a trim panel removal tool.All right, so the first step in the uninstall of our doors is to grab a T45 Torx socket and we're gonna remove the bolts holding on the hinges. This should also come in your hardware kit if you have one of those. Let's grab our socket and let's get this off. Using your socket, pull off this threaded nut on the bottom of the hinge. All right, so the next step is to unplug this wiring harness here, follow it from your door underneath. There should be a gray plug, press down on the tab and pull it out. Now you can unhook this safety here, give your door a little bit of slack, that should help out, and unhook it. All right, at this point we can grab our door and lift it off the hinges.For our rear door, we need to remove this panel section right here. You can either pop it off by hand or use the trim panel removal tool and it will either just hang right here or you can remove it completely. Now you can see the wiring harness that has to come out, there's a smaller clip than the front, just press down on the tab and remove. Put some slack in your door and you can lift this harness off of the hinge in here, it's the same hook as the front. All right, now you can remove the two threaded nuts on the bottom here with your T45 Torx. All right, so once your hardware is removed from the hinges and your wiring harness is unplugged, you can grab and remove this door. I think it's a little bit easier with the window rolled down. All right, with your front and rear doors removed, you wanna repeat that process on the other side.All right, so before we can install our doors onto the Jeep, we need to prep them a little bit by installing the hinges and the latch. Now, the hinges should be marked driver side and passenger side, but it's important which ones you install where. The one without the curve in the hinge installs up top, right over these three holes right here. And then one with the curve in the hinge, it's a deeper curve, goes towards the bottom. To install these, we're using these hex head bolts and you want to use a washer on the top. Line them up with the holes in the door and these are installed in the front side of the door, so it will face out. So, we have our bolt with a washer on going through the front and then through the backside of the door we're using a nut as well as a lock washer. We're gonna leave these hand tight for now and then tighten them down when they're ready to go on the Jeep.All right, so now we can install our lower bracket. We flipped the door over to give you guys a better look at the backside. So, just make sure you're installing it in the same way as the top one. This is the angled bracket so it's gonna go on the front face of the door. Grab your bolt and washer, make sure you're using a washer, lock washer and nut on the backside the same as the top. And then for this last one is a little bit different, we're still using our washer and our bolt, gonna go through the hole. But then before we install the rest of our hardware, we're gonna install the safety strap. Now this one should be on the lower bracket, the one single bolt that's out by itself. Now you can install your washer, lock washer and nut. And again, we're leaving these hand tight until our door is installed.All right, now we can install our latch, before that we need to install this latch plate. Make sure we're grabbing the one that says P on it for the passenger side, we're lining up over these slotted holes on the door. Now, this is on the inside of the door, so on the outside we're gonna install one of these bolts and a flat washer. And on the inside we're gonna install a washer, lock washer and nut. Keep these hand tight for now, we will tighten them down once it's on the Jeep. All right, now we can install the latch. Again, these are labeled driver and passenger on the plastic that they come in. Make sure that we're using the one with the opening that matches the bracket. We're going towards the outside of the bracket towards the back of the door and this latch release should be towards the top. Grab two bolts, these will be from the outside to the inside and then grab your lock nuts and install them over the hardware. Now, these are the longer bolts. There are shorter and longer, these are the longer hex bolts to clear the latch. We're installing them only in the top and bottom, a bolt does not go through the center. Again, we'll tighten this down on the Jeep.All right, this is way we can grab our door, grab the hinge pins and install them over top of the holes for your factory hinges. Now, they are still loose so it may need some wiggling to get them installed but they should sit flush with each of these hinges. All right, so you wanna just take a glance at your hinge, make sure it's in the neighborhood of grabbing where it should be. And now we can grab a 13-millimeter socket and the included Allen key and tighten down the bolts going from the hinge bracket to the hinge.All right, now we can install the hinge onto the door. Make sure that it clicks two times. May take a little wiggling to get it right where it wants to shut nicely. So, after you've heard both clicks, you can adjust your door accordingly if it needs to come up or down. Grab a 13-millimeter wrench and the included Allen key and tighten it down. All right, at this point you can check that your door is straight across and nice and even and tighten down the hinges with your 13-millimeter wrench and the included Allen key.All right, so finally we're gonna install the bump stop so the door can close nice and tight. Now, they've included this rubber bumper, as well as some washers to space it out. You wanna space this as far as you need to, depending on your Jeep so that the door shuts and doesn't have any play in the latch when it's shut. Using a small Allen key tighten down this bolt and you will need to use a small washer on this bolt as well. That goes on the inside, it sort of of seats into this rubber stopper. And then check that it shuts nicely and that there's no play in the door.All right, now we can install the mesh piece, line it up over top of the door, does go towards the outside of the door, and the logo should be towards the front. There's a seam up top here, line that up at the top of your door and make sure it's even front to back in the door so there's an even amount of space on either side. Line up the Velcro on the backside of the door, Velcro it in place. You may need to work it in a little bit because it may wrinkle because of the shape of the door up here. And then repeat that on the bottom part of the door with the bottom Velcro. And then finally, you wanna secure each side, this is so it doesn't flap around on the highway. I'm just gonna fold this Velcro back a little bit because it doesn't need to be that long. If you don't wanna fold it over, you can trim this piece if you'd like but it'll stay put folded just fine. Finally, we can install the safety strap that prevents the door from opening too wide. If you've tightened it down in another position, just loosen this and tighten it down so it's facing inside like this. Close the door slightly until you can get the end over top and slide it over top of the factory hook.All right, now I can throw the factory Torx nuts into the bottom and onto the hinge. Now, for some reason these don't thread on nicely, you can loosen up these bolts and mess with the hinge a little bit just to line them up better. If you do that, just make sure that you're lining them up so they're flush still if you do need to make any adjustments. Grab a T45 Torx socket and tighten these down.All right, so for the installation for our rear doors, we're gonna grab the brackets that correspond to the passenger side because that's where we're starting. Now, the passenger side brackets, the top and bottom, are different. So, we're gonna grab the one that is straight across, that one goes towards the top. The one that has the bend in it, that one lines up with the bolt holes on the bottom. Now you wanna install these bolts with a washer through the front and these hinges will mount on the front face so they will show to the outside of your Jeep. Now, on the backside we're gonna install a nut, a lock washer and a washer.Now we can install the bottom one, we flipped over the door so you can see how it looks from the other side. So you're gonna install that hinge to the front face. Install the bolts to the front, and then a washer, lock washer and nut. Now we are leaving these hand tight for now and we'll tighten them down once it's mounted on the Jeep. For this last one, we're doing something a little different, the bolt with the washer will go through the front face and now the strap, the safety strap here will mount over top of this. And then we're going to install the washer, lock washer and nut. Make sure it's in this orientation facing forward so it can hook up to the factory hook.All right, now we can install the hinge plate. Make sure we're grabbing the one marked P for passenger side and the slotted holes will line up with the two slotted holes on the door. Keep in mind we're mounting this on the inside of the door where we just mounted our hinges on the outside. Grab the bolts with a washer on it same as the hinges and install it through the front face. On the backside you're gonna do a washer, lock washer and nut. And again, we're gonna leave these loose until we're bolting on the Jeep so that we can make our adjustments at that time.Now we can install our latch, this goes on the outside of the latch plate. Gonna install the longer hardware through the latch portion and we're only using the top and bottom holes here and then install a lock nut on the other side.All right, now we can install our door over top of the factory hinges. Line up the bottom and top hinge and slide them in place. Make sure that you're wiggling them all the way down so it mounts flush. Now you can line up your latch in the back, you may have to adjust the door a bit to make sure it lines up properly and then pull it back and we're gonna tighten down the lock nut that's holding on the actual latch. With a 13-millimeter socket and the included Allen key tighten these down. Now we can shut the latch, you may need to lift it in place. Make sure it sits within the latch and then shut it. It should latch twice or this latch portion should be flush on the inside here. Once you're sure the latch is fully engaged, grab a 13-millimeter wrench and the included Allen key and tighten these down.All right, so at this point we can tighten down the bolts that hold on the hinge pin. But a trick I like to do here since you have to install these anyway is to thread these on while this is still loose to ensure you get a good connection here. Grab your T45 Torx socket and tighten these down. Now, once you're sure that's tight, it should help you get these where they need to be. With your 13-millimeter wrench, hold them still and then tighten down with the included Allen key. So, just keep in mind there is a ton of adjustability to these doors They're not sitting exactly where you want them, you can adjust them to get them right where you'd like. Go ahead and repeat that process on the bottom. Thread on the factory Torx nut, tighten it down and then tighten down your hinges.Okay, now we can install these rubber bumpers. To do so, grab the small bolts with a small washer, thread them through the front of the rubber portion. And they've included seven spacers here just to make sure that you can get it exactly where you need it on your Jeep. It should be snug but the latch should still latch fully. Go ahead and line it up and then thread it into the portion of your doors right behind the latch. And then with a small Allen key, tighten it down. So, depending on your Jeep, you may use the same that we're using, one large spacer and the rubber bumper, but you may need some more and it is nice that they've included several so that you can get a nice tight fitment on your door. Once you've installed it, just double-check that the door swings shut. All right, so once it's installed, it should shut on the latch, shut fully and there should be no wiggle room in the door. If there is still wiggle room you can add some more spacers.All right, now I can install this mesh. You wanna make sure that the logo is towards the front when we spin it around. If you're not sure, this cutout is towards the rear. Lay it over top on the top bar, line it up up as best you can and then fold over the Velcro. And Velcro it over the bottom as well, you may need to adjust part of your Velcro on the top as you go. Now, once you have your Velcro installed, install these other Velcro straps. This is just to keep the mesh portion tight when you're driving on the highway so it doesn't flap around. This last piece goes over top of the bar here as an added anchor point. All right, now you can install the safety strap, goes over the factory location preventing your door from opening too far.All right, so that is gonna do it for the review and install of these trail doors. And remember for all things Jeep keep it at extremeterrain.com.

      Product Information

      Features, Description, Reviews, Q&A, Specs & Installation
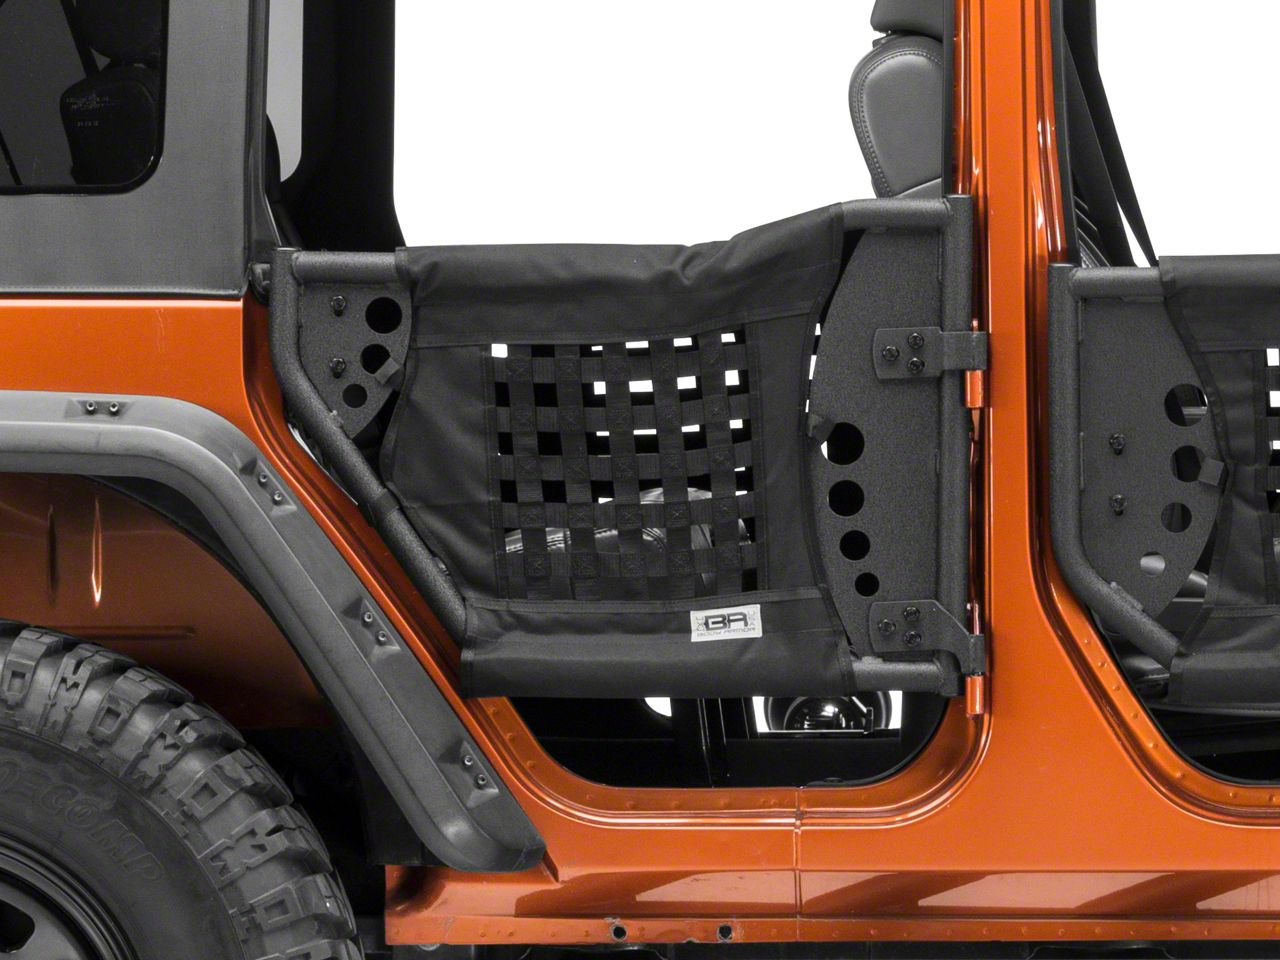
      Features & Specs

      • GEN 3 Trail Door
      • Updated Version of The Original
      • Redesigned Door Pin
      • Precision CNC Machined
      • Improved Robotic Welding
      • 1" Wide, 1/8" Thick Woven Nylon Web Door Inserts
      • Doors Come Predrilled
      • Black Powder Coat Finish
      • Sold in Pairs
      • Proudly Made in The USA
      • Built for All 2007-2018 Jeep Wrangler JKs

      Description

      Conquer All Terrain. Own both the road and the trail with rugged Jeep products by Body Armor. A significant upgrade over stock doors and a must-have for serious Jeep enthusiasts, these GEN 3 trail doors are the newest and best version of the classic trail door.

      Quality Components and Construction. Now robotically manufactured in the USA, they feature a redesigned door pin that allows the use of stock door bolts. This anti-theft measure also reduces vibration and ensures a smoother ride. Robotically welded and CNC-cut door frames are consistently a perfect fit.

      Improved Features. The secondary features on the GEN 3 rear trail door have also undergone an overhaul. We improved the webbing with heavy CORDURA 1" wide, 1/8" thick woven nylon. The fit is better and we included Velcro to secure the webbing and prevent flapping. Arm pads are encased in nylon to improve durability and comfort.

      Installation. Perfectly fitted to the body via CNC-machining and robotic welding. Doors are compatible with stock door bolts for easy installation. The frames are also predrilled for aftermarket mirrors.

      Application. Body Armor 4x4 GEN 3 Rear Trail Doors are made in the USA for all 2007-2018 Jeep Wrangler JKs.

      Fitment:

      Details

      Body Armor 4x4 JK-6140

      CA Residents: WARNING: Cancer and Reproductive Harm - www.P65Warnings.ca.gov

      Installation & What's in the Box

      Installation Info

      What's in the Box

      • (2) Trail Doors
      • (20) 8MM-30MM Hex Head Bolt
      • (49) 8MM Flat Washers
      • (20) 8MM Lock Washer
      • (28) 8M Hex Nut
      • (2) Upper Door Pins
      • (2) Lower Door Pins
      • (2) Limiting Straps

      4.6

      Customer Reviews (23)

        Questions & Answers

        10 More Questions

        Will It Fit My Wrangler

        • JK Rubicon 4 Door - 07, 08, 09, 10, 11, 12, 13, 14, 15, 16, 17, 18
        • JK Wrangler 4 Door - 07, 08, 09, 10, 11, 12, 13, 14, 15, 16, 17, 18

            Related Wrangler Categories