Talk to a Wrangler Sales Tech
1-877-870-8556
M-F 8:30A-11P, Sat-Sun 8:30A-9P
Logo Image
$20K Sweeps! 10 Chances to Win! Enter Daily >

Barricade HD Drop Side Step Bars (07-18 Jeep Wrangler JK 2-Door)

Item J150091
Verify parts fit and get product recommendations.
Wrangler Sales Techs: Connect Now M-F 8:30A-11P, Sat-Sun 8:30A-9P
$0.00
On Sale

$179.99 (pair)

FREE Shipping Market Price $312.99 You Save 42% ($133.00) Up to 10% off for Military & First Responders! See Details

Open Box from $107.99

Will this fit your Vehicle?

Select a different vehicle Help?
Update or Change Vehicle
Ship to: Enter Zip
Sorry, please enter a valid US or CA postal code
We're sorry, zip can't be updated at this time.
    Create a list
    Add to New List

    Saved - View your saved items

    We're sorry. We couldn't save this product at this time.

    or use

      Product Videos

      Merideth: If you're in search of an easier way to get into your 2018 or newer 2-Door JL Wrangler, get some good side protection for your Jeep, and also achieve a heavy-duty look, these Barricade HD Drop Side Step Bars are going to be right up your alley. Now, this set of steps will be great for any JL owner who's looking for better accessibility into their cab, especially with the addition of a lift or a leveling kit and need the extra drop compared to a standard side step bar.I would also recommend these to more of the daily driver or, like, trail rider considering the drop in the steps. So if you do plan on doing any crawling, I would just keep the clearance here in mind. Now, these steps will feature a large stepping surface here offering a decent amount of space to put your foot while getting roughly a 2-inch drop.Now the stepping surface here will have some large arrays cut out which will give you some extra traction in the wetter days. Now the top of the sidestep here is also gonna do a great job in covering a lot of that rocker area and tuck very closely to offer a clean look and double as some really good side protection for day-to-day or again, light off-road driving.Now, speaking of protection, these will be made of a steel tube and steel plate construction giving them good durability, if they do end up taking a hit, and will have a nice black powder coat finish on top to match with any other heavy-duty accessories, and most importantly, protect the steel underneath from rusting.Not to mention the hybrid between the two being up at the top and the plate step here is going to offer a nice off-road and heavy-duty look to the side of the JL. Now, these are gonna come in at roughly $325, which I think is a pretty good price for a drop-down step. Now, comparing to the other choices in the category, I really like the fact that these steps aren't going to drop significantly low. So clearance in normal situations won't be compromised much at all. And this is still going to get you that added drop that you need when getting in and out.Not to mention, this will have that tubed and angular construction for more of a unique look. So I think if you're looking for those aspects out of a step, then this is gonna be a great choice for you. Now when it comes to install, this will be an easy one out of three wrenches on the difficulty meter, taking you about two hours to get both of these mounted up with some pretty basic hand tools. At this point though, we can head over to the shop and check out how to do that step by step. So, that's gonna wrap it up for me. Let's go ahead and get into the install.Man: The tools you'll need for this install are going to be a 13-millimeter wrench, a 10-millimeter wrench, a 13-millimeter 3/8 socket, and a 10-millimeter 3/8 socket, as well as a 3/8ths ratchet, or in my case, I use the 3/8ths impact. Hey, everyone, we're gonna be installing a set of drop side steps on this JK Wrangler. Luckily, there's nothing to uninstall. So let's jump right into that install.First thing we're gonna do is take a look at these brackets that are included in the kit. Now, on them, it is engraved which ones they are. You're gonna see something like this, PF, which stands for passenger side front. And then I got this other one here, which is PR or passenger side rear. I'm gonna grab the two for the passenger side because that's the side we're working on. Now that I have these two brackets, we're good to start attaching them to the vehicle.So we're here at the pinch weld on the front of the vehicle. And I'm holding this bracket, the bracket that's supposed to be here, PF. And they're only can really go one way. We got a bolt hole up here through the top, and you'll see that those two holes will line up through this bracket. So included with the kit, there's a whole bunch of hardware, but you will actually see that there's a few of these bolts that already have a washer and a lock washer on them. Now, these are gonna go up into the bottom of the chassis through the bracket.It's gonna be tough to see here, but I'm putting this bolt through here and then there is a hole right up there that they thread into. Just gonna get it started by hand.Now I have my 13-millimeter socket on a 3/8s impact. So I'm gonna zip it up there. But I'm not gonna go all the way tight because we still need to line up those two pinch weld holes. So I wanna make sure there's enough play in that that I can get those bolts through. Now we're good to go ahead and do the same step on the other side.Now, I'm at that spot towards the back where we can do the same thing. I've got the bracket that belongs in the back with that same bolt here, and I'm gonna pass it through, mount it up into that same bolt-hole spot there, get it started with my hand. And then again, I'm taking my 13-millimeter socket on my 3/8s impact, putting it up there, but I'm not tightening it all the way down.Now, at this point, we're good to go ahead and insert those four bolts here that go through the pinch weld into that bracket. So, for those guys there, we're gonna be using these longer 10-millimeter bolts that are included with the kit. Now, to put those through, first, we're going to take that bolt and we're gonna put a flat washer on. Then we're good to pass it through hole just like that. And on the backside of that guy, we're gonna be putting another flat washer the other side of the pinch weld.And then there's 10-millimeter nylon nuts included with the kit as well I'm gonna get on to the back. You're only gonna be able to get those so far by hand because there is nylon in them that kind of cuts into the thread while you tighten it. So get it as far as you can by hand. And I'm gonna do the same thing with that bolt, the washer, one through this side, and another washer, and then that nut here as well. Just gonna get it started.And to tighten those down, I'm gonna be using my 3/8s impact, but this time we're gonna be using a 10-millimeter socket, as well as a 10-millimeter wrench. And I'm gonna reach up behind, hold that nut still while I spin the bolt.You're gonna notice that I'm not gonna tighten this all the way because we need to have a little bit of adjustment in the brackets to get that step mounted up and get it centered properly. That went a little bit too far. So make sure we have a little bit of movement out of them, just like that to get our side-to-side play in that. And then we're gonna move to the back one and do the same thing, bolt through, throw them on the back.Now we're good to go ahead, put this guy on here. So I'm gonna line it up. It's looking like they can sit on the inside of these brackets, just like that. It should slide into place fairly easily. You can see that lines up pretty good. All we need to do is pass some bolts through those two brackets to attach them to each other.So the hardware you're gonna need for these brackets to attach to the steps are these long 13-millimeter bolts that are in the kit. We're gonna take a lock washer, drop down all the way, and then on top of that, a nice big flat washer. And it's gonna pass through... On the other side of that, we're gonna use another flat washer and then one of those 13-millimeter nuts that are in the kit as well. So this might be a little tricky. Holding this, passing a bolt through as well, slip it where it needs to go. Kind of have it up against my chest to support it a little bit.You're gonna take that first bit of the bolt we built there, pass it through. And then just a little bit of a pro tip, you should be able to take the weight off this a little bit. And it'll kind of hold itself there. And I'm taking that washer we talked about, putting it there on the bolt, and then the nut here on the other side. I'm gonna get that on with my hand to the point where it's holding it tight, but it's not secured. So we can still get some movement out of this. And they can do that same thing.Again, I'm taking another one of those bolts with the crush washer, regular washer. I'm gonna do the same thing on the hole that's farther back on the bracket as well, make sure it's lined up on the other side there. Get it through. Again, should kind of hold its weight. The other side to cooperate. And I'm taking a big washer, same thing as the front bolt on the inside there, and another one of those 13-millimeter nuts. Again, I'm just getting it tight by hand here, keeping it somewhat loose so we can still adjust it.And I'm gonna do that same thing I just did there on the back bracket. Now that we have everything loosely attached to the vehicle, we're good to go ahead and start tightening things down. And you can see since we left everything loose, there is a good bit of adjustment where we can get this sidestep sitting exactly how we want.Now that we have those four bolts through the pinch welds into those brackets, we're good to tighten up those very first bolts we put in come up through the bottom of the bracket. So, I'm gonna take my 13-millimeter socket on my 3/8s impact. I'm gonna go underneath and just zip those up tight like that in the front and then on the back bracket.Now I'm gonna switch over to my 10-millimeter socket and my 10-millimeter wrench. And we're good to tighten up those bolts here that goes through the pinch weld, reaching behind the wrench, tightening that down, 1, 2, 3, and 4, just like that. Now, we can be sure that our adjustment is entirely in the step itself, because those bolt holes on the step and on the bottom of the bracket are wallowed out, so we can move it up and down, get the height, and the angle that we've liked out of it.So, I'm gonna kind of hold it where I think looks good. We'll do some eyeballing here. I wanna make sure that this step is somewhat level as well. That's a big deal. You don't wanna have a dangly step. Have it like that, get it kind of where it needs to be right about there. It's good enough for me. And we can go ahead and start tightening those four bolts down.Now to do that, what I can do is just kind of get one to start compressing that lock washer by hand. If I can get one tight enough just like that, it'll pinch it, and kind of hold it close to where I want so that I can let go and use my impact. So that's gonna stay pretty near to where I want it, switching back to that 13-millimeter socket on 13-millimeter wrench here on the other side. I'm using my forearm just like this to kind of hold the step where I want.And that allows me put that impact gun, tighten that bolt. That looks pretty good lined up. You can tighten that back on. Then I'm gonna move on to that bracket in the front and tighten those down too.Now that you got this side completely secured, you're good to go ahead and move on to the other side and follow this exact same procedure. And there you have it. That is install complete. That was the Barricade HD Drop Side Step Bars for the 2007 to 2018 Jeep Wrangler JK 2-Door. For all things Jeep, remember to keep it right here at extremeterrain.com.

      Product Information

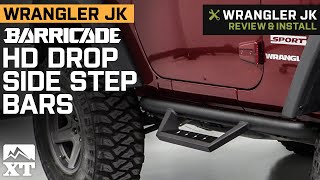
      Features, Description, Reviews, Q&A, Specs & Installation

      Features & Specs

      • Provides a Step for Easy Entry
      • Doubles as Side Protection
      • Rugged Off-Road Appearance
      • Dropped Step Angular Design
      • Heavy Duty Steel Plate and Tube Construction
      • Textured Black Powder Coated Finish
      • Direct Bolt-On Installation
      • Fits 2007-2018 Jeep Wrangler JK 2-Door Models

      Description

      Function and Style. Get in and out of your 2-door JK Wrangler with ease by installing a set of Barricade's HD Drop Side Step Bars. With an angular drop stepped design, these black textured Side Steps not only provide easy entry into your lifted Jeep, but they also give your Wrangler a rugged off-road appearance. As an added bonus, these HD Drop Side Step Bars can provide additional protection from both road and trail hazards.

      Heavy Duty Construction. Barricade manufactures their HD Drop Side Step Bars to precise specifications from heavy duty, steel plating and mandrel bent tubing for superior strength and rigidity. Barricade then completes their Side Step Bars in a high-grade, textured black powder coated finish for long lasting durability.

      Direct Bolt-On Installation. Barricade engineered their HD Drop Side Step Bars to be a direct bolt-on upgrade reusing the factory mounting points and hardware. There is no cutting or modifications required for a clean straight forward installation. Installation can be completed in about 2 hours with just basic hand tools and the help of a good friend.

      Application. This pair of Barricade HD Drop Side Step Bars are designed for use on 2007-2018 Jeep Wrangler JK 2-door models. Driver and passenger side included.

      Fitment:

      Details

      Barricade J150091

      CA Residents: WARNING: Cancer and Reproductive Harm - www.P65Warnings.ca.gov

      Installation & What's in the Box

      Installation Info

      What's in the Box

      • Driver Side Running Board
      • Passenger Side Running Board
      • Mounting Brackets
      • Mounting Hardware
      4.8

      Customer Reviews (140)

        Questions & Answers

        10 More Questions

        Will It Fit My Wrangler

        • JK Rubicon 2 Door - 07, 08, 09, 10, 11, 12, 13, 14, 15, 16, 17, 18
        • JK Wrangler 2 Door - 07, 08, 09, 10, 11, 12, 13, 14, 15, 16, 17, 18