Talk to a Wrangler Sales Tech
1-877-870-8556
M-F 8:30A-11P, Sat-Sun 8:30A-9P
Logo Image
$20K Sweeps! 10 Chances to Win! Enter Daily >

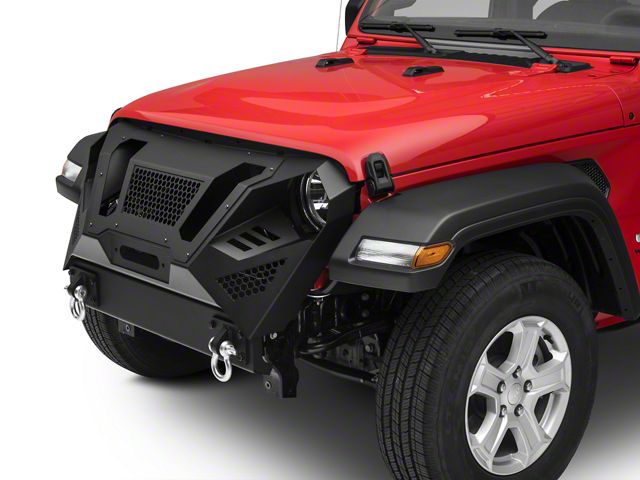
Barricade Apocalypse Grille Guard (18-24 Jeep Wrangler JL, Excluding 21-24 Rubicon)

Item J123339-JL
Verify parts fit and get product recommendations.
Wrangler Sales Techs: Connect Now M-F 8:30A-11P, Sat-Sun 8:30A-9P
$0.00
On Sale

$730.99

FREE Shipping Market Price $905.99 You Save 19% ($175.00) Up to 10% off for Military & First Responders! See Details

Will this fit your Vehicle?

Select a different vehicle Help?
Update or Change Vehicle
Ship to: Enter Zip
Sorry, please enter a valid US or CA postal code
We're sorry, zip can't be updated at this time.
    Create a list
    Add to New List

    Saved - View your saved items

    We're sorry. We couldn't save this product at this time.

    or use

      Product Videos

      Hey, guys. So, today, I'm here with the Barricade Apocalypse Grille Guard, fitting all 2018 and up JL Wranglers. So, this is obviously gonna be a love-it-or-hate-it mod, but this is gonna be for the JL owners out there looking for some very aggressive front-end styling to the front-end of their JL while also getting a ton of protection. Now, touching on that protection, you get a stubby front bumper as well as a grille guard combo. This is gonna stick out, being able to take a hit on the trail and hold up a lot better than your stock components would. So, this is also gonna come with a number of different benefits. You have this stubby aspect of the front bumper, allowing a ton of room on the side for larger wheels and tires. You're getting two solid recovery points if you ever get into a sticky situation on the trail. And you also get a winch plate inside and the fairlead mount upfront. Not to mention you get that very aggressive styling. You get some riveted accents as well as the honeycomb inserts. And I personally think this looks very well and fits very well on the front end of our JL.So, this is gonna roughly be $650, making this one of your most affordable options for a grille guard of this style on the site. So, as we all know, the Grumper is very expensive, and that's really just because of the premium brand as well as being one of the only options like this on the site for a very long time. So, this is gonna be one of your more affordable options. So, if you're looking to keep it on a budget, but you're still looking for that form and function out of a grille guard of this style, then this is gonna be right up your alley. So, install is gonna be a light two out of three wrenches on the difficulty meter. You're gonna need to install a couple of support brackets, but it's gonna involve basic hand tools. So, speaking of the install, let's jump into that now.The tools that I use for my install, one impact wrench, a 3-inch extension, a 10-inch extension, an 18-millimeter, 13-millimeter, and 10-millimeter open-ended wrench, a 3/8ths-inch drive ratchet, 1/4-inch drive ratchet, the provided Allen key, a flat head screwdriver, an 18-millimeter, and 13-millimeter deep socket, a 13-millimeter shallow socket, an 8-millimeter, and a 7-millimeter deep socket, a T30 Torx bit, a T15 Torx bit, and a trim removal tool.So, to kick off this install, we're gonna start by taking off our upper splash guard. You will need a 5-inch screwdriver. I'm just gonna use a flathead screwdriver in order to take out this series of pop clips. Now, you can also use a trim removal tool. I find it a little bit easier with a flathead. Now, depending on your model, you're gonna need a 7-millimeter socket in order to take off the two bolts that are holding the outside of the splash guard. And you can do the same thing on the other side. Now, we can remove our upper splash guard, and then we can move on to the lower splash guard.Now, we can remove the two 8-millimeter bolts on either side of the underside of our splash guard. Do the same thing on the other side. So, after those are removed, we can take a trim removal tool and start removing the pop clips that are holding in our splash guard. After you have all of them removed, we can remove this lower splash guard. So, after we have taken off our splash guards, we'll have access to the inside studs. So, we're gonna remove the four nuts on either side of our frame horns using an 18-millimeter socket. I'm also using a small extension in order to give myself some room. Now, we can do that on either side of our front wheel. Now, we can do the same thing on the other side.So, after all those bolts are disconnected, we can go ahead and remove our front bumper. So, after we have our bumper off, we can go ahead and start removing our grilles. So we're gonna need to pop our hood. So, now we can use our flathead screwdriver to remove a series of pop clips that are holding on our grille. After those are off, we can pop our grille forward and fully remove that. So, in order to install our Apocalypse Grille, we will have to take off these radiator shrouds on either side. So, first, we need to take off our radiator support. We are gonna be reinstalling this. So grab a T30 Torx bit, and we can go ahead and remove those. So, now we can remove our radiator shroud, removing the two pop clips on either side with a trim removal tool, as well as the two T15 Torx screws in just a moment. After those pop clips are removed, we can take a T15 Torx bit and remove our Torx screws. And we can wiggle this shroud out and do the same thing on the other side.So, before we mount up our new grille and bumper combo, I did want to tell you guys a little bit about what benefits that you're getting out of this compared to the factory components and compare them side by side. So, first off, this is gonna be a lot more durable, made of plated steel with an epoxy finish, and a two-stage black powder coat finish. It's gonna resist any rust or corrosion on the metal as well as give you a very aggressive and off-road appearance. Now, being that your factory components are plastic, you still get a steel crash guard in the back of your bumper here. However, like I said, this is gonna be a lot more durable, and it's gonna be able to take a hit on the trail and hold its own a lot better than your factory components.So, you're getting a number of different benefits out of the grille as well as the bumper. First off, this bumper is gonna have a winch plate on it, capable of pulley and winch with a pulling capacity of up to 12,000 pounds. So, that is a perfect option if you're looking to add a winch down the line. You also get mounts for D-rings, and we will add those on in just a moment. So, those are gonna act as a great recovery point compared to your factory tow hooks, which... Those are gonna be a lot safer and more efficient than these. So, you're also gonna have all of these honeycomb sections that are gonna help out with styling as well as allow a ton of airflow into your radiator. Now, enough about these two side by side, let's go ahead and install our new one. So, now we're gonna reinstall our radiator support, but we will be sandwiching a support bracket for our grille in between up at the top here.So, first, I'm going to start by reinstalling the bottom and threading that in. Once that's most of the way threaded in, it will just sit there. I don't want to tighten them down just yet, then we can wedge our bracket in between, align that up, and reinstall our factory bolts. Now, with those started in, we can take our T30 Torx bit and tighten those down. So, now we can mount up the bumper part of our front bumper and grille guard combo. So, what I'm gonna do is just let that sit on the frame, then we're gonna have our D-ring shackle that we're gonna install through our frame rail. Now, what I'm going to do is just loosely install our hardware, so starting with our flat washer, and attach that to back, then our lock washer, and then our nut. Now, we're not gonna tighten anything down just yet. We want to just make sure that this is secured, so when we do the other side, it does not come loose. And we can do the other side.So, now I'm gonna take an 18-millimeter wrench and an 18-millimeter deep socket and just go ahead and tighten down these bolts. So, now we can mount up our grille guard, sitting it flat on our bumper and aligning it with the holes, also aligning it with this bracket. Now, with the two-button head bolts, your lock washer, and your flat washer, we're gonna go ahead and install those on our support bracket that's on our radiator support. So, now we can take our provided Allen key and go ahead and tighten those top two bolts down. So, now we're going to install our support bracket on our radiator support. Now, this is gonna be at the most outside point of your radiator support. I'm gonna be using a 13-millimeter socket to remove this first bolt here, then we can install your side-specific bracket, re-install that factory bolt. Before we go ahead and tighten that down, I just want to put our button head bolt with our two flat washers and our nylon lock nut on the outside. Now, we can take that same 13-millimeter socket, tighten down our radiator support bolt. Then we can take our provided Allen key and a 10-millimeter wrench and go ahead and tighten that down. And we can do the same thing on the other side.So, there's gonna be three bolt holes on the bottom side of your grille guard as well as the top side of your bumper. Now, we have our bolts, our provided bolts that we're going to install in those slots. It's gonna be one on either side and one in the middle. Then we can attach the lock nut and our flat washer on the other side. So, now we can go ahead and secure that down. And you're not gonna have a lot of room to work with. I currently have my hand in the fairlead mount. All right. We can do the same thing for the other side. So, after you have the nuts threaded on, we can take a 13-millimeter deep socket and an extension and a 13-millimeter wrench and go ahead and tighten those down. Move on to the middle, and then for our last one. After everything is tight, we can attach our D-rings. Now, we can close up our hood, and we are all set to go.So, that's gonna wrap it up for my review and install on the Barricade Apocalypse Grille Guard, fitting all 2018 and up JL Wranglers. For more videos like this, keep it right here at extremeterrain.com.

      Product Information

      Features, Description, Reviews, Q&A, Specs & Installation

      Features

      • Aggressive Angular Off-road Appearance
      • Fabricated Steel Plate Construction
      • Durable Black Powder Coated Finish
      • Stubby Width Front Bumper Included
      • Built-in Winch Plate
      • High Strength D-Ring Mounts
      • Direct Bolt-On Installation
      • Fits 2018-2024 Jeep Wrangler JL Models, Excluding 2024 Rubicon and 3.0 V6 EcoDiesel Models

      Description

      Designed for Off-Road Use. Add an aggressive off-road appearance to your 2018-2024 JL Wrangler by upgrading to a Barricade Apocalypse Grille Guard and Stubby Bumper. The Grille Guard provides excellent protection from all types of trail hazards and features an angular, hard core appearance perfect for Mad Max himself. The compact design of the Stubby Bumper yields the extra tire clearance needed for approaching steep inclines or when negotiating large obstacles. Also included is a built-in winch plate that is capable of supporting a 12,000 lb. winch and two high strength D-Ring mounts, D-Rings not included.

      Heavy Duty Construction. Barricade Off-Road manufactures their Apocalypse Grille Guard and Stubby Bumper from heavy duty, fabricated steel plate for superior strength and rigidity. The D-Ring mounts are bolted into place for strength. Barricade then completes the entire Bumper and Grille assembly in a 2 stage finish using epoxy pre-coating and high-grade textured black powder coating for durability and long lasting corrosion resistance.

      Bolt-On Installation. Barricade engineered their Apocalypse Grille Guard and Bumper to be a direct bolt-on replacement for the original stock grille and bumper reusing the factory mounting points. There is no cutting or modifications required for a clean straight forward install. Installation can be completed in about three hours with just basic hand tools and the help of a friend.

      Application. This Barricade Off-Road Apocalypse Grille Guard with Stubby Bumper is specifically designed for use on 2018-2024 Jeep Wrangler JL models, excluding 2024 Rubicon and EcoDiesel models.


      Barricade Off-Road

      Fitment:

      Details

      Barricade J123339-JL

      CA Residents: WARNING: Cancer and Reproductive Harm - www.P65Warnings.ca.gov

      Installation & What's in the Box

      Installation Info

      What's in the Box

      • (1) Grille
      • (1) Bumper
      • (2) D-Ring Brackets
      • (1) Middle Grille Bracket
      • (2) Corner Grille Brackets
      • (8) M12x1.75x40mm Bolts
      • (16) M12 Flat Washers
      • (8) M12 Lock Washers
      • (8) M12 Nuts
      • (2) M8x1.25x40mm Bolts
      • (3) M8x1.25x30mm Bolts
      • (10) M8 Flat Washers
      • (5) M8 Lock Nuts
      • (4) M6x1.0x20mm Screws
      • (8) M6 Flat Washers
      • (4) M6 Lock Nuts
      • (2) M6 Lock Washers
      • (1) Allen Wrench
      4.3

      Customer Reviews (24)

        Questions & Answers

        10 More Questions

        Will It Fit My Wrangler

        • JL Rubicon 2 Door - 18, 19, 20, 21, 22, 23
        • JL Rubicon 4 Door - 18, 19, 20, 21, 22, 23
        • JL Rubicon 4xe 4 Door - 21
        • JL Wrangler 2 Door - 18, 19, 20, 21, 22, 23, 24
        • JL Wrangler 4 Door - 18, 19, 20, 21, 22, 23, 24
        • JL Wrangler 4xe 4 Door - 21, 22, 23, 24

            Related Wrangler Categories