FREE 1 to 3-Day Delivery on Orders $119+ Details

Top Sellers for Tacoma


How to Install Barricade 9500lb Winch w/ Synthetic Rope Kit Part on your Wrangler

Shop Parts in this Guide
- Barricade 9,500 lb. Winch with Wireless Control (Universal; Some Adaptation May Be Required)
- Barricade 9,500 lb. Winch with Synthetic Rope and Wireless Control (Universal; Some Adaptation May Be Required)
- Barricade 9,500 lb. Winch with Synthetic Rope (Universal; Some Adaptation May Be Required)
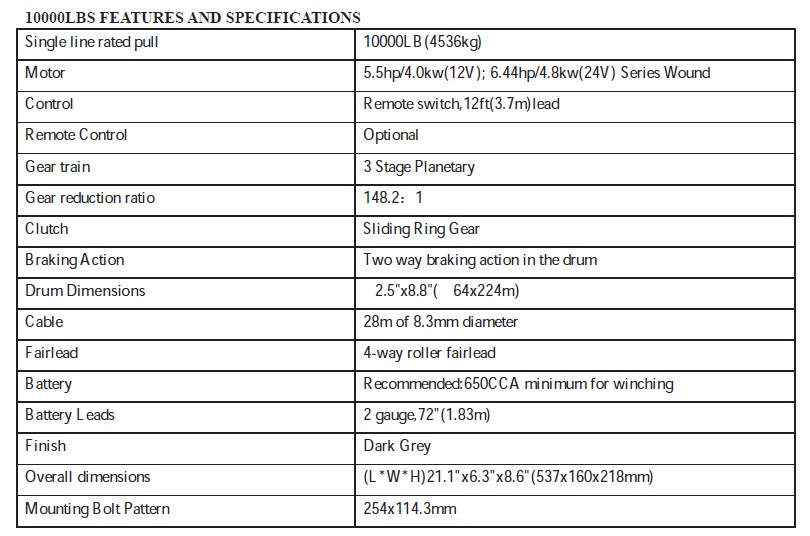
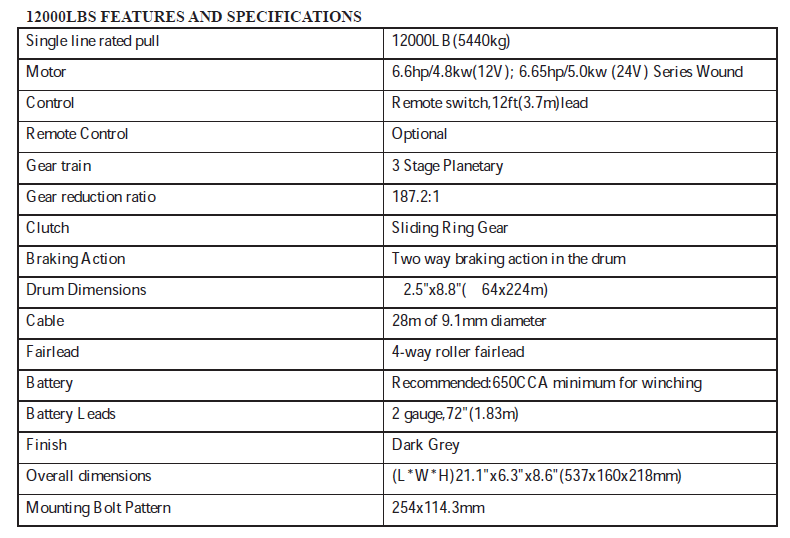
- Barricade 12,000 lb. Winch with Synthetic Rope (Universal; Some Adaptation May Be Required)
- Barricade 9,500 lb. Winch (Universal; Some Adaptation May Be Required)
- Barricade 12,000 lb. Winch (Universal; Some Adaptation May Be Required)
INSTALLATION
MOUNTING YOUR WINCH
1. a) The winch is to be mounted into a suitable steel mounting frame using the 4 point foot mounting system in either a horizontal or vertical plane.
b) It's very important that the winch be mounted on a at surface so that the three sections (motor, cable drum and gear housing) are properly aligned.
c) Before commencing installation ensure the mounting facility being used is capable of withstanding the winches rated capacity.
d) The tment of winches and/or a fronatl protection system may a ect the triggering of SRS air bags. Check that the mounting system has been tested and approved for winch tment in the airbag equipped vehicle.
2. Winch mounting frames and /or Frontal Protection Systems are suggested to suit most popular vehicles. Winch frames are packaged with detaeild tting instructions.
3. Should you wish to manufacture your own mounting plate the dimensions below will assist. A steel mount plate 6mm thick is recommended. Fasteners should be steel high tensile grade 5 or better. A poorly designed mount may void warranty.
4. The winch should be secured to the mounting with 3/8"UNC x 1-1/4"stainless steel bolts and spring washers provided.
5. The fairlead is to be mounted so as to guide the cable onto the drum evenly.
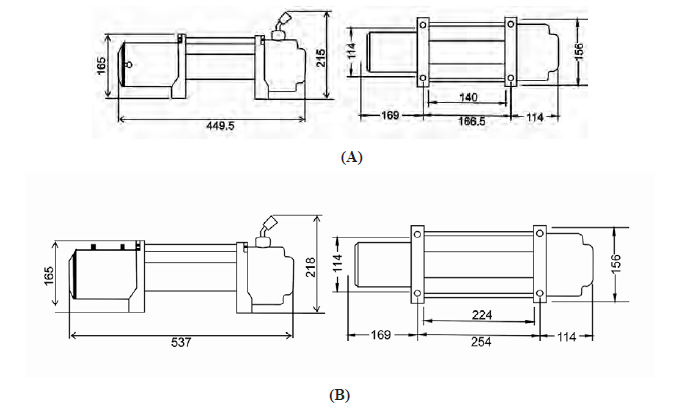
A is dimensions of 6000lbs, while B is dimensions of 8000lbs-13000lbs.
LUBRICATION INSTALLATION
All moving parts in the winch are permanently lubricated wit high temperature lithium grease at the time of assembly. Under normal conditions factory lubrication will su ce. Lubricate cable periodically using light penetrating oil. Inspect for broken strands and replace if necessary. If the cable becomes worn or damaged it must be replaced.
CABLE INSTALLATION
Unwind the new cable by rolling it along the ground, to prevent kinking. Removed old cable and observe the manner in which it is attached to the drum ange.
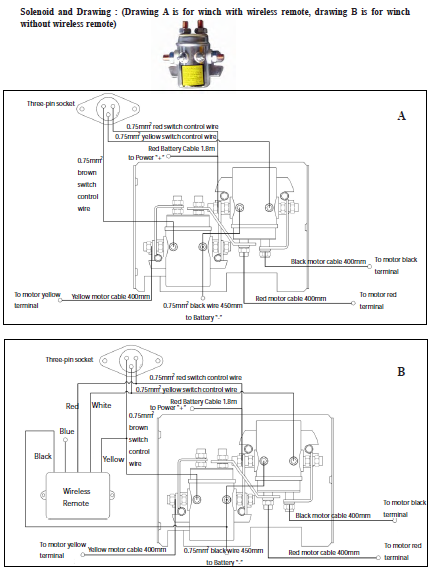
ELECTRICAL CONNECTION
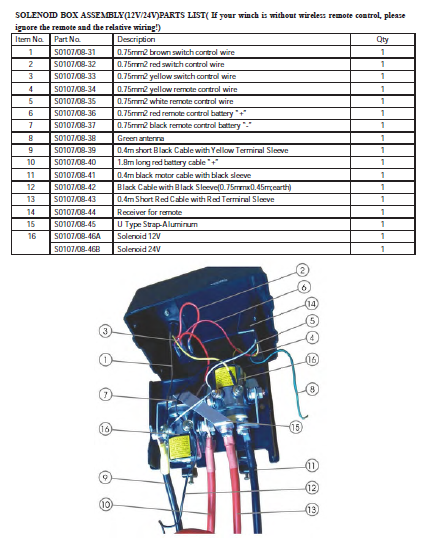
For normal self -recovery work, your existing electrical system is adequate. A fully charged battery and proper connections are essential. Run the vehicle engine during winching operations to keep battery charged. Pay close attention to proper electrical cable connection as follows (refer to Diagram1)
1. Short red cable (B') connecting to the red terminal (B) of the motor.
2. Short black cable with yellow jacket (C') connecting to the yellow terminal (C) of the motor.
3. Short black cable with black jacket (D') connecting to the black terminal (D) of the motor.
4. Thin black cable(a') connecting to bottom terminal (A) of the motor.
5. Long black cable (1.8m), one terminal (A') connecting to the bottom terminal (A) of the motor, and the other terminal negative (-) connecting to nega tive (-) terminal of battery.
6. Long red cable positive ( ) connecting to positive ( ) terminal of battery.

NOTE:
1. Your battery must be kept in good condition.
2. Be sure battery cables are not drawn taught across any surfaces, which could possibly damage them.
3. Corrosion on electrical connections will reduce performance or may cause a short.
4. Clean all connections especially in remote control switch and receptacle.
5. In salty environments use a silicone sealer to protect from corrosion.
WINCH OPERATION
SUGGESTION:
The best way to get acquainted with how your winch operates tios make a few test runs before you actually need to use it .Plan your test in advance. Remember you can hear your wnich as well as you can see it operate. Get to recognize the sound of a light steady pull, a heavy pull, and sounds causedb y load jerking or shifting. Soon you will gain con dence in operating your winch and its use will become second nature to you.
OPERATING:
1. Ensure the vehicle is secure by applying the parking brake or chocking the wheels.
2. Pull out the winch cable the desired length and connect to an anchor point. The winch clutch allows rapid uncoiling of the cable for hooking onto the load or anchor point. The shifter tab located on the gear housing of the winch operates the clutch as follows:
a) To disengage the clutch, move the clutch shifter tab ttohe "FREESPOOL" position. Cable could be free spooled o the drum.
b) To engage the clutch, move the clutch shifter tab into the "ENGAGED" position. The winch is now ready for pulling.
3. Recheck all cable rigging before proceeding .
4. Plug in the winch hand control. It is recommended that the winching operation takes place from the driver's position to ensure safe operation.
5. To commence winching operation, start vehicle engine, seclet neutral in transmission, maintain engine speed at idle.
6. Operate the hand control or the wireless remote control until the vehicle has been retrieved. Regularly check the winch to ensure cable is winding onto the drum evenly.
Note:
1. Never winch with your vehicle in gear or in park, which would damage your vehicle's transmission.
2. Never wrap the cable around the object and hook onto the cable itself. This can cause damage to the object being pulled, and kink or fray the cable.
3. Keep hands, clothing, hair and jewelry clear of the drum area and cable when winching.
4. Never use the winch if the cable is frayed, kinked or damaged.
5. Never allow anyone to stand near the cable or in line with the cable behind the winch while it is under power. If the cable should slip or brake, it can suddenly whip back towards the winch, causing a hazard for anyone in the area. Always stand well to the side while winding.
6. Don’t leave the switch plugged in when winch is not in use.
CHECK THE WINCH CAREFULLY AND THOROUGHLY BEFORE OPERATING!
MAINTENANCE
It is highly recommended that the winch be used regularly (once a month).Simply power the cable out 15m,free spool 5m and then power back in .This will keep all components in good working condition so that the winch can be relied on when needed. Contact your authorized ouettl for technical assistance and repairs.
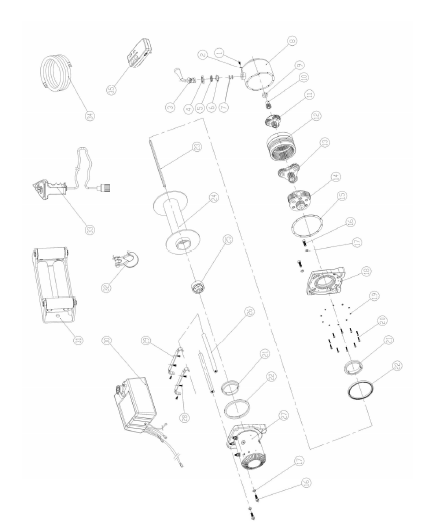
SPARE PARTS:
A comprehensive range of spare parts is available. Please kindly contact the distributor or the local retailer.
WINCHING CAPACITY
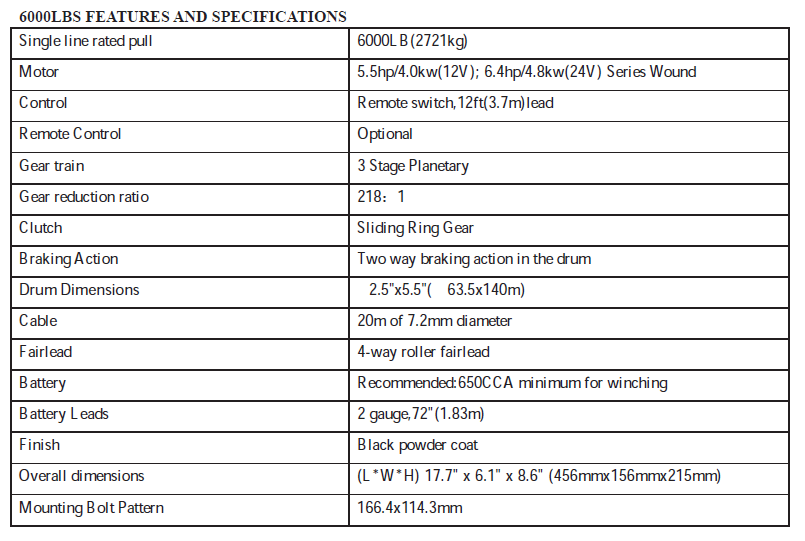
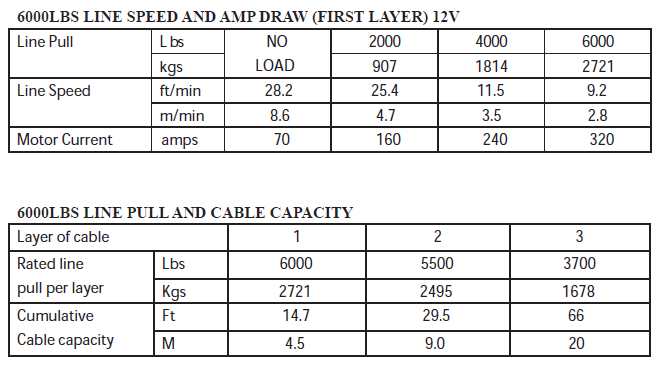
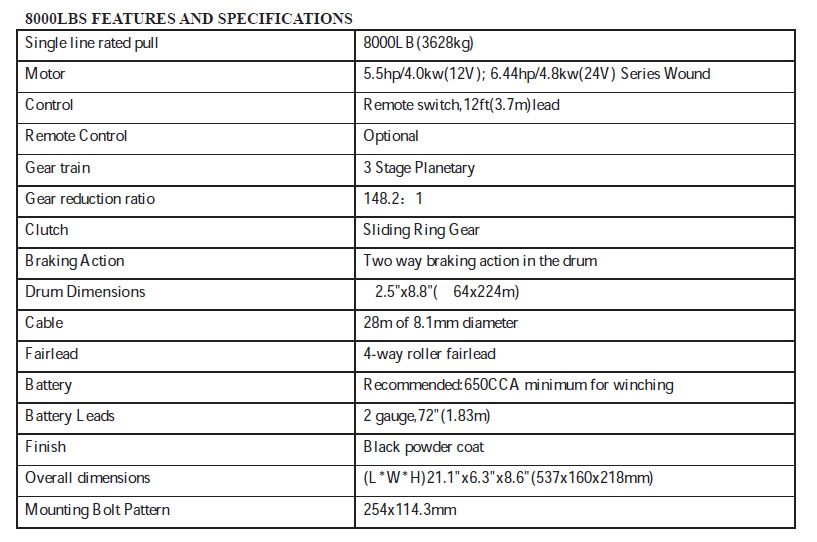
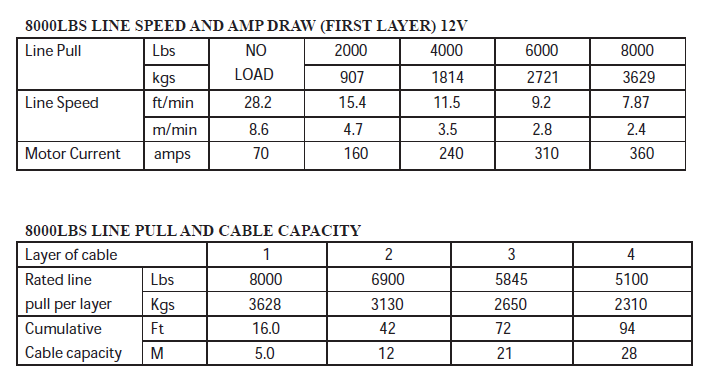
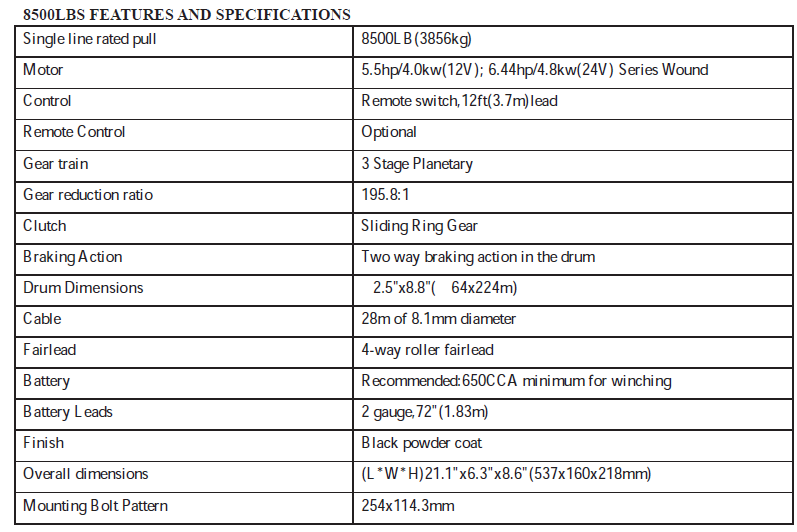
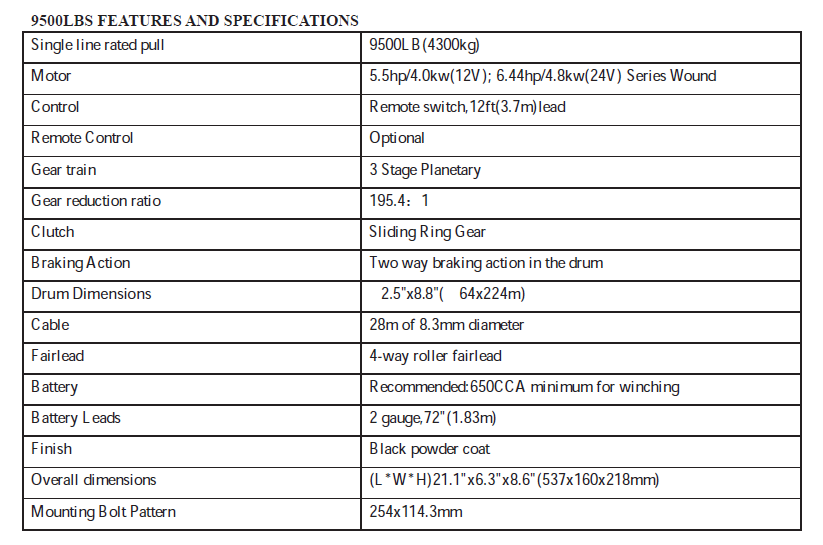
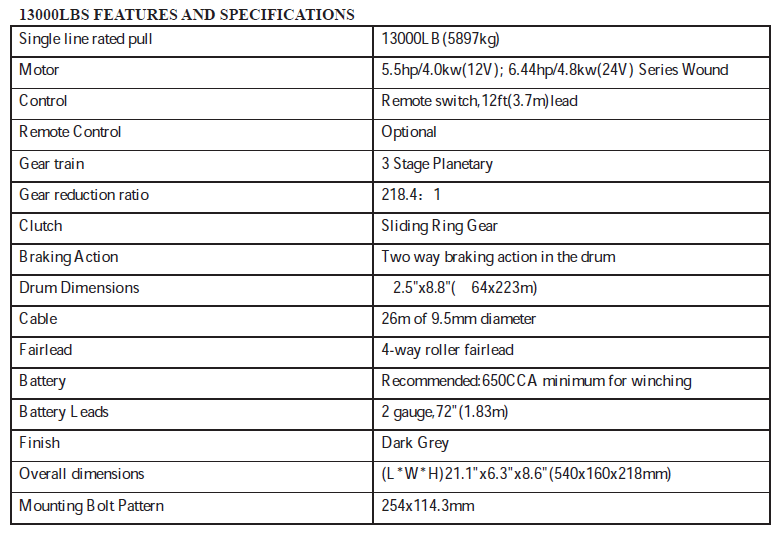
1. This winch has a capacity of 6000LB/8000LB/8500LB/9500LB/10000LB/12000LB/13000LB.
2. Pulling capacity is reduced as the incline increases.
3. Winch is not intended as a load securing device.
NOTE:
The safety precautions and instructions discussed in this mnaual can't cover all possible conditions and situations that may occur. It must be understood by the operator that common sense and caution are factors, which cannot be built into this product, but must be applied by the operator.