Talk to a Wrangler Sales Tech
1-877-870-8556
M-F 8:30A-11P, Sat-Sun 8:30A-9P
Logo Image
$20K Sweeps! 10 Chances to Win! Enter Daily >

RedRock High Clearance Cat-Back Exhaust (18-24 3.6L Jeep Wrangler JL 4-Door)

Item J132857-JL
Verify parts fit and get product recommendations.
Wrangler Sales Techs: Connect Now M-F 8:30A-11P, Sat-Sun 8:30A-9P
$0.00
On Sale

$236.99 (kit)

FREE Shipping Market Price $364.99 You Save 35% ($128.00) Up to 10% off for Military & First Responders! See Details

Will this fit your Vehicle?

Select a different vehicle Help?
Update or Change Vehicle
Ship to: Enter Zip
Sorry, please enter a valid US or CA postal code
We're sorry, zip can't be updated at this time.
    Create a list
    Add to New List

    Saved - View your saved items

    We're sorry. We couldn't save this product at this time.

    or use

    Get a $30 Prepaid Visa Card!

      Product Videos

      Hi, guys. So, today we're checking out the RedRock 4x4 High Clearance Cat-Back Exhaust System, fitting all 2018 and newer 4-Door JL Wranglers with that 3.6-Liter V6.Now, if you're in search of an affordable exhaust system that's gonna give you a lot of off-road functionality and create a more aggressive sound out of that 3.6-Liter, then this is going to be a great choice to take a look into. So, right off the bat, you can tell that this is going to open up a lot of space in the back, perfect for that off-roader or that weekend warrior that's doing a lot of technical off-roading and wants to minimize any exhaust damage and maximize their departure angles and their clearance while they're out on the trail. Now, this exhaust system is also going to do a really good job at opening up a lot of airflow and freeing up a lot of that restriction, creating a deeper sound, a deeper tone, and a more aggressive noise out of that 3.6-Liter.Now, speaking of sound, I'm gonna give this a three out of five on the loudness meter with one being completely soft, and five being incredibly loud. Now, this is going to sit in the middle. It will increase the volume, but what it's really gonna do is deepen that tone and create some of the throaty noise that you'd want out of an exhaust system without getting too raspy. As far as interior cab noise goes, this is not going to have a lot of drone and you're not really gonna hear it unless you get on the pedal. So, if you do like to hear your exhaust system from time to time, this is a great choice to take a look into. And this is also going to help out with some performance gains as far as horsepower, torque, and throttle response go, especially in that higher RPM range.Now, like I mentioned before, this is going to be incredibly affordable at roughly $250, which is very affordable for a cat-back exhaust system. Now, in comparison to other options on the page, some of the options that will be a little bit more expensive are usually gonna be made out of a higher quality 304 stainless steel in comparison to the 409 that we have here. Some other choices may have a larger muffler in the back with a dual outlet or a single outlet, and those are usually gonna be for somebody who wants more style than function. In my personal opinion, I think if you're looking for a very functional, a very high clearance cat-back system that tucks high and tight up against that frame grille, that's going to give you a good sound at a very affordable price, then this is going to be a great choice.Now, as far as install goes, I'm gonna give this a two out three wrenches on the difficulty meter. You will need a little bit more mechanical know-how in order to do this because this is a full cat-back system. However, it is pretty easy for a two out of three. You're gonna need some very basic hand tools to get the job done and probably about two hours' worth of your time. So, speaking of that install, let's jump into that now.The tools that I used for my install were an impact wrench, a 10-inch extension, a ratchet, 13-millimeter swivel socket, 13-millimeter ratcheting wrench, 13-millimeter deep socket, 15-millimeter deep socket, an exhaust hanger removal tool, and PB B'laster.So, our first step to removing our axle-back is to remove the hangers. Now, I personally like to remove the hanger from the frame instead of removing the axle-back from the isolator itself. There's a little bit more room to work with, especially with the axle-back being so big. So, for this, you're gonna need a 13-millimeter ratcheting wrench and a 13-millimeter socket or a swivel socket. Now, there's gonna be two bolts on the hanger on each side. So, we're gonna have one that's mounted to the frame and then one that's mounted to the frame bracket that's up and a little bit hard to see. I'm gonna start with the one on this side that goes into the direct side of the frame. I'm gonna use that 13-millimeter ratcheting wrench. We're gonna go ahead and remove that. Now, for this, you'll be able to see the back of the bolt. It's up on that bracket up at the top. I'm gonna be using a 13-millimeter swivel socket and a 10-inch extension to go over the sway bar to reach the head of the bolt.Now, once those two bolts are removed, you could probably see that there is a little hook here. Now, the hanger will stay in place if this is hooked on to that frame bracket. So, we're gonna do the same thing on the other side and leave this still hooked into that bracket. Now, because there's a little bit more room on this side, you can go ahead and use that 13-millimeter swivel socket with the extension on this side bolt here. With those hangers still hooked into the frame brackets, we can loosen up our clamp at the back of our axle-back using a 15-millimeter socket. What we can do at this point is now unhook those hangers from the frame brackets and wiggle our exhaust off.So, now that we have our axle-back portion off, we do need to take off our cat-back piping. I'm gonna start at the front with this clamp up here. I'm gonna be using a 13-millimeter socket. It may differ depending on what hardware that you have there. You may need a 15-millimeter socket. All right. So, once that is loose, what we can do at this point is disconnect the hanger from the isolator. I'm gonna use a little bit of PB B'laster and a hanger removal tool. So, this hanger is right on the frame over at the side, so I'm just gonna hit it with a little PB B'laster to help it go through. And it is going to be tight here. That's why I loosened everything up beforehand. We can disconnect it and squeeze it out. All right. So, we can just let it hang on the axle for a second before we completely disconnect the front. You may need to loosen up the clamp just a little bit more. Once that's loosened up enough, we can wiggle it off of that cat piping. So, ours was giving us a little trouble, so what I did was just took out that bolt. Then we'll be able to widen that clamp to get that off of there. So now that that's disconnected, we just have to wiggle this out. So, I'm just going to push it completely back to clear that front cross member there. And then once it's cleared, we can just wiggle it out from the axle side.So, before we hop into the rest of the install, I do wanna stop down and tell you guys a little bit more about this new RedRock exhaust system, how it compares to the factory one, some of the similarities and the differences, and how this is going to benefit your rig a lot better than the factory system.Now, starting off with just a brief overview of our factory system, we have a large, big, bulky, and restricted muffler in the back. It's gonna cause a lot of restriction and it's not going to allow a lot of clearance, considering that is huge mounted up underneath the back of your Wrangler. This is also gonna have a single outlet and it's going to lead into the rest of the cat-back piping with that resonator up at the front. That's just going to cause a lot more restriction, it's going to quiet the sound of the 3.6-Liter down a lot and it's just not going to allow the best airflow, especially with this pinch at the back of the axle-back that goes over the axle here. As you can tell, that is pinched. Again, that's going to cause a lot of restriction, less airflow, less performance, less sound.Now, we're moving over to this option. You're not getting any of that. We're gonna have a medium-sized muffler up at the front that's going to be more of a straight-through style, it going to be a little bit baffled. However, it is going to be a lot louder, considering that we don't have a large muffler and a resonator on our new system here. It's going to be mandrel bent piping, 2.5-inch all the way back. And you're not getting a muffler at the back, you are just getting a cutoff tailpipe that is going to tuck high up against the frame and stay out of the way. Now, this exhaust system is going to offer a lot more clearance considering that it is very simple, very to the point. You're not gonna have a large muffler in the back, perfect for the off-roader. Now, the big difference really comes down to the mufflers, but it also comes down to the construction as well. Our factory exhaust system is made of a steel material. As you can tell, it is already starting to show its age even though it is a brand new JL. They do tend to rust and wear out over time. With this new exhaust system by RedRock, this will be made of a 409 stainless steel material. Stainless is going to hold up a lot better in the long run, especially if you take care of it. So, this is going to last you a lot longer of a lifespan than your factory exhaust and, overall, it's just going to look a lot nicer as well.Now, this is also going to come with all the clamps, the hangers, and everything that you need in order to get it installed. And, overall, it is a high-quality exhaust system. Even though it is pretty affordable, you're getting a lot of benefits out of this. You're gonna get some high-quality weld and a high-quality construction with this, again, definitely a big step up from the factory exhaust system. So, what do you say we go ahead and put it together and put it on our JL?So, the one thing that we do have to transfer over to our new exhaust system is this hanger with the isolator over on this side that is going to allow the tailpipe to hang in place. So, I'm just going to take a little bit of PB B'laster to help get this thing off and we're gonna take it off our factory muffler. I'm using an exhaust hanger removal tool. Splurge it in the back there, push it all through. You could also use a pry bar to do this. But after it's off of our factory muffler, we can move over to our tailpipe making sure that it's oriented in the correct way. We're gonna slide that on to our new piping. It's probably already gonna have some lubricant on there, so it should be easy to pop on. I do like the fact that this is a factory-style hanger. It's gonna have a little tapered edge here, so it is going to hold that hanger in place pretty well. So, now with that being said, we can go ahead and head over to the Jeep and start piecing together our exhaust.So, I'm gonna start up at the front and start building our way back. Starting with our muffler, we're gonna get that around the flange there and screw down with our factory clamp. So, with this, you'll need to reinstall that bolt that we took out. And I'm just gonna snug this out just for the time being. But we don't want to completely tighten everything down just yet because we still want a little bit of movement when it comes to fitting our exhaust system. So, next with our straight piece of piping, what we're gonna do is slide that on, making sure that that clamp is on there as well, and then we can take our next piece of piping making sure that we have a clamp on here too. And I always like to orient the clamps in a way that they're easy to reach. So, I'm just facing that nut down, then slide this into place. And once that is completely on there, what we can do is slide this into that isolator that we have on the side of our frame. There should be a little of PB B'laster still left in there to help if you need to add a little bit more to get that through, it might be helpful. Then we can work on the over axle pipe.So, what we can do next is take our tailpipe, go over the sway bar making sure that we have that clamp on here already. What I also did was just put support underneath the muffler to raise the exhaust system in a way that it will be more or less correctly sitting on the Jeep so we can get an idea on where these parts will sit. So, once that's over the sway bar and on to that over axle pipe, we can wiggle that on, get our exhaust hanger into place and start to secure it down with those factory bolts. So, at this point, now that we're back here, what we can do is actually tighten up that hanger that we just installed. I'm gonna use that 13-millimeter ratcheting wrench that we used at the beginning to take it off. So we can also use the 13-millimeter swivel socket and extension for that top bolt. So, now that we have the exhaust supported at the muffler as well as this hanger, we can start to tighten everything down. I'm gonna use a 13-millimeter socket in order to tighten down the three clamps that we have on each of the pipes. I just wanna make sure that it is sitting over these cutouts here. Now, we can move on back. Then last but not least, once we get to the front with our factory hanger, I'm gonna use that 13-millimeter socket again in order to tighten it down. So after everything is all tightened up, then you're all set to go.So, that's gonna wrap it up for my review and install. Make sure you like and subscribe. And for more videos and products just like these, always keep it right here at extremeterrain.com.

      Product Information

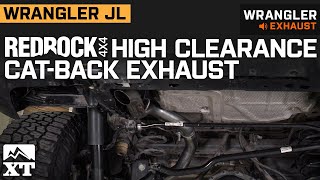
      Features, Description, Reviews, Q&A, Specs & Installation

      Features & Specs

      • High-Clearance Cat-Back Exhaust
      • Hi-Tuck Design for More Ground Clearance
      • Designed to Clear Aftermarket Suspensions
      • Free Flowing Mandrel-Bent Tubing
      • Stainless Steel Construction
      • Straight Through Muffler
      • Direct-Fit Bolt-on Upgrade
      • Fits 2018-2024 3.6L 4-Door Jeep Wrangler JL Models

      Description

      Extra Ground Clearance. RedRock 4x4's High Clearance Cat-Back Exhaust System is the ideal upgrade for 2018-2024 4-door JL owners who are looking to improve the power, performance and ground clearance of their 3.6L V6 Wrangler. Perfect for extreme trail adventures, this Cat-Back features a hi-tuck design that provides increased ground clearance, while allowing additional clearance for most aftermarket suspension kits.

      Stainless Steel Construction. RedRock 4x4 manufactures its High Clearance Cat-Back from mandrel bent, 2.5-inch diameter, stainless steel tubing for durability and corrosion resistance. This Cat-Back exhaust system features a straight through muffler that ends with a slant cut exhaust tip for impressive good looks and sound.

      Direct Bolt-On Installation. RedRock 4x4 engineered its Cat-Back Exhaust to be a direct upgrade replacement for your Wrangler's factory exhaust. This Cat-Back Exhaust Kit easily bolts up in the stock location with no cutting, drilling or modifications required for a straight forward install that can be completed in about 2 hours.

      Application. This RedRock 4x4 High Clearance Cat-Back Exhaust is specifically designed to fit 2018-2024 4-Door Jeep Wrangler JL models equipped with the 3.6L V6 engine.

      Fitment:

      Details

      RedRock J132857-JL

      CA Residents: WARNING: Cancer and Reproductive Harm - www.P65Warnings.ca.gov

      Installation & What's in the Box

      Installation Info

      What's in the Box

      • (1) Muffler
      • (1) Exhaust Tube
      • (1) Over-Axle Tailpipe
      • Mounting Hardware
      4.6

      Customer Reviews (91)

        Questions & Answers

        10 More Questions

        Will It Fit My Wrangler

        • JL Rubicon 4 Door - 18, 19, 20, 21, 22, 23, 24
        • JL Wrangler 4 Door - 18, 19, 20, 21, 22, 23, 24