Talk to a Gladiator Sales Tech
1-877-870-8556
M-F 8:30A-11P, Sat-Sun 8:30A-9P
Logo Image
$20K Sweeps! 10 Chances to Win! Enter Daily >

MBRP Armor Plus High Clearance Filter-Back Exhaust System; Turn Down (21-24 3.0L EcoDiesel Jeep Gladiator JT)

Item JG6850
Verify parts fit and get product recommendations.
Gladiator Sales Techs: Connect Now M-F 8:30A-11P, Sat-Sun 8:30A-9P
$0.00
On Sale

$199.99 (kit)

FREE Shipping Market Price $229.99 You Save 13% ($30.00) Up to 10% off for Military & First Responders! See Details

Will this fit your Vehicle?

Select a different vehicle Help?
Update or Change Vehicle
Ship to: Enter Zip
Sorry, please enter a valid US or CA postal code
We're sorry, zip can't be updated at this time.
    Create a list
    Add to New List

    Saved - View your saved items

    We're sorry. We couldn't save this product at this time.

    or use

      Product Videos

      Merideth: If you're in search of an affordable exhaust that will enhance your off-road ability and also offer some good but not over-the-top sound, this MBRP 3-Inch XP series high clearance filter back turn-down exhaust system will be a great pick for your 2021 or newer 3.0 EcoDiesel Gladiator. Now, getting right into sound, this will be a two out of five on the loudness meter with one being completely stock and five being wake-the-neighbors loud.The sound level here will make it a good option for the Gladiator owner not looking to be overpowered with volume but wants a deeper tone to the exhaust and also a comfortable cab environment. Now, its DPF system will also be a good option for the JT owners who are taking their truck off-road since this will tuck higher up than the average system allowing a good amount of clearance underneath the rear end of the truck to minimize any exhaust trail damage while you're off-roading. This system will be made of 3-inch diameter T409 stainless steel piping for smooth and direct airflow and also some great rust resistance.Now, this will mount up from the diesel particulate filter back, so you won't have to worry about modifying the exhaust when it comes to the emissions. This will also have a direct bolt-on configuration and will come with factory-style hangers and the clamp that you need for install, making it super hassle-free. Like I mentioned before, this is a super affordable choice for a DPF back exhaust at roughly $200.Now, in comparing this to some other options in the category, this will offer good performance in the fact that it's going to be a high-tuck system or a turn-down system, great for the avid off-roader, and it's made from quality materials, so you don't have to do much compromising.Now, other systems may have a different build with a side exit, different colored tips, or even made of a different material like 304 or even aluminized steel. Now, I think if you're looking for good sound and good clearance for your next trail ride or just everyday adventure, then this is gonna be a great choice.Now, install will be a two out of three wrenches on the difficulty meter, taking you roughly two hours to get the job done with some pretty basic hand tools. Now, one of our customers here has installed this on their JT and is gonna walk you through what that process looks like right now. That wraps it up for me. Let's go ahead and get into it.Man: Okay. So, these are the tools that I used. Used some mechanics gloves, a flashlight, 15-millimeter socket, 3/8-inch wrench, a 13-millimeter socket, and a 10-millimeter socket with an extension. I also used a 1/2-inch ratchet with the 21-millimeter socket and a 21-millimeter wrench and a 13-millimeter wrench. Used this to help get the exhaust pipe apart. I had the instructions. Also used the spare tire remover, the prank for that out of the Gladiator, and just a shop rag. And then just to loosen up those hangers on the exhaust, I used the penetrating lube.All right. The first step is to apply penetrating lube to the exhaust fasteners. So, I'm gonna go ahead and spray that here. Got a little bit of a leak. And then go back to the next one. All right. Here's the next one. We're gonna spray it up on here. Got a little drip there. And then there's one more, the last one's right up here. Here's the last one. I think we got the light better on there. All right.Okay. So, we got our penetrating lube on each of the fasteners. We'll let that sit for a minute, and we're gonna take down the spare tire. So, we're gonna connect these rods. They just clip together, and then they slide right in the back under the tailgate here to go this way. You wanna have the open end going in, and then it goes in at a little bit of an angle. There's a little notch in your bumper that kinda shows you the angle that that should be.So, then you can start cranking, and this will lower down your spare tire. And drop it all the way down towards even laying on the ground. All right. So, now we're gonna try and get this little hook outta here. If you turn it sideways, usually you can pull it through once you get down on the ground. And so it just comes through, has a spring on the end. All right. So, our spare tire is loose now, and we'll pull it out of the way. Stay out of the way.Okay. The next step is to loosen and move the rear track bar. So, I have a 21-millimeter wrench and a 21-millimeter socket. We're gonna loosen this up. I did get it a little bit loose before I started, and this is not the stock bar. It is one for my lift. So, it might look a little bit different on yours. We're gonna drop this down and out of the way. Just look at that. Just drops all on its own.Okay. Next, we're gonna remove the heat shield for the spare tire. This is a 10-millimeter socket. Remove by hand now. All right. These next two look like they're kinda tucked up under here. I'll do that one by hand now. And it is right up here. Little bit easier access than the last one. All right. That one was a nut on the end of a bolt, it looks like, and it feels like there is one more after that.All right. That is loose. The next step is to remove the nuts off of the exhaust flange here. So, this is a 13-millimeter socket. You can see there's a gasket in there where the new exhaust came with a new gasket. All right. Wrap this one up by hand. How these exhaust brackets are meant to move around a little bit, so they're rubber. Let's see if we can flex this a little bit better to come out.Okay. So, I've got a little mini pry bar I'm gonna try and pull these apart with, because I think that once I can get these separated, I can pull that exhaust and move it a little bit. So, let's see how this works. Get them to slide out. So, what I'm gonna do to try and make this a little bit easier on myself, I am going to undo this front part of the exhaust, these two bolts up here, right up here.Let me see if we can drop down this exhaust a little bit and help get it out of the way. This is a 13/2, came loose really easy. Well, look at that. You see how much that move? That is mostly out of the way now. Let's see if that gives us enough room over here. All right. So, what I'm gonna do is I'm gonna look at maybe loosening up the ones that go to these exhaust clamps too.Now, the reason I'm doing this is the instructions suggest maybe cutting it, and I'm trying to get this done without cutting it. All right. Now, you can see a little better now. Now, gonna get these bolts out. All right. So, that slid right off. Those two bolts undone. So, now that should make this a lot easier. I might just be able to slide these four now. Let's see. All right. So, I just noticed something that's holding this up. There is a plate in there.Okay. So, you can see right up in here, this exhaust bracket, it looks like it's meant to hit this metal bar to keep it from sliding forward. And so I'm going to undo this bracket to try and drop this down and get it out of the way of this metal bracket. I think we're looking at another 13-millimeter socket to get those loose. I got the second one out. Whoa, look at that. So, this thing just came way loose. Let's see here.So, now it just has one hanger up there. Let's see right there. So, I'm thinking if we just push this forward, it'll come loose. Okay. Now, the whole system is loose. Now the question is, can we trust it enough to get it down and out without cutting it still? So, now I do have a 3-and-1/2-inch lift. And so that's probably what's making this easy, easier, and it'll just slide in straight out the back.All right. So, now we have the stock exhaust removed, and I think that's going to be the more challenging part, just because there's more pieces to it. Next up, installing the MBRP exhaust. So, here's the under part without the exhaust. Up in there, you can see the...right up there, the exhaust bracket that you can slide it into. Those came out really easy with the penetrator in there. And so we are going to get this new system installed.Okay. Next step, we need to reinstall the track bar and the spare cover. I'm supposed to get this track bar up here again. There we go. All right. Back up here. All right. So, we have our spare tire protector up there and our suspension linkage back up. Okay. So, the first step to hang this new system is we're gonna install the hanger bracket loosely, so this, and get it back up in place. So, this is gonna fit across here, and then this is your hanger bracket.We're gonna slide that on, same direction it came off. The orange kinda points to the rear if you mix that up. I'm doing these loosely, there's a little bit left on these, then come back and tighten them. Okay. So, you can see the end of the pipe that I just installed with the clamp on there, and then we've got our hanger bracket right up above it, right up there. So, now we're gonna see if we can slide this in here. How much work is this gonna take? I don't know.Only we shall see. All right, well, it takes a little bit of work. Gotta get this thing in here. It is possible. There we go. Got it. Okay. So, while we're sliding, we can try and get it to line up with this. And now we have pipe connected. My clamp ended up sliding down. Let me bring that back around here, line that up so that it's easy to get to the exhaust hanger up here. Let me try and get this up here loosely.Okay. We're gonna connect the exhaust flange now. So, we need to get this gasket in between here first. And this is the hardware provided with the exhaust, comes with a couple washers and lock washers on it. And, also, we got the gasket that came with the new system. I'm just gonna try and get this gasket up in here so that it can be stuck between these two. Bring it up. So, get these nicely lined up. There we go.I've got a 13-millimeter wrench and socket to get these going. Okay. And then I could loosen up this one on the front part of the exhaust just to help me get it on. And so I'm gonna tighten these back up. Now, we just need to go through and torque everything that's loose. These ones, I just tight. So, I'm going to tighten up the hanger up here, kinda left it kinda loose.All right, got those on. And then I'm gonna go, and we're gonna tighten up these two up here with the clamp here. All right. I got those torqued down. Finally, we have our... We need to do the clamp. Okay. So, finally, we're gonna tighten up this pipe clamp, and we will have the new system ready to go. Then we'll just need to put the spare tire back on and see how it sounds. Clamp is on.And we've gone through and retightened, tightened up all the semi-loose nuts, and we are good to go. Okay. So, for the spare tire, we're going to slide it back into place, try and get it centered, feed the spring through, and then lock hanger into the angle. Now that we have that in, we can go back and crank it up.Merideth: So, that's gonna wrap it up for my review and the install of this MBRP 3-Inch XP series high clearance filter back turn-down exhaust system, fitting all 2021 and newer 3.0 EcoDiesel Gladiators. For more videos and products just like this, remember to always keep it right here at extremeterrain.com.

      Product Information

      Features, Description, Reviews, Q&A, Specs & Installation
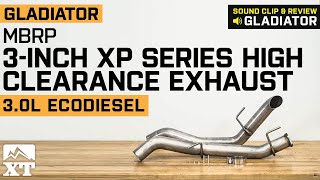
      Features & Specs

      • Rich, Mellow Exhaust Note
      • Improves Horsepower and Torque
      • Hi-Tuck Design for More Ground Clearance
      • 3-Inch Diameter T409 Stainless Steel Piping
      • Turn Down Exhaust Tip
      • Direct-Fit Installation
      • Lifetime Manufactures Warranty
      • Fits 2021-2024 3.0L EcoDiesel Jeep Gladiator JT Models

      Description

      Rich, Mellow Exhaust Note. MBRP's 3-Inch XP Series High Clearance Filter-Back Exhaust System was designed and dyno tuned to maximize the exhaust flow of your EcoDiesel Gladiator for an increase in horsepower and torque. Perfect for extreme trail adventures, this Cat-Back features a hi-tuck design that provides increased ground clearance, while allowing additional clearance for most aftermarket suspension kits.

      Stainless Steel Construction. MBRP proudly manufactures their XP Series Exhaust systems from 3-inch diameter, mandrel-bent, heavy duty, T409 stainless steel tubing for excellent exhaust flow and corrosion resistance. This system features a polished, stainless steel turn down exhaust tip.

      Direct Bolt-On Installation. MBRP engineered their XP Series Filter-Back Single Exhaust System to be a direct bolt-on upgrade replacement. This Exhaust System will easily bolt straight up to the factory piping without any cutting, modifications or special tools required for an easy straight forward installation.

      Application. This MBRP 3-Inch XP Series High Clearance Filter-Back Exhaust System; Turn Down is designed to fit 2021-2024 3.0L EcoDiesel Jeep Gladiator JT models.

      Fitment:

      Details

      MBRP S6502409

      CA Residents: WARNING: Cancer and Reproductive Harm - www.P65Warnings.ca.gov

      Installation & What's in the Box

      Installation Info

      What's in the Box

      • Tail Pipe
      • Over-Axle Pipe
      4.7

      Customer Reviews (19)

        Questions & Answers

        10 More Questions

        Will It Fit My Gladiator

        • 3.0L V6 EcoDiesel - 21, 22, 23
        • 3.6L V6 - 23