Talk to a Tacoma Sales Tech
1-877-870-8556
M-F 8:30A-11P, Sat-Sun 8:30A-9P
Logo Image
$20K Sweeps! 10 Chances to Win! Enter Daily >

Injen Evolution Cold Air Intake with Oiled Filter (16-23 3.5L Tacoma)

Item TT5880
Verify parts fit and get product recommendations.
Tacoma Sales Techs: Connect Now M-F 8:30A-11P, Sat-Sun 8:30A-9P
$0.00
Our Price

$440.95 (kit)

FREE Shipping Market Price $507.99 You Save 13% ($67.04) Up to 10% off for Military & First Responders! See Details

Will this fit your Vehicle?

Select a different vehicle Help?
Update or Change Vehicle
Ship to: Enter Zip
Sorry, please enter a valid US or CA postal code
We're sorry, zip can't be updated at this time.
    Create a list
    Add to New List

    Saved - View your saved items

    We're sorry. We couldn't save this product at this time.

      Product Videos

      Hey, guys, it's Sara with extremeterrain.com. And today, we have a review and install of the Injen Evolution Cold Air Intake with Oiled Filter, fitting your '16 to '21 3.5-Liter Tacoma models. This is perfect for the Tacoma owner who wants to improve the flow of their intake system and replace that restrictive paper filter of your factory with a smoother flowing and reusable option. This air intake system features a free-flowing roto-molded polyethylene airbox, intake tube, and air scoop to provide smoother flowing and cooler air to your engine. It also includes an eight-layer oiled cotton reusable air filter with an inspection window in the airbox itself, so you can check the condition of your air filter without having to uninstall this intake.No tune is required to run this intake on your Tacoma. However, to get the most out of this intake a tune can be helpful. It's also proudly designed and manufactured in the United States. So, as far as price goes, this intake system comes in at around $450 which is the middle of the road price-wise when compared to other options. And for your money, you are getting a full intake system with an air scoop and a reusable filter. And as far as the install goes, I'm giving this one a one out of three wrenches on the difficulty meter. It does feature a direct bolt-up install with no modification required and can be done within one hour. So, with that said, let's check out that install.For this install, we used an impact gun but a regular hand ratchet will work just fine. You also may want an extension, you'll need a 12-millimeter socket, a 4-millimeter Allen key or Allen socket, and a 3-millimeter Allen key or Allen socket. You'll also need Phillips and flat-head screwdrivers, a pop clip removal tool, and you may want a set of needle-nose pliers. All right. So, so the first step in our uninstall is to grab your factory engine cover and pull up to release it off of your truck. Next up, we're gonna remove this rad support cover. Grab a pop clip removal tool and pull up on each of these pop clips to remove them. We will be reusing some of these so make sure to save them for reinstall.Now, don't forget about the four pop clips that are on the other side of the rad support cover. Remove these as well. Then remove the cover itself. Next up, we're gonna disconnect the connector for the MAF, press down on the black tab, and remove it. You'll note that the wiring harness itself is connected to the airbox. Grab your pop clip removal tool and remove this wiring harness. There's a second connector right at the back of this secondary part of the airbox. Go ahead and remove that with your pop clip removal tool as well. And set it off to the side.Now, there are two clamps with 10-millimeter bolts on them. Go ahead and grab your 10-millimeter socket and loosen these up. Once they're loosened up that you can slide them around, we can pop off the intake tube. Repeat that process for the other one. Next up, we're gonna pop each of these clips off the side of the airbox. And pick up this portion of the airbox and remove it out of your intake tube. Next up, we can disconnect this tube that goes to the intake. To do that, go ahead and grab a needle-nose pliers and pinch this metal clip. Once that's out of the way, you can grab the tube and wiggle it free. Then grab the intake tube itself and wiggle it free. Next up, you can pop the air cleaner out of your airbox. Now, there are two bolts inside the airbox, go ahead and grab a 12-millimeter socket and get these removed. Second one is a little bit harder to see, it's right at the bottom. Now, there is a third bolt on the far side of the intake box. Go ahead and remove this one as well with a 12-millimeter socket. Now we can wiggle and remove the intake box itself.All right. And now that we have our factory intake uninstalled from our truck, we can take a look at it side-by-side with our new intake here. Now, these are both closed box intakes. However, they do have some important differences I wanted to point out. This one features a roto-molded intake tube that features a lot smoother flow when compared to the tube of your factory. In addition, it also adds this large intake duct across the front that sits where your factory rad support cover would sit. And it also comes with this reusable filter that will save you some money over having to buy new filters for that factory intake box. So, with that said, let's go ahead and finish up our install.Now, before we can install our new intake tube, we do need to transfer over that MAF sensor. All you need to do is grab a Phillips head screwdriver and remove both of these screws on your factory airbox. Then wiggle and carefully remove this. Now you can grab that MAF sensor and slide it into the opening on your new intake tube, and grab the included M4 Allen head bolts, and thread them in. Grab an M3 Allen key if you need to help you thread it in. Repeat that with the other bolt. And once they're both in we can tighten them down with this 3-millimeter Allen key.Now we have the factory airbox here and we need to remove these three rubber grommets with their metal sleeves so we can reuse them. Now, the grommets themselves are not gonna come out of where they are with the metal sleeve still in. So, the first thing we're gonna do is press down on the metal sleeve with a flat-head screwdriver to remove it first, and then we will remove the rubber grommet. Do this carefully so that you don't tear the rubber grommet. You can also use your finger if you'd like. Once you get started, you can reach inside and remove that metal sleeve. Then the rubber grommet will squish enough that you can remove it from the hole. Repeat that with the rest of these.Same thing, we're gonna push the metal sleeve in first. Once you get started, you can remove it by hand. And then just push that grommet in or you can fold it in from the outside, go the reverse way as long as you remove this grommet. And the same thing on this one outside here. It does look like you can slide it out but, again, that metal ring is gonna get in your way. So, go ahead and pop that out. Then you can squish that grommet and pull it straight back towards you. Now you can repeat that in reverse to install these grommets into the new airbox. Go ahead and get the grommet lined up by itself. And then once it is, you can slide that metal sleeve through the center. The ones that are open circles are a little bit trickier to line up. Same thing, once you have them in place, slide those metal sleeves in. Now we can install the intake tube.So, now we have our airbox here, we have this intake that we're going to attach. Now, keep in mind these pieces are upside down currently, I think it's a little bit easier to attach them upside down. You'll see a part number on the bottom of both the intake and the airbox. So, what you're gonna do is slide these together. And once you have those together, grab your larger Allen hardware with your washer, and thread it in. Then once you have the two pieces attached, grab your Allen hardware with the attached washer with rubber grommet, go ahead and get those threaded in.And then with your 4-millimeter Allen key or Allen socket, tighten it down. Now, we're flipping the intake over and installing the two bolts on the other side. Same process, just go ahead and line them up, make sure it's fully seated, and thread them in. Now we're gonna install this smaller piece of weatherstripping right on the smaller side of the airbox opening. You'll see a lip here. All you wanna do is line this up and press it into place over top of this lip, making sure you trim off any excess. Now we can line up the intake on the truck. Start to line up your airbox and that opening on the airbox with the rubber weatherstripping with the opening on your truck. Once you have that in place, line up these two tabs on the rad support. Then we can finish attaching the intake.Now you'll see two openings on the air intake. You wanna take these factory pop clips, line them up, and press them in place. Repeat that with the second pop clip. Now we can reinstall your factory bolts through those rubber bushings and metal sleeves into the threads. Now, we're working with the far one here, this is on the backside of the intake box. I'm using a socket and an extension to help get it started. And then with our 12-millimeter socket, and again this extension here, we're gonna tighten this down. Now we can install the bolts on the inside of the airbox.Now, this might be very hard for you guys to see. But these bolts go back in the factory locations through the bushing. It may help to leave all these bolts loose to wiggle them around and get them lined up to their factory holes. Then with your 12-millimeter socket, tighten it down. Now, this last one is extremely hard to see, guys, you're probably not gonna see very well on camera. But it goes exactly where your factory one did. Go ahead and line it up and thread it in. Then with your 12-millimeter socket, tighten it down. Now, again, if you're having trouble lining any of these up, go ahead and loosen up the rest of your bolts and then tighten them all down at the end.Next up, grab your air cleaner, line it up in the air box. There are tabs on it so go ahead and twist until it lines up nicely in the airbox and locks in place. Now we can install our intake tube. The first thing we're gonna do is grab this coupler and slide it over top of the intake tube. Then we wanna make sure that our clamps are in place. Now you can fully disconnect these clamps and install them later. But you can also slide these over now and have them in place so that all you have to do is tighten them down, whatever you feel is easiest for you. We're gonna start by lining up the tube in the airbox and these clamps will slide around a little bit so don't worry about that. Then we're gonna slide the whole tube over top of the throttle body, and then wiggle that rubber coupler in place to make sure it's fully seated completely over top of the throttle body. And once your coupler is fully seated on the throttle body, you'll see it right up to this tab here. We can grab a flat-head screwdriver or a socket, and go ahead and tighten down all these clamps. We're gonna start with the throttle body. Next up, line up that medium-sized clamp on the other side of this coupler. Then slide your largest clamp over top of the air cleaner section, and with your socket or a flat-head screwdriver, go ahead and tighten this downNext up, you wanna slide this air tube over the port on your intake tube. Go ahead and slide that in place. And then with a needle-nose pliers, pinch that factory clamp, slide it in place, and let it go. And finally, grab your connector and reconnect it to your MAF sensor. Make sure you hear that click and make sure that wiring is secured and it's away from anything hot, moving, or sharp.All right. So, that is gonna do it for the review and install of this intake system. And remember, for all things Tacoma, keep it right here at extremeterrain.com.

      Product Information

      Features, Description, Reviews, Q&A, Specs & Installation

      Features & Specs

      • Horsepower and Torque Gains
      • Improved Throttle Response
      • Reusable Oiled Air Filter
      • Durable Roto-Molded Polyethylene Construction
      • Simple Bolt-On Installation
      • No Computer Re-Tune Required
      • Not CARB Certified
      • Limited Lifetime Warranty
      • Fits 2016-2023 3.5L Toyota Tacoma Models

      Description

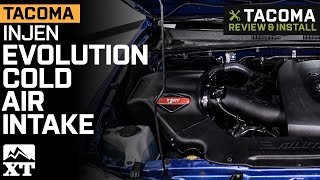
      Extra Power for The Open Trail. Give your Tacoma truck that extra power boost with the Injen Evolution Cold Air Intake With Oiled Filter. This cold air filter combines a large free-flowing inlet tube, and an efficient air scoop to direct large amounts of cold air into your engine. This boost of cold air results in more complete fuel combustion, giving your truck that extra torque and horsepower it needs to negotiate the toughest off-road trails.

      No Tuning Needed. The Injen Evolution Cold Air Intake With Oiled Filter provides its power through a combination of advanced design and high-tech construction. This cold air intake will work with your truck’s stock ECU calibration. That being said, an aftermarket ECU re-tuning can always maximize the performance of your truck and this intake.

      High-Efficiency Oiled Air Filter.
      The Injen Evolution Cold Air Intake uses an advanced oiled air filter. This air filter uses an 8-layer cotton gauze filter media that allows maximum air flow. The filter features 1-inch deep pleating that increases surface area. This feature works with an exclusive filter oil to provide extremely efficient filtration. Cleaning is easy with just mild soap and water, or an appropriate air filter cleaning fluid.

      Durable Build Quality.
      The Injen Evolution Cold Air Intake With Oiled Filter features a housing, inlet tubes, and air scoop that are constructed from high-density polyethylene using a specialized roto-molding process. This results in durable one-piece components that are highly resistant to engine bay heat. This cold air intake uses automotive-grade silicone couplers, and stainless steel clamps to ensure a long service life.

      Easy Installation. The Injen Evolution Cold Air Intake With Oiled Filter installs in the same area as your factory air box. No modifications to your vehicle are necessary. Additionally, all mounting hardware is included for a relatively easy install procedure.

      Backed by a Limited Lifetime Warranty. The Injen Evolution Cold Air Intake is backed by a limited lifetime warranty covering manufacturing defects. Please visit the manufacturer’s website for more details.

      Not CARB Certified. This Injen Evolution Cold Air Intake is not CARB certified, therefore it is not legal for use in California or other states adopting California emission standards. Not legal for use on pollution controlled motor vehicles; not intended for highway use.

      Application.
      The Injen Evolution Cold Air Intake With Oiled Filter fits 2016-2023 3.5L Toyota Tacoma models.

      Fitment:

      Details

      Injen EVO2200C

      CA Residents: WARNING: Cancer and Reproductive Harm - www.P65Warnings.ca.gov

      Installation & What's in the Box

      Installation Info

      What's in the Box

      • (1) Air Box
      • (1) Inlet Tube
      • (1) Air Scoop
      • (1) Coupling Hose
      • (1) Dry Air Filter
      • (2) Clamps
      • (6) Washers
      • Mounting Hardware
      4.8

      Customer Reviews (277)

        Questions & Answers

        10 More Questions

        Will It Fit My Tacoma

        • 2.7L I4 - 23
        • 3.5L V6 - 16, 17, 18, 19, 20, 21, 22, 23